pretty simple and self explanatory? I plan on take this route on my project as well
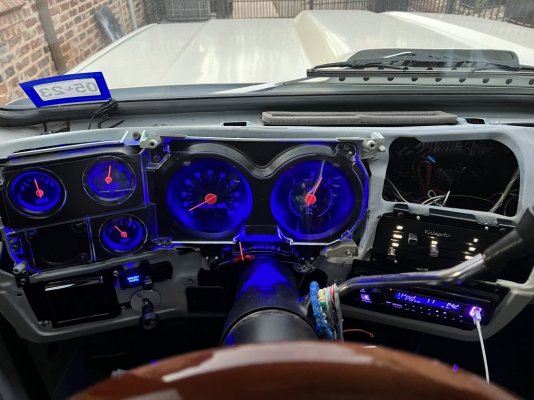
I very much want to do this as well. I like the idea of keeping a factory look but I always wished for a tachometer instead of that huge fuel gauge when I was driving my parents' vehicles. The nostalgia is nice but I want a tach.
Of course I am VERY proud of my Quartz Clock! I hate to lose that.
I don’t have it actually installed yet- still trying to find some twist light sockets locally today- but, I guess the answer to that depends on how familiar you are with the inner workings of these clusters. The LMC instructions aren’t terrible, but it’s helpful if you do one of two things:
1- take it apart and put it back together in the reverse order while it’s fresh in your brain or…
2- take some cell pictures as you go along in case you can’t remember the sequence, that way if you get interrupted, you can reference them. And which gauge went where in the side holes.
The gauges are only held in the backing plate by a handful of screws, and they are partially stabilized by the little spring clips that the posts slide through to make contact with the printed circuit. The new clips from LMC have new tension, so I found it helpful to put a flat blade screwdriver in the spring clips and spread to take some of the tension out so you don’t have to push on the gauges so hard to get the posts to slide through the clips during reassembly. Don’t go all Hulk on it, just enough to take a little tension out, like Bob Ross would do. It’ll keep you from having to push so hard on the gauges when you’re putting them back in the cluster.
Getting into the weeds a bit here, but I’d call it a 2/5 difficulty. Just be really careful with all the gauge needles. They are extremely delicate. I actually found a NOS AC Delco gear indicator on Ebay and was testing it lightly to see if the trolley slid freely and bumped the needle- snapped right off. But, I was able to use my broken-cable original by using the cable from the NOS and fixing it. Yes, they are that delicate.
Of note- MAKE SURE you order the right kit. LMC tach kits jump from pre-‘80 to ‘83 and up. The ‘83 and up uses a backing plate that is for electronic speedo and does not have a provision for the cable clip. If you have an ‘81-82 you can still use the kit, but you’ll have to order an additional backing plate that will have the speedometer cable clip. Which is what I had to do since I was unaware of that discrepancy. It would be interesting to add up all their parts on the website and see what the difference would be in price.
Hope this helps (probably not
")
)