My Qjet almost left me stranded a few weeks ago. Fuel pouring from the top of it, flooding the motor. I finally got it restarted and home. Started a rebuild and here is my advice to others in my position that are starting out with minimal knowledge on the Quadrajet. I will use multiple terms next to each other for the parts as I saw them called several things online
Note, this is what I did and how it went for me. I make no claim to be an expert on the Qjet. Follow my advice at your own risk.
Before you start take plenty of pics all over the carb. Especially the linkages.
As you take parts off keep taking pics as some parts cover others and you won't see everything exactly because it will be covered. Example, Electric choke linkage.
First you need to get a rebuild kit
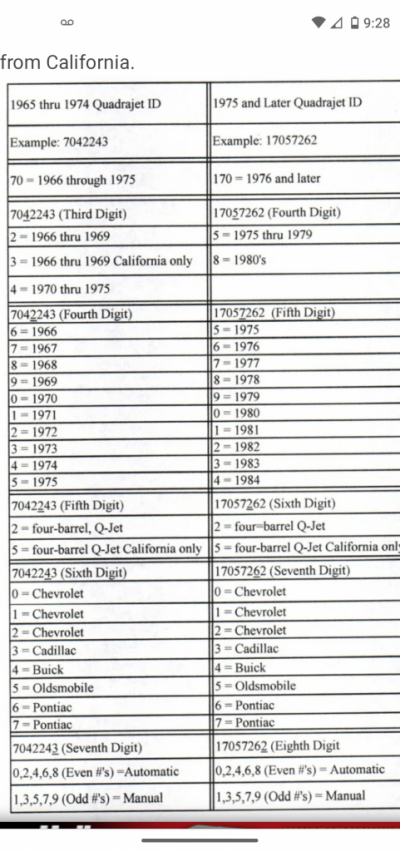
- You can find the model number of your Qjet above the secondary linkage on the driverside of the carb.
- you may want to pull yours apart first to see what gaskets you need. Rebuild kits are generic and fit many apps.
- When you pull yours apart try your best to keep the gasket intact so you verify which you need.
Once I got started on the carb from my 86 GMC 2500 I found that the was a M4MEF and the model number was 17085213. It is good to know this if you get the kit from a parts store.
I ended up with a GP Sorensen kit from Advance and later a Walker kit from O'Reilly. The Walker kit was better in my opinion
You will need a cleaner as well. There are several options. Carb cleaner and a toothbrush. Dips, parts washers etc. I bought a can of Berryman with the plastic basket from O'Reilly and it worked fine after a few hours of soaking.
When you pull the carb apart start wherever you want. But here is how I did it.
Accelerator pump lever (right front top of carb like a see-saw)
- take a punch or nail and push the roll pin toward the carb. Put a feeler gauge behind it so the pin doesn't rest against the carb body. Makes it easier to push back in place unless you are not reusing it. If not reusing it then just knock it out, bend it upwards and pull it out. My kits came with new ones. The Walker kits fit better. Put the lever in the basket for cleaning.
Take off the choke pull-off. Left front of carb above the choke. Two screws get it off with the vacuum line. Set it aside with it's linkage to the top secondary flaps.
I took off the choke flap I guess you don't have to.
To take off the top of the carb, airhorn/bowl cover, remove all the screws on top. There are two inside the primaries next to the venturis. They were allen head. Set them all aside. There are screws on the bottom as well. Mine had three. set them aside.
Again, try to make sure you keep the gaskets intact for comparison.
Take off the flaps for the secondaries. Take the Secondary hanger off. ***Note that the flap screws maybe "staked" sometimes you have to grind the back of the screw off to take it out.
Take the plastic secondary cam out of the hanger and set it aside.
Look under the bowl cover. Where the plate shaft goes into the cover there is a small tension spring, use a pick and unhook it.
Airhorn/Bowl cover is ready for cleaning.
************************************************************
Bowl
Separate the top cover and throttle body/plate/block. Pull out the accelerator pump and set it aside.
Remove the black plastic cap in the bowl over the float and metering rods.
Now is a good time for a photo to see how the needle hangs off your float in the back and the orientation of the 'D' clip the float hinges on.
Lightly pull the primary metering rods from their housing. Do not ruin the plastic/nylon bushing that keeps it in it's housing. Also keep it's spring with the rods and do not bend the hanger. I put the rods/needles in the cleaner but not the hanger due to the plastic grommet that keeps it in the bowl.
** APT **
My carb has an APT in front of the primary hanger. This is a stop for the hanger and is set from the factory. I took mine out as I did not know this. I found information online that said Edelbrock set theirs at 2 turns out when they were rebuilding Qjets and it the carb works fine.
If you want to take yours out it would be best to screw it all the way in and count the number of turns it takes so you can put it back where it was.
It is adjustable with the carb back together but there is a plug above it on the bowl cover/air horn that some have to drill out and tap for a screw to cover it. I cut a notch in my APT screw to fit a small screw driver and set it at 2 turns out. My carb had been remanned by Holley before so the bowl cover/air horn already had a screw in cover. I did have to take it out and cut a groove into it so I could use a screw driver to remove it from the outside of the carb to make adjustments if needed.
Now that the primary hanger is out take out the float. New ones can be had at parts stores and online. They run about 10-11 bucks.
Take out the jets and make sure not to scar them. Put them in the basket to clean.
Take out the needle seat. A large blade flat tip screwdriver should work. Make sure you get the little gasket under it.
Your kit should come with a new needle, seat and gasket.
You will see a black screw between the accelerator pump housing and the APT. There is a check ball under there. Your kit comes with a new one. Some use a punch and the old check ball to reform the seat it seats in. I did not.
If you haven't already take the fuel filter housing apart.
Before you remove the choke score the black plastic cover and the edge of the metal housing so you have a reference of where it was so you can put it back in the same spot. Choke flap angle gauges seem hard to come by now.
Once the cover and coil are off take the housing off the carb. Mine was a torx bit. When you do this there is a metal arm for the choke flap linkage that will fall out of the bowl. Looks like a small surf board with holes in it.
Keep the silver, green and black choke linkage all together. You can dip them if you want.
Now the Bowl should be apart and ready for cleaning.
************************************************************'
Throttle body/plate/block
This is a whole freaking mess of springs, rods and annoyance. Make sure you take good photos.
The throttle plate screws may be "staked" so you may have to grind them from the back.
This was the worst part of my build. They were all T-8 torx and bunch of them stripped. Needle nose vise grips were my tool of choice for the stubborn ones.
In hindsight there were no plastic or rubber parts on the throttle body so I should have thrown the turd in the cleaner as is but I took the whole thing apart, with out good photos. D/A move on my part.
If you take it apart you may want to mark the plates for which side they go on, I have heard they are side specific on TV but I didn't mark them and it was not the source of may later problems.
I did not take out the idle mix screws. I do not have the flex shaft screw driver to set them once on the vehicle. Didn't cause me any issues.
To take off the secondary shaft open it and remove the cotter pin style spring. Also undo the tension on the secondary return spring against the throttle body itself. After that it all comes apart. Check and make sure the shaft doesn't have a bunch of play. If it does you will have to put a bushing kit in the throttle body. If you Google it all kinds of stuff comes up.
On the primary shaft, same thing on the screws. Once the plates are off you will need to take the fast idle set screw area apart to get the shaft out. Take more pics. There is a regular screw in the side of the shaft, take it out and it comes apart. Check the shaft for play at some point in this.
************************************************************
Now I cleaned all the small stuff first them poured the can of cleaner into a drain pan and put the bowl, air horn and throttle body in it. I let those sit over night and the small parts for a few hours. Came out real clean.
The Berryman doesn't evaporate or if it does it take a lot longer than 24 hours. Wear gloves, keep it off your skin.
************************************************************
Before you put it all back together you need to do something about the secondary plugs/bowl plugs in the bottom of the bowl. Google and you will see what I mean. They leak and cause a rich condition. Mine were already epoxied but use epoxy, JB weld, something you are comfortable with to plug them for good.
Putting the throttle body back together.
I won't bore you with step by step. As long as you took good pics it should be easy. But I ran into a huge issue with my primary and secondary plates.
It was very hard to screw the screws back in. I ended up tapping every screw hole to clean them out and using a die to correct the threads on at least half the screws. I even had to do this for the secondary hanger screw.
I used Loctite on all the screws to guard from them backing out
When you put the plates in get both screws in and before you tighten them you need to seat the plates. I ran into a high idle and sticking secondaries because I did not do this. Basically screw them almost all the way in and hold the body up against a light. Move them around slightly until the least amount to no light comes around the plates in the bores. This fixed my high idle and sticking issue. I ended up taking the carb back apart to do this after my initial rebuild attempt.
Make sure all the linkage is correct and on the secondary return spring make sure you wrap it around the shaft before setting against the link to the primaries. It can set without doing this but won't have good tension so make sure you wrap the long end around the shaft at least once.
I backed my fast idle screw out until is was not touching the metal tang that goes to the fast idle linkage. I set the fast idle with the choke cold to 1200RPM. (Not the factory setting) My factory setting was 1900 and I don't like that.
Set your bowl on its top and put the gasket on the bottom. Put the throttle plate on and screw it down but don't torque it yet incase you have to pull it back apart like I had to. Flip it over and put the bowl guts back together.
Don't forget the gasket under the new needle seat.
Don't forget the check ball and screw
Make sure you put the D clip for the float in the same way it was. Hang the needle like it was. It does not go in the holes on the float. Set your float level.
My float called for 13/16" measured 3/16"back from the toe/front edge of the float. Don't jamb down on the needle very hard as it has a rubber tip. Plenty Youtube stuff on this.
If you set it too high fuel can run out the top of the carb. Hence, why I bought two carb kits.
Put the black plastic cover back on and put the primary hanger and rods back in with their spring. Make sure there is no binding. The plastic grommet should interference fit back in it's bore to keep the primary hanger in place.
Take your bowl cover and lightly tap the brass tubes into the cover. They can fall out over time.
Put your gasket on the bowl. take a knife or razor and cut the slots imprinted on the gasket for the primary rod. Don't tear it.
The accelerator pump has a rubber cup and spring. The kit came with a new one and a fitting to help change it. As long as the spring action is not binding the pump itself should be fine. Once you have changed the cup and spring set it in place under the gasket. It will stick up.
On the top cover, the Walker kit came with an o ring and metal washer to hold it in place for the accelerator pump shaft where it comes through the bowl cover. The other kit did not and when I tore the carb apart there was not an o ring on it. I did use the o ring for extra insurance and the metal washer taps in for an interference fit.
Put your top cover back together. I again had to tap all the holes for the flaps and use a die to correct threads.
The screws to the cover all have a sequence and torque rating. Check yours specs. Don't forget the bottom ones.
Make sure you put all the choke linkage to where it is not binding and the secondary lockout lever is on the bottom side of the secondary lockout tang.
I used a flashlight and the choke flap rod to reconnect the choke linkage inside the bowl. Have patience. Mine went on with the "surf board" piece at about the 9-9:30 angle.
My carb now runs nice and smooth. Idles at 800RPM now that I took care to set the throttle plates in with little to no light passing through them and making sure wrap the secondary return spring around the shaft fixed my hung open issue.
The rebuild fixed my first fuel coming out the top issue and the carb runs well and the exhaust is not rich. Really it is lean if anything.
I did find that on the rebuild my issue that caused this whole thing was a blown top cover gasket. It was soaked in fuel. I think the needle may have hung up. Either way it is good now.
I hope this helps someone.