Turbo 350 Disassembly

Disclaimer: Links on this page pointing to Amazon, eBay and other sites may include affiliate code. If you click them and make a purchase, we may earn a small commission.

HotRodPC

Administrator
Staff member
Admin
Joined
Aug 29, 2010
Posts
47,008
Reaction score
8,977
Location
OKC, OK
First Name
HotRod
Truck Year
85 K20 LWB
Truck Model
Silverado
Engine Size
454 - Turbo 400 - 3.73
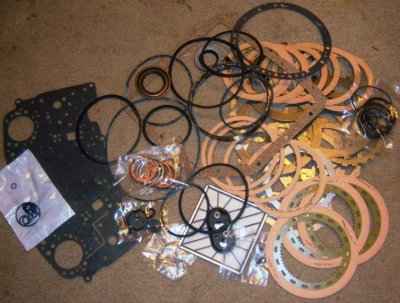
I do the same thing. As for gaskets that is what I thought, although I may buy a gasket and seal kit to be sure if I tear anything.

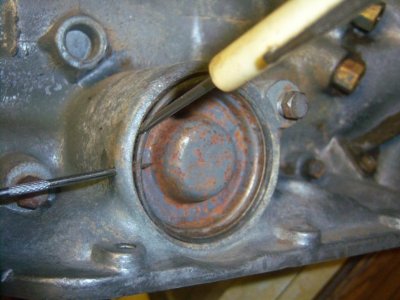
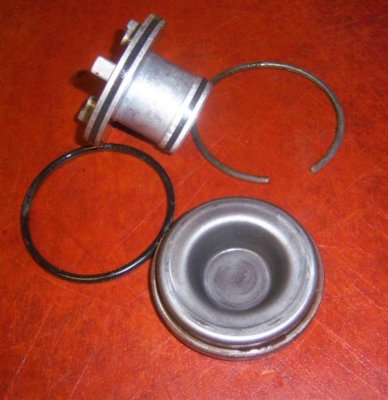
I know the parts/guts I am going to use are good, they are in my 88 and we drive it alot, but the case around the PS cover for the 1-2 accumulator the back end if broke off and leaked. I used some seal all glue on it and seems to have done the truck.

If it starts to leak or I just have the time and want something to do I am going to switch cases, the case is good, came from dad's 84 but the internals suck. it was acting like driving with the brakes on, not really slipping like in neutral just acting like it was loading the motor and revving but not transferring the power. So it's a donor parts trans now.


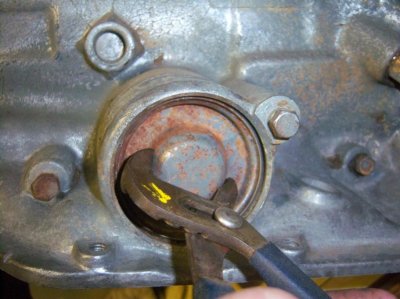
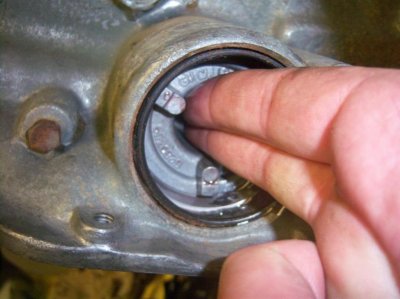
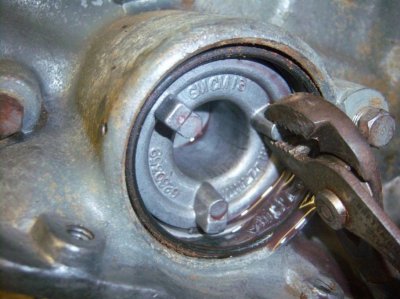
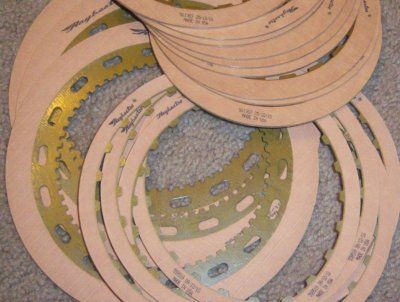
Another point I was going to make, that musty be the stage one shift kit/HD version since it has 2 check balls left in place. I've put in 2 of those kits and did the stage 2 street/strip version both times, uses the same stacked plate setup but only one check ball. The stage one involves removing the spring from the 1-2 acc. on the side cover too. I never did that one.

This one didn't have the accumulator spring either for some reason, but yes, its the Stage 1 RV/Heavy Duty Kit. I have done many Stage 2 Kits, and I love the way they work on the T350. I had a guy once, punch me out 100 of those transfer plates. It was like $100 set up fee, then after that, it was like $1.25 per plate. So I had about $2.25 in each plate, threw away check balls and srprings, and then used a paper hole punch to enlarge 3 or 4 holes in the stock paper valve body gaskets and there I had it. It was a HRPC Shift Kit. I charged the same price as store cost as a B&M shift kit back then. Those were the days, I was making some cash back then.
 

Swims350

Full Access Member
Joined
Jul 30, 2010
Posts
4,351
Reaction score
811
Location
Logan WV
First Name
Chris
Truck Year
1983
Truck Model
K10
Engine Size
none
the spring is removed because of the stage one kit. The instructions call for it, but stage 2 doesn't never understood that one.

That's all the stage 2 kits are, the plates, remove all balls but one, then the gaskets they have, plus enlarging like one hole in the seperator plate.
 

HotRodPC

Administrator
Staff member
Admin
Joined
Aug 29, 2010
Posts
47,008
Reaction score
8,977
Location
OKC, OK
First Name
HotRod
Truck Year
85 K20 LWB
Truck Model
Silverado
Engine Size
454 - Turbo 400 - 3.73
the spring is removed because of the stage one kit. The instructions call for it, but stage 2 doesn't never understood that one.

That's all the stage 2 kits are, the plates, remove all balls but one, then the gaskets they have, plus enlarging like one hole in the seperator plate.

You sure about that on the accumulator spring? I never installed it on Stage 2 kits either. Might be why my Stage 2 kits worked better than everyone elses. :shrug: All the accumulater is for is to cushion the 1-2 shift, so by eliminating it, you are going to have a harsh firm 1-2 shift which is the purpose of a shift kit, so I never reinstalled the accumulator srping unless it was a stock granny rebuild.
 

HotRodPC

Administrator
Staff member
Admin
Joined
Aug 29, 2010
Posts
47,008
Reaction score
8,977
Location
OKC, OK
First Name
HotRod
Truck Year
85 K20 LWB
Truck Model
Silverado
Engine Size
454 - Turbo 400 - 3.73
Rebuild Kit Parts

Next up !!! Coming Soon to a thread near you !!!


Trans Rebuild Kit including, Steels, Clutches, Seals, Gaskets, Filter, Band, Check Balls and Metal Clad Sealing Rings !!!
attachment.php


Raysbestos Clutches, Made in USA !!! No Junk in Transmissions I build !!!
attachment.php


Heavy Duty Kevlar Band. More holding power !!! Also Made in USA !!!
attachment.php


TransJel Assembly Lube. One of the few brands. I like this brand. Probably nothing more than Vaseline mixed with Transmisson Fluid. Very Important to use a lube that will melt down and become part of the transmission fluid. This is why you don't use lube like White Lithium Grease to build a transmission.
attachment.php
 

Attachments

  • transjel.jpg
    transjel.jpg
    4.4 KB · Views: 438
  • th350kit 021.jpg
    th350kit 021.jpg
    97.1 KB · Views: 449
  • th350kit 023.jpg
    th350kit 023.jpg
    93.1 KB · Views: 429
  • th350kit 024.jpg
    th350kit 024.jpg
    58.4 KB · Views: 482
Last edited:

Swims350

Full Access Member
Joined
Jul 30, 2010
Posts
4,351
Reaction score
811
Location
Logan WV
First Name
Chris
Truck Year
1983
Truck Model
K10
Engine Size
none
yep, posative on it. The stage 1 rv/hd mode you remove it from the side cover.

stage 2 you leave it.

It confused me because I always heard what you said, remove it and get a harder or faster shift. I was going to remove it, but figured since the instructions said not to I'd leave it alone.
I loved all my stage 2 kits, it would hit 2nd good and get a really nice and long tire chirp, then sometimes going to 3rd would get a little one. That's just in the monte carlo with 3.42's and 215/65's on it. The 2k stall converter held it back too, or was bad, with a stock one if you get on it hard and with a 305 it'll almost let loose going from 1 into 2. it really slips tires.

Godd info though next time I'll remove the spring. May do it on my 4x4. Guy who built it said he removed all but one bb and it should firm up the shifts etc. well it's fast, no slippage but not firm like a shift kit. I doubt he did any plate work though to the stacked plates or the seperator.
 

HotRodPC

Administrator
Staff member
Admin
Joined
Aug 29, 2010
Posts
47,008
Reaction score
8,977
Location
OKC, OK
First Name
HotRod
Truck Year
85 K20 LWB
Truck Model
Silverado
Engine Size
454 - Turbo 400 - 3.73
I just read the B&M Instruction sheet and you are right. It clearly says, Heavy Duty Only, Use an Awl or small and pry out .......

So that must be why my Stage 2 Kits were wicked as hell. I'm telling you, drag racers loved my Stage 2 kits. They say it works as well as a Full Manual Valve Body without being Full Manual valve body. Cars with LSD, with a mid throttle take off from a light, not even really getting on it hard, would get sideways hitting 2nd gear. I knew the 1 and 2 check balls, 2 for HD and 1 for SS. I also confirmed the plate was drilled for HD on this one. So its a Stage 1 Kit. I'll save it for one of my builds in one of the trucks if I ever used a T350 again. So far seems 2 are going to be Th400 and 2 are going to be 700r4.
 
Last edited:

HotRodPC

Administrator
Staff member
Admin
Joined
Aug 29, 2010
Posts
47,008
Reaction score
8,977
Location
OKC, OK
First Name
HotRod
Truck Year
85 K20 LWB
Truck Model
Silverado
Engine Size
454 - Turbo 400 - 3.73
Next up !!! Coming Soon to a thread near you !!!


Trans Rebuild Kit including, Steels, Clutches, Seals, Gaskets, Filter, Band, Check Balls and Metal Clad Sealing Rings !!!
attachment.php


Raysbestos Clutches, Made in USA !!! No Junk in Transmissions I build !!!
attachment.php


Heavy Duty Kevlar Band. More holding power !!! Also Made in USA !!!
attachment.php


TransJel Assembly Lube. One of the few brands. I like this brand. Probably nothing more than Vaseline mixed with Transmisson Fluid. Very Important to use a lube that will melt down and become part of the transmission fluid. This is why you don't use lube like White Lithium Grease to build a transmission.
attachment.php

You know things are getting bad when, you start doing trailer previews for threads to come in the future. :roflbow::roflbow::roflbow: :shitsweak:
 

Swims350

Full Access Member
Joined
Jul 30, 2010
Posts
4,351
Reaction score
811
Location
Logan WV
First Name
Chris
Truck Year
1983
Truck Model
K10
Engine Size
none
shoot if you removed the spring for the S/S mode, that's what I'm going to do.

I had heard others say you can drill out the 2 holes for the HD kit, then drill out the 3rd. which is for the S/S kit, so maybe I'll look into that, drill the holes, remove the spring and do the stage 2 or whatever.
 

oneluckypops

Full Access Member
Joined
Feb 6, 2011
Posts
2,210
Reaction score
90
Location
Sedalia, Mo.
First Name
Luke
Truck Year
85
Truck Model
K30 SRW
Engine Size
5.7 Fuel injected Vortec/ 4L80E
you ever gonna build this tranny? I want my peakctures
 

HotRodPC

Administrator
Staff member
Admin
Joined
Aug 29, 2010
Posts
47,008
Reaction score
8,977
Location
OKC, OK
First Name
HotRod
Truck Year
85 K20 LWB
Truck Model
Silverado
Engine Size
454 - Turbo 400 - 3.73
Yeah, in fact tonight, I finished taking off the accumulator and pressure taps, so I have more pics to add to the disassembly. Normally I do that first, but didn't this time.

Oh yeah, you're wanting pics of the Haggery Snapress. I'll just do that now too since I'll be downloading these accumulator pics. I'll have to fire up the other computer though. I am in the living room tonight on the house guest computer. I keep all my pics on my main computer in the office. So give me a bit, to get the pics, then I'll change computers. I'll have them up tonight.
 

HotRodPC

Administrator
Staff member
Admin
Joined
Aug 29, 2010
Posts
47,008
Reaction score
8,977
Location
OKC, OK
First Name
HotRod
Truck Year
85 K20 LWB
Truck Model
Silverado
Engine Size
454 - Turbo 400 - 3.73

Attachments

  • 79%20driverside.jpg
    79%20driverside.jpg
    97.7 KB · Views: 450
Last edited:

oneluckypops

Full Access Member
Joined
Feb 6, 2011
Posts
2,210
Reaction score
90
Location
Sedalia, Mo.
First Name
Luke
Truck Year
85
Truck Model
K30 SRW
Engine Size
5.7 Fuel injected Vortec/ 4L80E
Yeah, in fact tonight, I finished taking off the accumulator and pressure taps, so I have more pics to add to the disassembly. Normally I do that first, but didn't this time.

Oh yeah, you're wanting pics of the Haggery Snapress. I'll just do that now too since I'll be downloading these accumulator pics. I'll have to fire up the other computer though. I am in the living room tonight on the house guest computer. I keep all my pics on my main computer in the office. So give me a bit, to get the pics, then I'll change computers. I'll have them up tonight.

:tictoc:
 

HotRodPC

Administrator
Staff member
Admin
Joined
Aug 29, 2010
Posts
47,008
Reaction score
8,977
Location
OKC, OK
First Name
HotRod
Truck Year
85 K20 LWB
Truck Model
Silverado
Engine Size
454 - Turbo 400 - 3.73

:Moon: and your ticktock !!! I got the pics. Now I have to go get on the computer to post up. I also have to resize them, so it will take me just a bit, but they should be up tonight. I'll probably put them in a seperate thread incase someone else wants to try to make one too.
 

89Suburban

Supporting Member
Supporting Member
Joined
Dec 7, 2010
Posts
24,454
Reaction score
5,613
Location
Southeast PA
First Name
Paw Paw
Truck Year
2007
Truck Model
Chevrolet Tahoe LT
Engine Size
5.3, 4WD
:popcorn:
 

HotRodPC

Administrator
Staff member
Admin
Joined
Aug 29, 2010
Posts
47,008
Reaction score
8,977
Location
OKC, OK
First Name
HotRod
Truck Year
85 K20 LWB
Truck Model
Silverado
Engine Size
454 - Turbo 400 - 3.73
OK, so normally, I'd remove the accumulator cover, spring and piston when I remove the external components but I didn't have my pic handy. So I have now done it.

Insert the pic in the side hole pushing the snap ring out of the groove so you can get a screwdriver behind it, and pry it out of its position.
attachment.php


Now, using some kind of tool you can grap the accumulator cover and pull the cover out.
attachment.php


Normally, you'd see a big spring in here. But because this transmission had a shift kit, the accumulator spring has been discarded. Purpose of the spring and accumulator is to cushion the 1-2 shift. Being a shift kits intent is to firm up the shift, the spring is eliminated.

Now pretend its you favorite girl and give it a 2 finger inserstion to pull the accumulaor piston out as far as possible by hand, then grab it with pliers or other tool and pull it out of the case.
attachment.php

attachment.php


Here is the accumulator cover, piston, O ring and snap ring removed from the case. Notice to the 2 sealing rings on the accumulator piston. Those ger replaced in a rebuild as well as the sealing O ring to the cover.
attachment.php
 

Attachments

  • Th350dis 002.jpg
    Th350dis 002.jpg
    90.4 KB · Views: 500
  • Th350dis 004.jpg
    Th350dis 004.jpg
    81.3 KB · Views: 604
  • Th350dis 007.jpg
    Th350dis 007.jpg
    66.3 KB · Views: 716
  • Th350dis 008.jpg
    Th350dis 008.jpg
    85.5 KB · Views: 583
  • Th350dis 016.jpg
    Th350dis 016.jpg
    69 KB · Views: 446
Last edited:

Latest posts

Forum statistics

Threads
41,856
Posts
903,620
Members
33,370
Latest member
mitchell1128
Top