Fix this Paint? Any ideas that I do not have to repaint the whole Suburban?

Disclaimer: Links on this page pointing to Amazon, eBay and other sites may include affiliate code. If you click them and make a purchase, we may earn a small commission.

Grit dog

Full Access Member
Joined
May 18, 2020
Posts
9,429
Reaction score
17,285
Location
The Right side of Washington
First Name
Todd
Truck Year
1986, 1977
Truck Model
K20, C10
Engine Size
454, 350
@Woodman77
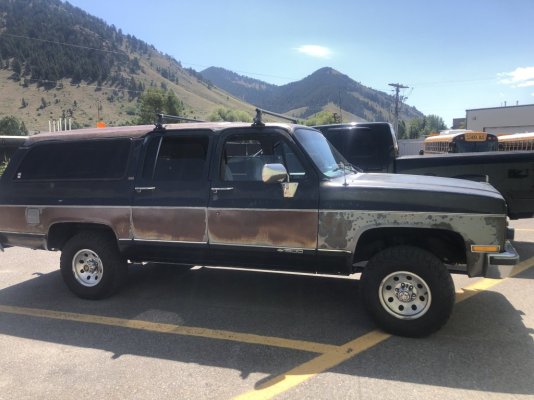
That’s a shame as it looks like someone did a very decent job repainting it at some point.
Unfortunately there’s no way to “fix” what’s there without removing it completely and starting over.
After that much effort on the affected panels or areas, even if you could color match, stay above the trim line, etc, you can’t trust what’s left on the rest of the vehicle imo.
Nice part is, if it’s all as straight and clean as those pics, it’s more than just a scuff n squirt but if it is not peeling up base coat after however many years old that paint job is, you don’t have to go all the way down to bare metal.
Like @Sad Sack said, the prep is easy and basic but just a lot of effort.
Start with the quickest methods like pressure washing. Followed by scraping, imo. You might be able to peel a lot of it off with a razor blade. Tedious but cleaner and imo less effort than breaking out the heavy sanding tools. Whatever don’t come off by those 2 means gets the sander! By spend few min testing how aggressive (quicker removal) you want to start with vs how easy it is to get to primer or base coat stage (320-400 grit).
You can remove paint quickly and end up spending more time and effort erasing deep sand scratches (60-100grit scratches) than it takes to not be as aggressive in the first place.
At this point you could do all the paint prep and then take it somewhere to be masked and sprayed.
 

Finkaire

Finkaire
Joined
Dec 28, 2021
Posts
629
Reaction score
1,230
Location
California
First Name
Loren
Truck Year
1984
Truck Model
Silverado c10
Engine Size
305
Yup, mine was a peeler as well. Remove as much as you are comfortable with. Bumpers, mirrors, grill, door handles, moldings, have the glass removed and take to a place like Miracle. Somewhere where they just do completes, they typically do a pretty good job in that is all they do. It’s a great start, it will give you motivation to bring your beloved squarebody to whole different level!!
Btw, looking at the picture, I left the wing windows, PITA to R&R
 

Attachments

  • IMG_3111.jpeg
    IMG_3111.jpeg
    156.1 KB · Views: 34
Last edited:

Dejure

Full Access Member
Joined
Mar 3, 2025
Posts
477
Reaction score
924
Location
Eastern Washington
First Name
Kelly
Truck Year
1978
Truck Model
C15
Engine Size
350
A friend asked me to buff out his car when it had that problem. I explained that I could make it look good, but it would only last a week. The reason is, the buffing would just remove the detached clear coat and feather the part that was yet attached into the paint so it looked good, but the feather thin part would start detaching in the elements and it'd be back where it started.

Because, as usual, he's so much smarter about things he asks others to do for him because he doesn't know how, I did it. Now, he knows buffing something like that looks good for about three days in the 110 of summer.

What I didn't experiment with was, buffing, cleaning and adding a clear coat. That MIGHT have been a different game.

In the end, I'm a fan of 1/8" thick old school paint you can buff [insert sheepish grin here].
 

YakkoWarner

Full Access Member
Joined
May 29, 2024
Posts
643
Reaction score
1,049
Location
Central Texas
First Name
Wolf
Truck Year
1989
Truck Model
R2500 Suburban
Engine Size
454
A friend asked me to buff out his car when it had that problem. I explained that I could make it look good, but it would only last a week. The reason is, the buffing would just remove the detached clear coat and feather the part that was yet attached into the paint so it looked good, but the feather thin part would start detaching in the elements and it'd be back where it started.

Because, as usual, he's so much smarter about things he asks others to do for him because he doesn't know how, I did it. Now, he knows buffing something like that looks good for about three days in the 110 of summer.

What I didn't experiment with was, buffing, cleaning and adding a clear coat. That MIGHT have been a different game.

In the end, I'm a fan of 1/8" thick old school paint you can buff [insert sheepish grin here].

Wouldn't the bubbling/detaching clear just lift underneath a new coat of clear? I can see a new coat of clear on the paint itself if you have enough remaining to clean/degloss and give the new coat some tooth to grip to, but going over a layer that already is having adhesion problems doesn't sound like it would work.....
 

Dejure

Full Access Member
Joined
Mar 3, 2025
Posts
477
Reaction score
924
Location
Eastern Washington
First Name
Kelly
Truck Year
1978
Truck Model
C15
Engine Size
350
Like I said, I don't know. It MIGHT be it would work fine. And success may depend on how it's approached.

I believe the problem starts when that thin, money saving clear coat wears out in one spot, then just keeps working back, as the elements work at the joint of the still existing clear coat and the missing clear coat.

However, it could be they used garbage that didn't allow for the expansion and contraction of the metal with changes in temperatures, which would compromise adhesion (if that isn't a factory/paint shop defect, I don't know what is).

The same kind of problems happens with wood (an area I am FAR more familiar with). The wood expands and contracts and does so at a different rate than do finishes, causing them to break loose from the wood they're applied to.

Once the finish fails and water gets under it, it expands and contracts. Again, breaking finish adhesion at and near the affected area (so good and dry is a good thing, when finishing).


It MIGHT be adding the same finish would result in it flowing/wicking under the edge where the paint isn't protected by clear-coat, locking it down (too thin and that may not happen).

If the current clear-coat was lacquer, you could buy a small can where wood finishes are sold, then spray or even brush a bit on a section (would it really look worse) and see what happened.

Of course, it would pay to clean it well first and to try to do a fairly good job, in case it did work.

You could try it in two test areas. One with the clear coat carefully feathered to remove the detached clear-coat portions, and one just gambling it will flow under.

The nice thing is, the only reason you would have to sand lacquer between coats is because you wanted to, since it melts into the previous application. That fact may even cause it to eat through the really thin part next to the unprotected part and cause it all to adhere again.

Then there is that I may be full of it. All or some of this may be nonsense. Whatever you do, let us know. It could help a lot of others with the same problem (which I don't have).
 
Last edited:

xm20k

Runs on 93 octane, caffeine, and spite
Supporting Member
Joined
May 26, 2025
Posts
1,109
Reaction score
2,847
Location
Girard, Ohio
First Name
David
Truck Year
78
Truck Model
c10
Engine Size
388
You must be registered for see images attach
That right there is why I don't mess with clear.

Single stage and if it ever needs touched up its sand for adhesion, paint the spot, wet sand to blend, done. Did away with the Sante Fe roof on mine and you can't even tell matches the rest of the cab and doors in both color and shine. Ya I get clear can make it super shiny and protect the paint under it, but when it peels it's a nightmare besides it's not a show truck, I couldn't drive something that had better than a 10–20foot paint job sounds like too much stress and anxiety for me.

You must be registered for see images attach


You must be registered for see images attach
 
Last edited:

YakkoWarner

Full Access Member
Joined
May 29, 2024
Posts
643
Reaction score
1,049
Location
Central Texas
First Name
Wolf
Truck Year
1989
Truck Model
R2500 Suburban
Engine Size
454
At least in the short term I'll be needing to spot-repair some clear on my British car project because it had been repainted and cleared before I got it, and 90% of it is great. The paint/clear didn't fail but some physical damage due to careless handling by the previous owner(s) left some body damage, and at this point I'm not inclined to repaint the whole car. I just wish they'd left some clues as to what they repainted it with since I need to get at least a close color match.

Having failed factory paint is in some ways better because at least you know what it is supposed to be, failing mystery paint is almost impossible to reverse engineer.
 

Dejure

Full Access Member
Joined
Mar 3, 2025
Posts
477
Reaction score
924
Location
Eastern Washington
First Name
Kelly
Truck Year
1978
Truck Model
C15
Engine Size
350
That single coat, no clear thing reminds me of my commercial painting days:

(1) Any paint job (automotive or structures) is ONLY as good as the base they are put on.

Based on the foregoing, if the clear coat is failing and you paint over it, you are building on that clear coat, rather than on the paint it was applied to, both of which have different ingredients.

(2) We would have to touch up spots on paint jobs that had been damaged. Very often, once the chemically and color matched paint dried and hardened, even we could not find the repair.

SIDE NOTE: Generally, if you are touching up a, for example, pencil eraser size spot, you are best served by dabbing ONLY it and walking away, rather than trying to feather it in. If there is a tiny difference between new and old paint, making the treated area larger by trying to feather the paint in will just make the repair bigger and more noticeable.

(3) Whether structural paint for a building or automotive paint, repairs can be matched to make them invisible to computer or the eye.

SIDE NOTE: Preparing for future problems can be as simple as having items that can be removed to be used for matching paint. That could be as simple as having a piece of material with the paint color attached to each house side (each side will fade at a different rate than the others and having a match piece for each side allows one to just focus on that side, as needed, to keep what's painted protected).

I used to walk a few miles to classes, to polish up on what I ignored decades earlier. There was a Porsche ALWAYS parked nose in before a garage door. The east side the car was shiny red. The west side was badly faded.
 
Last edited:

bucket

Super Moderator
Staff member
Moderator
Joined
Aug 3, 2010
Posts
35,095
Reaction score
43,613
Location
Usually not in Ohio
First Name
Andy
Truck Year
'77, '78, '79, '84, '88
Truck Model
K5 thru K30
Engine Size
350-454
While that was certainly an issue back in the day, 99.9% sure that is not original paint.
It could be, I suppose, but that funky pinstripe with the witness marks under the paint from the old original wide striped pinstripe decal and the sagging base coat under the window trim in the door suggest otherwise.
GM did start switching to 2 stage paint late 80s and this truck being an 88 it’s possible? My first ‘90 GMC pickup was 2 stage but I don’t know when or if they even switched on the late model squares. 1986 squares are still 100% single stage paint.

I won't bet the farm on it, but I'm nearly certain my '88 Burb was single stage (It had been resprayed in base/clear and the clear is wearing thin). My old '90 Burb was original paint and it was base/clear.

At any rate, the OP's rig is NOT wearing it's original paint and the clearcoat delam is likely a cause of low quality paint or improper prep. Much like these two re-sprays lol:

You must be registered for see images attach


For what it's worth, the rig in question is glossy overall. I personally would just drive it ant not worry about it.
 

Steelbuddha

Full Access Member
Firefighter
Joined
Mar 16, 2024
Posts
132
Reaction score
200
Location
Central North Carolina
First Name
Jonathan
Truck Year
1984
Truck Model
K20 (dump bed)
Engine Size
350
I had an '89 Ford truck that had the clearcoat start failing after about a year. Several guys in the fire department I served in had the same thing happen back then with their new trucks. The manufacturers were trying to meet new environmental regulations for reduced VOCs in paints, and everybody's paint was failing.

After a couple of unsatisfactory paint jobs on my square (one a failed matte paint), two years ago I shot it with urethane bedliner. Not shiny but indestructible. It looks fine. Hit it with a pressure washer maybe twice a year, and you're good to go. I'll be dead before it needs to be painted again.
 

Tommy L

Junior Member
Joined
Aug 25, 2024
Posts
14
Reaction score
7
Location
Moline
First Name
Tom
Truck Year
1987
Truck Model
R10
Engine Size
6.0 LS
If you redo the paint, make sure the clear coat is the good stuff with UV protection, otherwise you will be doing it again in 3 to 5 years.
 

MBeef61

Junior Member
Firefighter
Joined
Jan 14, 2025
Posts
3
Reaction score
6
Location
Oregon
First Name
Mike
Truck Year
1978
Truck Model
K10
Engine Size
396
Depends how perfect you want it. If it were me I would try sanding it down and re clear it. They have wipe on and spray on obviously
 

Dejure

Full Access Member
Joined
Mar 3, 2025
Posts
477
Reaction score
924
Location
Eastern Washington
First Name
Kelly
Truck Year
1978
Truck Model
C15
Engine Size
350
Yep. Most of us have seen those failing paint jobs the experts put on new Dodges, GMC's, Fords. . . .
 

Fat 454

Full Access Member
Joined
Jul 24, 2012
Posts
382
Reaction score
605
Location
Australia
First Name
Andy
Truck Year
1973
Truck Model
C20 Suburban
Engine Size
454
whatever you do - DO NOT let any bodyshop convince you to sand back to bare metal ( especially on the edges of doors etc. ). As bad as OEM factory top coats are, you will be hard pressed to replicate the original cleaning and phosphate anti corrosion prep from the factory.
As stated above, lightly scrape and / or sand off the clear if you choose to, however try to retain as much of the factory colour coat as possible as a solid foundation for whatever you put back on. It WILL save you heartache down the road if you are planning on keeping the truck for any reasonable period of time ( read 3+ years).
Also if you can't remove window rubber, you can lift and insert a line of plastic coated wire all around the frame. That will allow the re-spray to not form a crappy hard edge around the rubbers.
 

Forum statistics

Threads
48,401
Posts
1,066,542
Members
42,778
Latest member
Skippy
Top