
How challenging is replacing brake master cylinder?

Disclaimer: Links on this page pointing to Amazon, eBay and other sites may include affiliate code. If you click them and make a purchase, we may earn a small commission.

Rotten 1

Full Access Member
Joined
Jan 9, 2024
Posts
50
Reaction score
66
Location
Tennessee
First Name
Chris
Truck Year
1974
Truck Model
C10
Engine Size
350
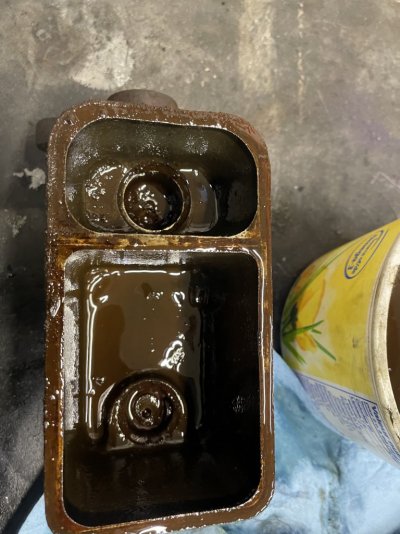
hey folks - finally starting on a few projects on a 1974 Chevy C10 - first up is brakes. The guy I bought the truck from a couple years ago said he "did a brake job but they might need to be bled". I have not done that as brakes were ok, but the last couple of months the brake pedal is soft and mushy, and does not get any firmer after a few pedal pumps. Power brakes, discs in front and drum in back.

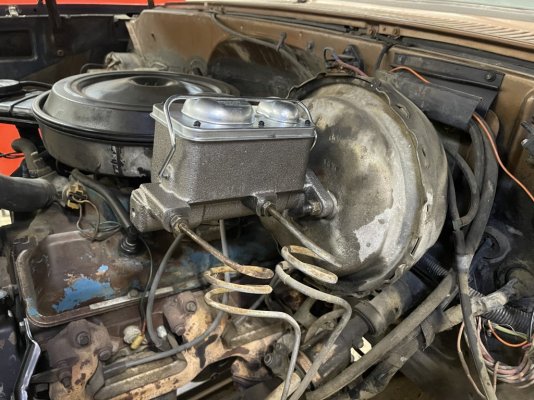
My trouble shooting (with a lot of Chat GPT) leads me to thinking that I need to replace the master cylinder.

I'm generally pretty handy but it's been a lot of years since I really got into car repairs, so first question is... how hard is replacing the master cylinder. from a few YouTube videos it looks like the main steps are:
Buy new Master Cylinder
Pull the old one
Bench bleed the new one
install the new one
bleed the brake lines

then go about my merry way.

What am I missing and any tips?

Thanks guys
 

fast 99

Full Access Member
Joined
Dec 31, 2021
Posts
2,576
Reaction score
4,088
Location
Spokane, Washington
First Name
Brian
Truck Year
81,85
Truck Model
K20
Engine Size
350
When bench bleeding do not bottom the piston. Only push it in about 1/2 way. It is possible to cut the lip seal if bottomed out. Won't be as messy if the lid is installed before bolting it on.

On older vehicles I usually check that the bleeders can be opened and are not clogged up before removing the master. If plugged take bleeder off, use a small drill bit dirt can be removed.
 

75gmck25

Full Access Member
Joined
Oct 13, 2016
Posts
2,786
Reaction score
3,098
Location
Northern Virginia
First Name
Bruce
Truck Year
1975
Truck Model
K25 Camper Special TH350 NP203
Engine Size
5.7
Also make sure you have flare nut wrenches for the brake lines where they attach to the booster. They are going to be tight, and a regular open end wrench won’t have enough bite to get them off without rounding the edges. If you try using vice grips or pliers you may distort the nut or fitting enough that it won’t seal again.

As already mentioned, don’t push the piston down too far when bench bleeding, or after you get it installed and are using the brake pedal to push out the air. Have your assistant use short strokes until you get good pressure. When you push the pedal down too far it often screws up the seal on the piston.

You may have to play around with the proportioning valve to get it to apply pressure to both front and rear. It’s designed to pop to one side and apply pressure to only one half of the system when there is a brake line failure. Bleeding brakes sometimes looks like a failure and it locks to one side.
 
Last edited:

ali_c20

Supporting Member
Supporting Member
Joined
Sep 20, 2016
Posts
2,130
Reaction score
3,244
Location
Austria
First Name
Alexander
Truck Year
1974, 1979
Truck Model
C20, K5
Engine Size
350, 350
Spray some penetrant like WD40 on the lines and fittings. The lines sometimes seize to the fittings and can be twisted off.
 

Rotten 1

Full Access Member
Joined
Jan 9, 2024
Posts
50
Reaction score
66
Location
Tennessee
First Name
Chris
Truck Year
1974
Truck Model
C10
Engine Size
350
Above is all good info. :waytogo: Question, though - have you tried gravity bleeding the brakes ? One man job and you may find the PO was correct that it needed a bleeding session.


I'll give that a try once this winter event gets done with us as the truck is currently outside. Tell me more about a gravity bleed or do I just go to Youtube?
 

Ricko1966

Full Access Member
Joined
Apr 11, 2017
Posts
10,167
Reaction score
19,654
Location
kansas
First Name
Rick
Truck Year
1975
Truck Model
c20
Engine Size
350
I wouldn't condemn the master cylinder so fast. And I don't have $.10 confidence in the things on chat gtp . Make sure the rear brakes are adjusted, jack up a front and rear wheel have someone step on the brakes,see if front and rear work. If you have some brakes but not good brakes,I don't suspect the master first .Unless the brake light is on
 

Radiohead

That guy on the Columbia
Joined
Mar 17, 2022
Posts
3,183
Reaction score
10,294
Location
Low Earth Orbit where it's safer
First Name
Eric
Truck Year
MCMLXXIX
Truck Model
C-20 Silverado Camper Special
Engine Size
454 crazy cubes, or 7.4 luscious litres
If you're going with gravity, have the master bench bled completely first.

And ffs, don't run the reservoir dry. Still should finish bleeding the old fashioned way, with a helper pumping the pedal (not all the way to the end of its stroke) and you running the bleed screw, calling out up and down as needed.

Do RR 1st, LR 2nd, RF 3rd and LF last with the rear brakes properly adjusted prior and parking brake off. Don't want its switch on and you thinking it is having a proportion valve hiccup. Keep the reservoir full. Easy peasy man!
 

Rusty Nail

Cowboy of both Time and Space
Joined
Jan 29, 2015
Posts
10,280
Reaction score
10,611
Location
the other side of the internet
First Name
Russell
Truck Year
1977
Truck Model
C20
Engine Size
350sbc
Also make sure you have flare nut wrenches for the brake lines where they attach to the booster. They are going to be tight, and a regular open end wrench won’t have enough bite to get them off without rounding the edges. If you try using vice grips or pliers you may distort the nut or fitting enough that it won’t seal again.

As already mentioned, don’t push the piston down too far when bench bleeding, or after you get it installed and are using the brake pedal to push out the air. Have your assistant use short strokes until you get good pressure. When you push the pedal down too far it often screws up the seal on the piston.

You may have to play around with the proportioning valve to get it to apply pressure to both front and rear. It’s designed to pop to one side and apply pressure to only one half of the system when there is a brake line failure. Bleeding brakes sometimes looks like a failure and it locks to one side.
and NOBODY wants their nuts distorted!
 

Goldie Driver

Full Access Member
Joined
Mar 19, 2018
Posts
4,380
Reaction score
7,573
Location
Houston, Texas
First Name
Britt
Truck Year
1980
Truck Model
GMC K1500 Suburban
Engine Size
350
I'll give that a try once this winter event gets done with us as the truck is currently outside. Tell me more about a gravity bleed or do I just go to Youtube?
Simple enough. Take the lid off the master cylinder and make sure that the fluid level is full. Put the lid back on loose when full.

Without ever touching the brake pedal, start with the right rear bleeder and let it run until clear fluid (no bubbles) appears.
Tighten the bleeder, check the fluid level and add as needed, then do the left rear.

Follow the same procedure for the right front and left front and reinstall the cap tightly on the master cylinder.

Optional : Follow @ali_c20 's lead and enjoy a brew while waiting and watching fluid for air. :waytogo:
 

Oldbear42

Full Access Member
Joined
Feb 15, 2024
Posts
248
Reaction score
668
Location
Linden, Alberta, Canada
First Name
Shaine
Truck Year
1981
Truck Model
C20 LWB Scottsdale
Engine Size
350
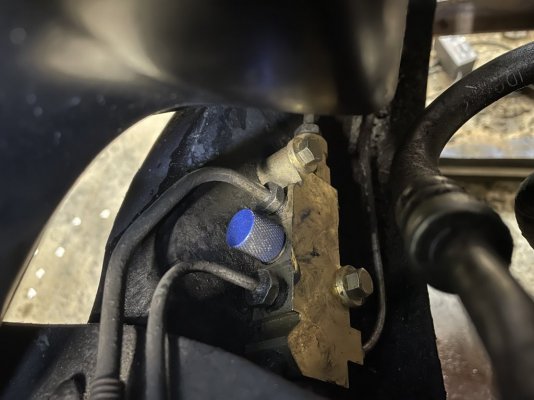
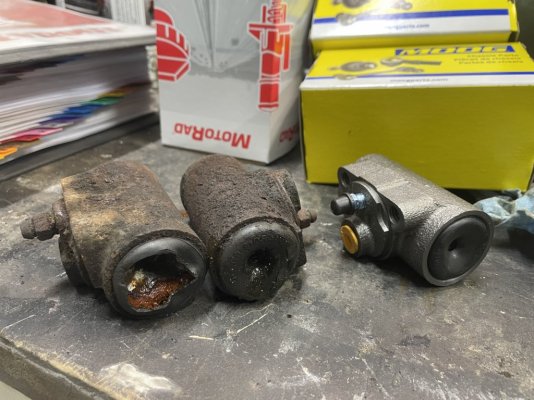
Depending on the year and model, you may have a proportioning valve (as mentioned before). Mine is super convenient to get to ;) - just remove your inner fenders and fan shroud... The little lockout tool makes bleeding easier by holding both circuits open. My proportioning valve was so gummed up that I replaced it along with the master cylinder. Took us longer to bleed the brakes than to change the master cylinder, but most of my issues stemmed from the stuck valve. And the rear wheel brake cylinders both leaked so the truck went into "save the front brakes" mode.
 

Attachments

  • IMG_8757.JPG
    IMG_8757.JPG
    106.1 KB · Views: 41
  • IMG_8678.JPG
    IMG_8678.JPG
    168 KB · Views: 44
  • IMG_8756.JPG
    IMG_8756.JPG
    189.3 KB · Views: 44
  • IMG_8755.JPG
    IMG_8755.JPG
    149.1 KB · Views: 45

Sad Sack

Supporting Member
Supporting Member
Joined
Sep 3, 2024
Posts
2,946
Reaction score
6,081
Location
Nebraska
First Name
Goober
Truck Year
1985
Truck Model
C15
Engine Size
305
FWIIW: On the bleeding part, run your bleeder hose with a good seal on the zerk, up a good 6" (think upside down U) or more then back down into a catch jar. Less chance of air getting sucked back in.
 

Craig Nedrow

NADAR UNDER THE RADAR
Supporting Member
Joined
Sep 1, 2018
Posts
1,674
Reaction score
4,203
Location
Washington State
First Name
Craig
Truck Year
1973 (have two), 1985
Truck Model
K10, K20, C20
Engine Size
350, 454, 6.2 Detroit
Gravity bleeding is my favorite bleeding method. Watch the brake fluid drip and have a beer.
I wanna have a beer with this guy, I bet they have great beer there!!!!!
 

Forum statistics

Threads
48,665
Posts
1,074,152
Members
43,333
Latest member
duncan_schawalder
Top