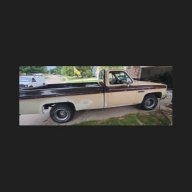
Clue me in on R&R Trurn Signal Switch on an 86 GMC, please!

Disclaimer: Links on this page pointing to Amazon, eBay and other sites may include affiliate code. If you click them and make a purchase, we may earn a small commission.

Gpaw44

Full Access Member
Joined
Apr 3, 2016
Posts
52
Reaction score
53
Location
Texas
First Name
Alex
Truck Year
1986
Truck Model
1500
Engine Size
305
Once I get down to the switch part how does the switch arm come out? Is there a screw holding it or does it just pull out. My arm has the windshield washer switch, washer button as well and cruse botton on the end. The videos I have watched skip over this part. Where is a good source to get a new switch? Thanks, in advance
 

Hilllbilly

Full Access Member
Joined
Sep 30, 2024
Posts
765
Reaction score
1,506
Location
PNW
First Name
Elon
Truck Year
1981, 72, 67, 65
Truck Model
k20, c10
Engine Size
472
A screw be holding the metal arm onto the plastic

I guess that's what you be axing

You must be registered for see images
 

Sad Sack

Supporting Member
Supporting Member
Joined
Sep 3, 2024
Posts
2,952
Reaction score
6,088
Location
Nebraska
First Name
Goober
Truck Year
1985
Truck Model
C15
Engine Size
305
Search for Standard Ignition TW20.


If yours is a 10 pin.
 

CalSgt

Full Access Member
Joined
Oct 3, 2021
Posts
2,289
Reaction score
5,527
Location
CA
First Name
Casey
Truck Year
1980
Truck Model
Chevy K-10 Custom Deluxe
Engine Size
350
I've never done one with the washer/wiper and cruise control on the turn signal stalk but I assume the rest of the process is the same. Should be one screw in the stalk, one screw in the center of the "Hazard" flasher switch, and two Phillips screws holding the switch to the column.

When you get your new switch, de-pin the plastic connector so you are just dealing with the wires. I like to take a picture of the connector before I remove the wires so I have a reference when putting them back in. Also, with the newest switch I did I needed to drill out the screw hole for the hazard flasher. The screw that was in my hazard flasher knob would not thread in all the way.

Clip the wires from your old switch, then tape the end of the new wires to the old ones. Try to keep the new wires as low profile and "flat" as possible, opposed to being wadded into a round bundle. You also want to avoid having a big bundle of tape, the connection needs to be kinda sleek. I usually bend one wire on each harness back against itself and hook them together for a little extra strength so the tape doesn't pull apart when pulling the new wires in. I've also used the old wiring to pull a single wire through to use later for pulling the new harness in.

Go under the dash, unhook the connector from the column, and gently pull the new wiring through the column. You may need to carefully feed the wires in from the steering wheel side as you pull. I don't think I've ever needed to lubricate the wires for the pull, but I wouldn't hesitate to use a little bit of soapy water if it felt too tight.

Once the new switch is in position, re-install the wire ends in the connector, plug the connector into it's spot on the column and test all the signals and hazards before you put the lock and cover plate back on.

If it's a tilt column try to get down to any of these screws while the switch is out, make sure they're tight. These are famous for loosening up and causing a wobbly column. You can get to one or two of them with the column pulled down this far IIRC, they are about 6-8" down from the turn switch and hold the whole top of the column to the main column.

You must be registered for see images attach


Here is how the connector mount to the column... see how the wiring all lays flat? The channel the wires go in is a flat plastic raceway which is why I said to make sure your wire bundle is flat when you pull it in.
You must be registered for see images attach

 

Broken85

Supporting Member
Supporting Member
Joined
Jan 14, 2024
Posts
310
Reaction score
449
Location
Cumberland, NJ
First Name
A
Truck Year
1985
Truck Model
K10
Engine Size
350
If you are asking how the blinker arm comes out of the column; yes it just pulls out with a good tug and then pushes back in. Make sure it is clocked correctly before you shove it back in there.

The blinker/high beam/ cruise control/ wiper switch is the first thing they install in the column and the last thing out, so everything (read EVERYTHING) has to come out first. Many have found it easier to take the whole column out and doing it on a bench rather than in the truck.
 

YakkoWarner

Full Access Member
Joined
May 29, 2024
Posts
684
Reaction score
1,121
Location
Central Texas
First Name
Wolf
Truck Year
1989
Truck Model
R2500 Suburban
Engine Size
454
I've never done one with the washer/wiper and cruise control on the turn signal stalk but I assume the rest of the process is the same. Should be one screw in the stalk, one screw in the center of the "Hazard" flasher switch, and two Phillips screws holding the switch to the column.

When you get your new switch, de-pin the plastic connector so you are just dealing with the wires. I like to take a picture of the connector before I remove the wires so I have a reference when putting them back in. Also, with the newest switch I did I needed to drill out the screw hole for the hazard flasher. The screw that was in my hazard flasher knob would not thread in all the way.

Clip the wires from your old switch, then tape the end of the new wires to the old ones. Try to keep the new wires as low profile and "flat" as possible, opposed to being wadded into a round bundle. You also want to avoid having a big bundle of tape, the connection needs to be kinda sleek. I usually bend one wire on each harness back against itself and hook them together for a little extra strength so the tape doesn't pull apart when pulling the new wires in. I've also used the old wiring to pull a single wire through to use later for pulling the new harness in.

Go under the dash, unhook the connector from the column, and gently pull the new wiring through the column. You may need to carefully feed the wires in from the steering wheel side as you pull. I don't think I've ever needed to lubricate the wires for the pull, but I wouldn't hesitate to use a little bit of soapy water if it felt too tight.

Once the new switch is in position, re-install the wire ends in the connector, plug the connector into it's spot on the column and test all the signals and hazards before you put the lock and cover plate back on.

If it's a tilt column try to get down to any of these screws while the switch is out, make sure they're tight. These are famous for loosening up and causing a wobbly column. You can get to one or two of them with the column pulled down this far IIRC, they are about 6-8" down from the turn switch and hold the whole top of the column to the main column.

You must be registered for see images attach


Here is how the connector mount to the column... see how the wiring all lays flat? The channel the wires go in is a flat plastic raceway which is why I said to make sure your wire bundle is flat when you pull it in.
You must be registered for see images attach


OK - inquiring minds want to know on this one:

You used the phrase "de-pin the connector" very casually - as if it were something that could be accomplished by mere humans.
How the -censored for my protection- do you actually do that without destroying the connector and wire ends? The one time I tried to get one of those things apart (only 3 wires, much less than the one in question here) I ended up destroying all of it and had to find another one to cut and splice the wires onto.
 

Broken85

Supporting Member
Supporting Member
Joined
Jan 14, 2024
Posts
310
Reaction score
449
Location
Cumberland, NJ
First Name
A
Truck Year
1985
Truck Model
K10
Engine Size
350
OK - inquiring minds want to know on this one:

You used the phrase "de-pin the connector" very casually - as if it were something that could be accomplished by mere humans.
How the -censored for my protection- do you actually do that without destroying the connector and wire ends? The one time I tried to get one of those things apart (only 3 wires, much less than the one in question here) I ended up destroying all of it and had to find another one to cut and splice the wires onto.
it’s not difficult to press the retain clip in the harness with a pick and pull out the pin, but IMHO you don’t need to do that to get it through. You can turn the bracket plug sideways with the wires in it and get it through the channel. Get a good pull string and some electrical tape to keep everything tight and small.
 

Jgonick

Full Access Member
Joined
Jan 12, 2017
Posts
572
Reaction score
752
Location
West Texas
First Name
Joel
Truck Year
1985
Truck Model
K10
Engine Size
350
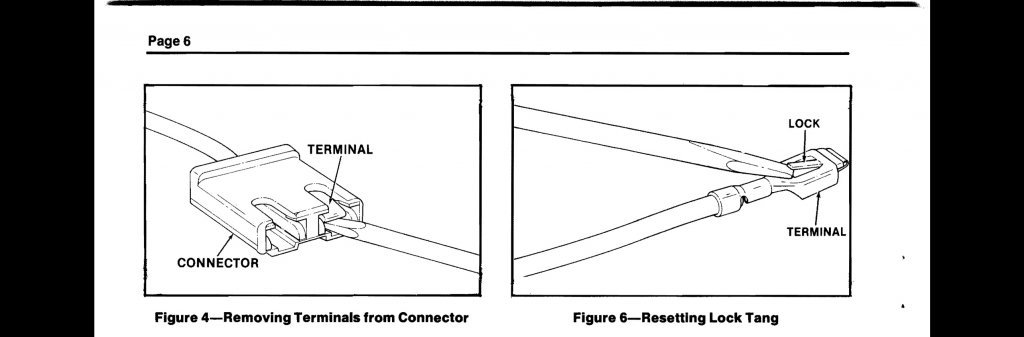
The metal terminals will have a tab (tang)- you push the wire as deep as it will go from the back into the connector .-this causes the metal terminal to be as far forward as possible. Take a very small flat head screwdriver (or something similar) and push the metal tab down - when you are pushing the metal tab down you pull the wire out. Takes a little practice but once you do a few it becomes easy- see attachment
 

Attachments

  • IMG_2338.jpeg
    IMG_2338.jpeg
    42.4 KB · Views: 41

Gpaw44

Full Access Member
Joined
Apr 3, 2016
Posts
52
Reaction score
53
Location
Texas
First Name
Alex
Truck Year
1986
Truck Model
1500
Engine Size
305
The metal terminals will have a tab (tang)- you push the wire as deep as it will go from the back into the connector .-this causes the metal terminal to be as far forward as possible. Take a very small flat head screwdriver (or something similar) and push the metal tab down - when you are pushing the metal tab down you pull the wire out. Takes a little practice but once you do a few it becomes easy- see attachment
For this I have used a Bobby Pin. You know, those things ladies and some men now wear in their hair to keep it pinned back out of their face!
 

CalSgt

Full Access Member
Joined
Oct 3, 2021
Posts
2,289
Reaction score
5,527
Location
CA
First Name
Casey
Truck Year
1980
Truck Model
Chevy K-10 Custom Deluxe
Engine Size
350
OK - inquiring minds want to know on this one:

You used the phrase "de-pin the connector" very casually - as if it were something that could be accomplished by mere humans.
How the -censored for my protection- do you actually do that without destroying the connector and wire ends? The one time I tried to get one of those things apart (only 3 wires, much less than the one in question here) I ended up destroying all of it and had to find another one to cut and splice the wires onto.
Like @Broken85 @Jgonick @Gpaw44 said... There is a small lock tab on the connector, push the wire into the plug, depress the lock tab with a small tool and gently pull the wire out. Before reassembly, ensure the lock tabs are bent back out so they latch when inserting the wire some lock tabs are springy and go right back and others need persuasion.

There are some connectors that are an absolute PIA to do this with so I understand where you are coming from, but the turn signal connector isn't too bad. Actually... Now that I think about it, these GM column turn signal connectors are where I first learned this skill.


I've been tempted to buy one of these kits for the more PIA connectors, especially the ones too small to get nearly any tool into to get the wire to release.
 

Matt69olds

Full Access Member
Joined
Jan 8, 2018
Posts
2,850
Reaction score
4,713
Location
Central Indiana
First Name
Matt
Truck Year
81
Truck Model
GMC 1/2 ton
Engine Size
455 Olds
For this I have used a Bobby Pin. You know, those things ladies and some men now wear in their hair to keep it pinned back out of their face!
xc_hide_links_from_guests_guests_error_hide_media
 

Latest posts

Forum statistics

Threads
48,666
Posts
1,074,187
Members
43,338
Latest member
jw23655
Top