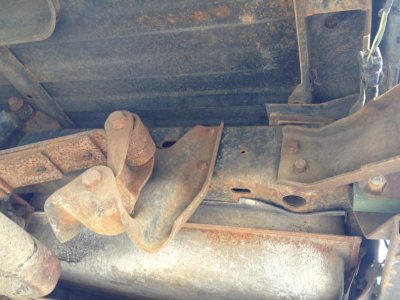
Replacing the body mounts K5 blazer

Disclaimer: Links on this page pointing to Amazon, eBay and other sites may include affiliate code. If you click them and make a purchase, we may earn a small commission.

Milblazer

Full Access Member
Joined
Mar 21, 2013
Posts
268
Reaction score
5
Location
Colorado
First Name
MilBlazer
Truck Year
1984
Truck Model
K5
Engine Size
6.2
I have this kit from Daystar that has all polyurethane mounts and what not that has been collecting dust for a while. I want to know how much of a pain it is to do this. Should I have a friend help? How much beer should I buy that friend? As always your help is greatly appreciated. Thanks
 

Mr Clean

Super Moderator
Staff member
Super Moderator
Joined
Aug 18, 2010
Posts
10,270
Reaction score
9,961
Location
North East Texas
First Name
Shawn
Truck Year
1982 & 1985
Truck Model
K10 Extra Cab w/ Proper SWB, & 85 K5 Blazer
Engine Size
454 BBC, & 383 Stroker
It's not a huge pain in the ass. Yes get a friend, 18 pack of beer, and a pizza. Do one side at a time, and just lift the body up high enough to get the bushing in and out. The reason for one side at a time, is to keep your body from slipping around on the frame, and screwing up your gaps.
 

Milblazer

Full Access Member
Joined
Mar 21, 2013
Posts
268
Reaction score
5
Location
Colorado
First Name
MilBlazer
Truck Year
1984
Truck Model
K5
Engine Size
6.2
It's not a huge pain in the ass. Yes get a friend, 18 pack of beer, and a pizza. Do one side at a time, and just lift the body up high enough to get the bushing in and out. The reason for one side at a time, is to keep your body from slipping around on the frame, and screwing up your gaps.

So you don't get a cockeyed body? Would look a little funny going down the road when the right side gets there before the left. I've heard you have to remove the tension bars or torque bars on the tailgate beforehand so you don't bend the body to hell. Any truth to that?
 

bucket

Super Moderator
Staff member
Super Moderator
Joined
Aug 3, 2010
Posts
30,298
Reaction score
27,899
Location
Usually not in Ohio
First Name
Andy
Truck Year
'77, '78, '79, '84, '88
Truck Model
K5 thru K30
Engine Size
350-454
If the truck is rusty, I'd get a couple 24 packs and plan on loaning out the family couch.
 

Milblazer

Full Access Member
Joined
Mar 21, 2013
Posts
268
Reaction score
5
Location
Colorado
First Name
MilBlazer
Truck Year
1984
Truck Model
K5
Engine Size
6.2
If the truck is rusty, I'd get a couple 24 packs and plan on loaning out the family couch.

Its not too bad. I do plan on stocking up on PB blaster and soaking all the bolts a couple days ahead of time.
 

bucket

Super Moderator
Staff member
Super Moderator
Joined
Aug 3, 2010
Posts
30,298
Reaction score
27,899
Location
Usually not in Ohio
First Name
Andy
Truck Year
'77, '78, '79, '84, '88
Truck Model
K5 thru K30
Engine Size
350-454
Still can't hurt to get a couple 24 packs. Then you don't have to go back to the store when it's time to celebrate completing the job. Obama will thank you for saving the fuel :anitoof:
 

chengny

Full Access Member
Joined
Feb 22, 2012
Posts
4,086
Reaction score
1,022
Location
NH
First Name
Jerry
Truck Year
1986
Truck Model
K3500
Engine Size
350/5.7
Its not too bad. I do plan on stocking up on PB blaster and soaking all the bolts a couple days ahead of time.

There is one common thing that can wrong. And if it happens, it will quickly turn this job into a struggle.

What started out to be a pleasant Saturday afternoon that only required pulling 4 bolts, sliding in the new mounts and replacing the bolts (and sipping beer in the sunshine with your advisers) can become a weekend long nightmare. You'll end up spending hours on your back, getting rust in your eyes, swearing and drinking beer by yourself (the advisers, having picked up the scent of actual work, will have fled the scene).


That would be if your "captive nuts" - that the forward mount bolts screw into - decide to make a break for freedom. These nuts are actually just 2" X 2" square steel plates with a hole drilled in the center and tapped to accept the mount bolts. The are located within the cab floor supports (normally hidden and inaccessible). They are sometimes still held captive by a couple of tack welds but the welds are usually rusted away or break free with the application of any real torque on the bolts.

When this happens, the mounting through-bolts will spin endlessly (and easily as well, due to your pre-application of PBlaster).


A little trick from the body guys:

Never mind spraying the bolts with penetrating oil from under the truck - gravity will being fighting your efforts. The best way to soak the rusty nuts is to either drill holes through the sides of the cab floor supports. An even better method is to drill down through the cab floor and spray from the top.

Do this for a week or two before you go to pull the mount bolts and maybe you'll get lucky.


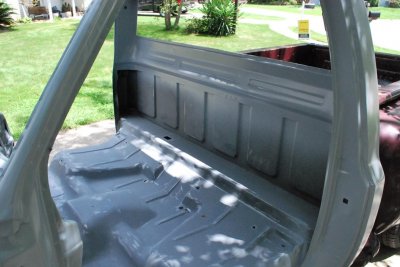
A picture of a real bad cab floor/mount situation and the locations and associated parts for your job ( I think - the vehicle pictured looks like a Blazer/Jimmy)


You must be registered for see images attach


You must be registered for see images attach
 
Last edited:

robert8096

Full Access Member
Joined
Mar 27, 2011
Posts
878
Reaction score
56
Location
Goose Creek SC
First Name
Robert
Truck Year
1986
Truck Model
c10
Engine Size
350
Don't use an impact gun either. Slow steady force is the best way. Mine were not rusted and I used an impact gun on the first one and had to cut a hole in the floor and weld the capture nut to get the bolt out. Used a pry bar on the other three and had no problems. Notice the hole near right rear mount in an otherwise clean floor.
 

Attachments

  • DSC_0141.jpg
    DSC_0141.jpg
    92.3 KB · Views: 600

Milblazer

Full Access Member
Joined
Mar 21, 2013
Posts
268
Reaction score
5
Location
Colorado
First Name
MilBlazer
Truck Year
1984
Truck Model
K5
Engine Size
6.2
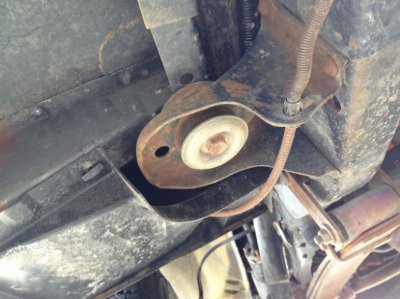
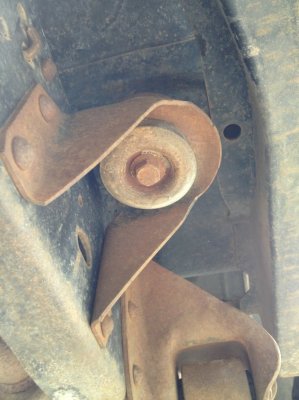
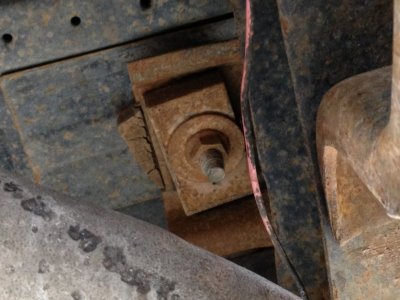
Here are my mounts. I think these are the mounts anyway, well the last two anyway. I tend to stay away from impact tools. I've got some breaker bars and extensions I'll use. Plus a bit of pipe from the local hardware store to give me some more leverage.
 

Attachments

  • photo 1 (4).jpg
    photo 1 (4).jpg
    94.7 KB · Views: 718
  • photo 2 (4).jpg
    photo 2 (4).jpg
    94.2 KB · Views: 655
  • photo 3 (3).jpg
    photo 3 (3).jpg
    93.3 KB · Views: 919
  • photo 4 (2).jpg
    photo 4 (2).jpg
    95.9 KB · Views: 962

robert8096

Full Access Member
Joined
Mar 27, 2011
Posts
878
Reaction score
56
Location
Goose Creek SC
First Name
Robert
Truck Year
1986
Truck Model
c10
Engine Size
350
Those don't look too bad. Spray them with penetrate lube and just take your time. The ones with the bolt going into the cab are going to be the PIA ones. The ones with the bolt going thru the cab should be easy. Those you can most likely grab the bolt from inside of the cab if they start to spin. From those pictures they don't look too bad. Why are you changing them?
 

Milblazer

Full Access Member
Joined
Mar 21, 2013
Posts
268
Reaction score
5
Location
Colorado
First Name
MilBlazer
Truck Year
1984
Truck Model
K5
Engine Size
6.2
Those don't look too bad. Spray them with penetrate lube and just take your time. The ones with the bolt going into the cab are going to be the PIA ones. The ones with the bolt going thru the cab should be easy. Those you can most likely grab the bolt from inside of the cab if they start to spin. From those pictures they don't look too bad. Why are you changing them?

Some of the suspension bushings are very dry rotted and I would rather replace everything at or around the same time so it wears evenly and I can tell the difference to see how the ride has changed.
 

robert8096

Full Access Member
Joined
Mar 27, 2011
Posts
878
Reaction score
56
Location
Goose Creek SC
First Name
Robert
Truck Year
1986
Truck Model
c10
Engine Size
350
I understand. Body mounts don't usually wear as much as suspension bushings.
 

89Suburban

Supporting Member
Supporting Member
Joined
Dec 7, 2010
Posts
24,744
Reaction score
6,531
Location
Southeast PA
First Name
Paw Paw
Truck Year
2007
Truck Model
Chevrolet Tahoe LT
Engine Size
5.3, 4WD

That would be if your "captive nuts" - that the forward mount bolts screw into - decide to make a break for freedom. These nuts are actually just 2" X 2" square steel plates with a hole drilled in the center and tapped to accept the mount bolts. The are located within the cab floor supports (normally hidden and inaccessible). They are sometimes still held captive by a couple of tack welds but the welds are usually rusted away or break free with the application of any real torque on the bolts.

When this happens, the mounting through-bolts will spin endlessly (and easily as well, due to your pre-application of PBlaster).


A little trick from the body guys:

Never mind spraying the bolts with penetrating oil from under the truck - gravity will being fighting your efforts. The best way to soak the rusty nuts is to either drill holes through the sides of the cab floor supports. An even better method is to drill down through the cab floor and spray from the top. Do this for a week or two before you go to pull the mount bolts and maybe you'll get lucky.


What about drilling up into the captive washer or next to it and installing a bolt or something to keep it from spinning? :popcorn:


Here are my mounts. I think these are the mounts anyway, well the last two anyway. I tend to stay away from impact tools. I've got some breaker bars and extensions I'll use. Plus a bit of pipe from the local hardware store to give me some more leverage.

Man you go it easy. THIS is bad rust: :(

You must be registered for see images
 

Milblazer

Full Access Member
Joined
Mar 21, 2013
Posts
268
Reaction score
5
Location
Colorado
First Name
MilBlazer
Truck Year
1984
Truck Model
K5
Engine Size
6.2
Man you go it easy. THIS is bad rust: :(

You must be registered for see images
[/QUOTE]

Ouch. Is that from salt?
 

Forum statistics

Threads
43,936
Posts
946,049
Members
35,982
Latest member
jake26104
Top