making the broken out piece

Disclaimer: Links on this page pointing to Amazon, eBay and other sites may include affiliate code. If you click them and make a purchase, we may earn a small commission.

Raider L

Full Access Member
Joined
Sep 1, 2020
Posts
1,892
Reaction score
994
Location
Shreveport, LA
First Name
William
Truck Year
1974
Truck Model
C10
Engine Size
355
The first thing I had to do was to determine what the shape of the curve is. I tried to take some measurements but it was not possible to transfer numbers to something I could work with. I don't design by math and seldom have. So I needed to find a shape of something I could use to actually place the piece I cut out onto and use it to copy the shape. But what? Then I remembered I had saved some cans, like large bean cans and other cans of different diameters. So I got them and took them out to the truck and put them up to the instrument panel to see if one of them was pretty close to the shape of that part of the dash I wanted to copy.
 

Raider L

Full Access Member
Joined
Sep 1, 2020
Posts
1,892
Reaction score
994
Location
Shreveport, LA
First Name
William
Truck Year
1974
Truck Model
C10
Engine Size
355
The process.
You must be registered for see images attach
Look at the curvature of this can. It's a #10 can I think about 8 or 9 inches in diameter. It doesn't matter what diameter it is what I'm looking at is the curve of the can, and now look at the curve of that part of the instrument panel there at the column. It looks a little to much curve doesn't it? The panel there isn't that wide of a curve, it's tighter.
You must be registered for see images attach
Okay, now look at this one. Boy, that's real close to the curve of that part I will copy. To do this, you look at the outer curve of the can then quickly look at the curve of the panel there, and back and forth from the can to the panel. It's real close isn't it. This can is a can that's larger than a big "cut green beans" can. Larger. And I can't remember what came in it.
You must be registered for see images attach
Place the can in the vise, but I have it just barely held in place because I don't want to squeeze it, it will distort it out of shape. That's the plastic piece I cut out, on top just barely held in place with a clamp.
You must be registered for see images attach
This is what I've used before because it's a cooler flame and I can control it better. All I want to do is soften the plastic and not melt it to bad. It'll be melted some but that's okay I can fix that later. The paper under the butane bottle there, is the math I did. The diameter of the instrument panel I needed to copy was almost 4 1/2". My math came out to a little over 4.25". The can I choose is exactly 4.5" in diameter. Lucky I had that can. All I would do is hunt for something else. I'd find it.
 
Last edited:

Raider L

Full Access Member
Joined
Sep 1, 2020
Posts
1,892
Reaction score
994
Location
Shreveport, LA
First Name
William
Truck Year
1974
Truck Model
C10
Engine Size
355
Next, heating up the plastic with this torch. I don't put the flame right on the piece, near it. I'm watching the piece heat up and start moving then I know it's soft enough to press down. If the surface starts looking like it wants to boil you know you're to close. I don't let that happen, I've done this before. I thought that maybe I could bend this piece by putting it in boiling water. Some plastics you can do that with. But the piece would be hot as heck and how would I get it on the curving surface and keep it in place before it cooled, to much handling and all. I decided it wasn't worth the hassle.
You must be registered for see images attach
Self explanitory. But you can see the piece is flat and I'm going to heat it up so it's soft enough to bend it to this curved shape.
You must be registered for see images attach
I couldn't actually show the doing of it, but suffice it to say I worked it with the heat getting on it, then off, pressing to see if it's soft enough, heating it some more, then when it's soft enough pressing it and holding the "tool" on it, back and forth with the heat and the tools to hold it in place. The texture is rough, I was trying to hold it down with a red rag. That turned out to be a mistake and that's what messed the surface up. But it looks worse than it actually is. But I can put a thin film of fiberglass resin on it then sand it smooth later. Years ago there was a product on TV for repairing cracks and whatnot in your dash. Part of the kit was a piece of some kind of film that you'd lay on the resin and press and hold it on the repair and after the resin set up you could peel it off and it would leave that cracked leather look to it that matched that texture on the dash so it would blend in. Anyone remember that stuff? I wish I had some of it. All I have is real leather and I'm afraid it would stick to the piece. But that would be cool, huh?
You must be registered for see images attach
Here's the basic curve. You'll see it's pretty much right on.
You must be registered for see images attach
I had to bend this front down because the front of the panel is bent over like this. Of course what I have bent over is a lot more than needed, but that's the point is to have something I can sand down to what the final shape will be. These are some of the "tools" I used. You know you use what you have. After heating the piece up, quickly I'd be holding onto the socket and mashing the front with the striker. I needed something wide and flat to cover as much area as I could at one time. In bending the piece in the front it has a pucker in the middle as I knew it would have. So I put some extra heat on it and just mashed it inward. I'll fix it later on after I get the piece cut down.
 
Last edited:

Raider L

Full Access Member
Joined
Sep 1, 2020
Posts
1,892
Reaction score
994
Location
Shreveport, LA
First Name
William
Truck Year
1974
Truck Model
C10
Engine Size
355
The rest of the process.
You must be registered for see images attach
I've got the piece held in behind the panel and it looks like it's going to be okay. The steering wheel got in the way and there's a shadow covering up the most important part, the front edge of the panel so you can see the closeness of the curve.
You must be registered for see images attach
So I moved over to the other side and it looks okay here to. See that little lip on the outer edge of the panel above my piece? You can feel it if you put your finger under there. That rubber seal, you see it by my thumb, will close up on this part on the front. See, that can I choose was the right curve, wasn't it?
You must be registered for see images attach
I tried another shot and I think it looks okay. Now, I need to start thinking about how I'm going to make that hook that goes into that pocket on the trim panel that goes underneath.
Some may think this is a waste of time, why don't I just buy another panel, but I enjoy doing stuff like this because it keeps my brain from falling into my shoes. Oh, I had another idea. I can use black sanding primer to fill in any surface imperfections. And maybe some "crackle paint"? You know that stuff? I like that paint, it looks so neat all cracked looking.
 
Last edited:

Goldie Driver

Full Access Member
Joined
Mar 19, 2018
Posts
3,925
Reaction score
6,375
Location
Houston, Texas
First Name
Britt
Truck Year
1980
Truck Model
GMC K1500 Suburban
Engine Size
350
I was thinking your rag texture is not too bad !

:waytogo:

I like engineering, but sometimes it is more effort than just buying the part.

I have been thinking about how I could split the cluster at the seam where the upper driver's ac duct is to make getting at the cluster easier.

No action, just thought.

Enjoying watching your work, though.

:Caffeine:
 

Raider L

Full Access Member
Joined
Sep 1, 2020
Posts
1,892
Reaction score
994
Location
Shreveport, LA
First Name
William
Truck Year
1974
Truck Model
C10
Engine Size
355
@Goldie Driver,

Hmm. That sounds interesting. But if you'll notice the back of the instrument panel has so many braces in it it would be difficult to figure out where to start. It would require some planning. Part of the problem is there aren't any things in the "instrument case" that white plastic box for screws. You'd be doing what I'm doing. You'd have to get another case and cut screw posts off of it and glue them in where you split the case. Like I say, it'd require some planning. But I know what you mean though, you have to pull the whole instrument panel to get at the gauges. I don't like it either.

I was going to make my own panel out of a thick, 1/8", piece of alum. sheet. But I got as far as cutting out the sheet, shaping it, and then bending it. And that was it. I think what happened was I got another idea of how to cut the case, white plastic box, out and just keep the perimeter so I could still screw it to the dash, and separated all the gauges. The only part I kept was the case where the speedo and the gas gauge went, for the new tach. I even kept the clear lens for that part, but drilled holes in it with a big hole saw so the instrument panel would go back on level with the dash and not warp it. I even cut away the metal backing part that covers all the little gauges on the left. And again the only part of that piece I kept was the part that's over the speedo and the gas gauge for the new tach.
Just that was a heck of a job.
 

Raider L

Full Access Member
Joined
Sep 1, 2020
Posts
1,892
Reaction score
994
Location
Shreveport, LA
First Name
William
Truck Year
1974
Truck Model
C10
Engine Size
355
@Goldie Driver,

How'd you like my idea of using different size cans to find the right curve shape? That just popped in my head. It came to me when I was carrying the math I had done back to the shop. I was walking through the carport and happened to look down at one of those #10 cans I use for cig. butts. And it came to me, "Hey, I can use one of those cans to make the shape!" That's how those things happen, you know?
 

Goldie Driver

Full Access Member
Joined
Mar 19, 2018
Posts
3,925
Reaction score
6,375
Location
Houston, Texas
First Name
Britt
Truck Year
1980
Truck Model
GMC K1500 Suburban
Engine Size
350
@Goldie Driver,

How'd you like my idea of using different size cans to find the right curve shape? That just popped in my head. It came to me when I was carrying the math I had done back to the shop. I was walking through the carport and happened to look down at one of those #10 cans I use for cig. butts. And it came to me, "Hey, I can use one of those cans to make the shape!" That's how those things happen, you know?

I like that - creative way to make a curve.

All it takes is lots of cans to choose from ...

:dogpile:
 

CRM

Full Access Member
Joined
Jun 6, 2016
Posts
1,188
Reaction score
2,775
Location
Pasco, Washington
First Name
Casey
Truck Year
1985
Truck Model
K2500
Engine Size
350 CI
I might have a spare sitting on my parts shelf somewhere. ;)
 

Goldie Driver

Full Access Member
Joined
Mar 19, 2018
Posts
3,925
Reaction score
6,375
Location
Houston, Texas
First Name
Britt
Truck Year
1980
Truck Model
GMC K1500 Suburban
Engine Size
350
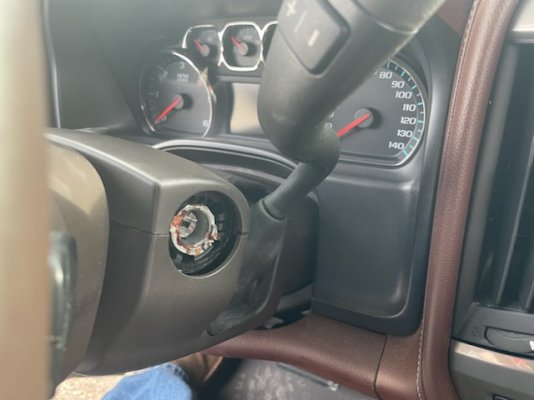
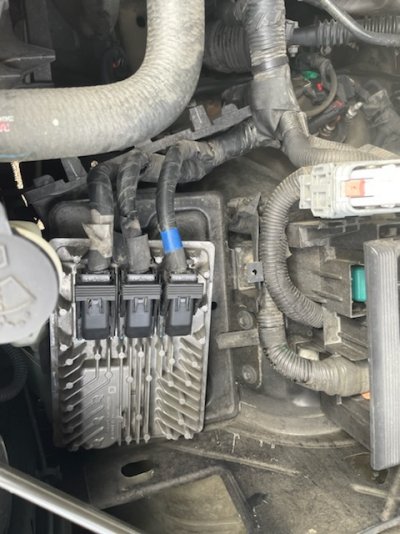
Since all this was brought on by your truck being messed up by thieves, let me show you how my buddies newer Chevy truck was done.

I had to ask - that is an ECU on the battery tray.

Thieves brought their own ...


:eek:
 

Attachments

  • IMG_4523.jpg
    IMG_4523.jpg
    73 KB · Views: 67
  • IMG_4526.jpg
    IMG_4526.jpg
    120.9 KB · Views: 65

Raider L

Full Access Member
Joined
Sep 1, 2020
Posts
1,892
Reaction score
994
Location
Shreveport, LA
First Name
William
Truck Year
1974
Truck Model
C10
Engine Size
355
@CRM,

Thank you, but that's not the part that's broken, I have that part, it's the lower part of the instrument panel that mates up to that part you're showing, that got broke. I just wasn't paying attention, and may have been so upset about my truck being broken into that I just thought, "screw it.", and chunked it out!
 

Raider L

Full Access Member
Joined
Sep 1, 2020
Posts
1,892
Reaction score
994
Location
Shreveport, LA
First Name
William
Truck Year
1974
Truck Model
C10
Engine Size
355
@Goldie Driver,

D-A-N-G!! I wonder if the thieves used one of those dent pullers to jerk the key part out of the column? You know like you see on TV, where it takes the guy like two seconds to jerk the thing out and he sticks a screw driver in there and cranks the vehicle. Also, I know the fob sends a signal to the computer, and I think the key has something to do with starting to, I mean obviously turning the ignition switch, but something other than that. I don't really know just stuff I've heard people say. So they brought their own ECM to crank the truck? Man, that's scary that they would be that prepared. It looks like they beat the key part out, or used a big screw driver or something.

How did you friend get his truck back? But, wait, how did they get in the truck?
 
Last edited:

Goldie Driver

Full Access Member
Joined
Mar 19, 2018
Posts
3,925
Reaction score
6,375
Location
Houston, Texas
First Name
Britt
Truck Year
1980
Truck Model
GMC K1500 Suburban
Engine Size
350
@Goldie Driver,

D-A-N-G!! I wonder if the thieves used one of those dent pullers to jerk the key part out of the column? You know like you see on TV, where it takes the guy like two seconds to jerk the thing out and he sticks a screw driver in there and cranks the vehicle. Also, I know the fob sends a signal to the computer, and I think the key has something to do with starting to, I mean obviously turning the ignition switch, but something other than that. I don't really know just stuff I've heard people say. So they brought their own ECM to crank the truck? Man, that's scary that they would be that prepared. It looks like they beat the key part out, or used a big screw driver or something.

How did you friend get his truck back?

Copied from his text :

They had to swap ECU's, they brought their own to swap because the RFID chip in the key is matched to the ECU.

Couldn't ******* believe how easy it was . Pop the radio plate, pull four screws, pull the display back, cut and pull the wires out of the on-star module. I got the videos from Bobby, 1 minute, 31 seconds. Unbelievable.

This was at his work, literally in the parking spot Goldie used to mark. :dogpile:

The police recovered it 11 miles away.
 

Raider L

Full Access Member
Joined
Sep 1, 2020
Posts
1,892
Reaction score
994
Location
Shreveport, LA
First Name
William
Truck Year
1974
Truck Model
C10
Engine Size
355
@Goldie Driver,

Yeah, but how did they get into his truck? You say he was at work so I suppose he left the door unlocked? It was in the parking lot? A minute and a half, sounds like pros. Because ordinary thieves looking for targets of opportunity, an unlocked door, someone left the keys in the ignition, popped in somewhere and left the engine running, etc. wouldn't have the money to have a pre-programmed ECU in their back pocket, and one for a specific vehicle. This is a car thief ring who hand out equipment to those with the money to "buy in". They work for someone who is giving them so much money per vehicle. The more vehicle's they steal the more money they make. When it's over they hand back the ECU's, they're destroyed, and the thieves walk away with a pocket full of money. It's happened here in town a bunch of times. The ring leader is always looking for something specific, whatever it is he's told some bigger outfit wants.

Did they ever catch the guy(s)? Probably not. But what did the thieves do, dump the truck? Did it have something built in that would stop the vehicle a certain distance from where it was stolen? Did On Star have a program that if a system is suddenly disabled they put a tracker on it right then? On Star probably were the ones who disabled the vehicle, if that's what happened. You have to buy that anti-thieft program, if I'm not mistaken. But I don't know how it could have been if the ECU was bypassed. Hmm, don't know.
 

Forum statistics

Threads
41,851
Posts
903,515
Members
33,365
Latest member
rossivey
Top