front fender gap

Disclaimer: Links on this page pointing to Amazon, eBay and other sites may include affiliate code. If you click them and make a purchase, we may earn a small commission.

Doppleganger

Full Access Member
Joined
May 24, 2019
Posts
11,701
Reaction score
54,099
Location
OH-MI: Just like it sounds
First Name
Chris
Truck Year
1985
Truck Model
K20
Engine Size
5.7
Had this same question a few years ago.....thought I had chicom repro parts.....then was told it was all original and fit better than most. lol

You must be registered for see images attach
 

Inman789

Member
Joined
Jan 23, 2022
Posts
47
Reaction score
33
Location
Inman, SC
First Name
Jeff
Truck Year
1973
Truck Model
k10
Engine Size
454
sorry, I misunderstood which picture you were talking about for reference. A lot got lost in translation here. The upside down junk picture is 81 and up, you are correct. I thought you were referring to my first picture in post 1 where I was showing the front gap and A pillar mess. I was only zoomed in on the upside down junk (81 and up) fender to see if there was an easy way to massage those points to bring the front of the fender closer to the center of the truck. I just pulled my fenders off and the front nuts are an integral part of the inner skin, and any tweaking or massaging that is way beyond my skill level.
Went to my local supplier (who restores Camaros, Chevelles and trucks) who I got my doors and bedsides from and ordered a new passenger front fender.
Thanks for everyone's input, I really do appreciate it
 

Randy and Easton

Full Access Member
Joined
Feb 6, 2021
Posts
884
Reaction score
1,245
Location
North Richland Hills, Texas
First Name
Randy
Truck Year
1976
Truck Model
C-10 LWB
Engine Size
350
We played some after the new hood went on… still not right.. frustrating but way down in the list to do….
 

Attachments

  • 8B5A9D0E-4A9D-4EA7-BF42-BC319ABE1B69.jpeg
    8B5A9D0E-4A9D-4EA7-BF42-BC319ABE1B69.jpeg
    115.5 KB · Views: 39
  • 03429917-D220-4A1A-A1B7-49F95BBDB4B6.jpeg
    03429917-D220-4A1A-A1B7-49F95BBDB4B6.jpeg
    165.3 KB · Views: 37
  • A2E2124C-AE6E-42F4-8463-5BDB82D5445C.jpeg
    A2E2124C-AE6E-42F4-8463-5BDB82D5445C.jpeg
    172.1 KB · Views: 41
  • 04AD8B9A-E13F-4EC3-AF7C-422D6B6D5262.jpeg
    04AD8B9A-E13F-4EC3-AF7C-422D6B6D5262.jpeg
    95.2 KB · Views: 39
  • 020D50CD-5BC0-4786-8B18-BFBDCBDEFCF8.jpeg
    020D50CD-5BC0-4786-8B18-BFBDCBDEFCF8.jpeg
    105.8 KB · Views: 38

Octane

Full Access Member
Joined
Dec 31, 2019
Posts
2,004
Reaction score
3,571
Location
Atlanta
First Name
Eddie
Truck Year
1977
Truck Model
K10
Engine Size
350
I thought most all these trucks had crappy fit, and finish from the factory. My 77 certainly does. And it has never been wrecked. So I just go with it.
 

Copymutt

Full Access Member
Joined
Jan 17, 2020
Posts
189
Reaction score
562
Location
Colorado
First Name
Jim
Truck Year
74
Truck Model
K20
Engine Size
350
Late to the party here.
Getting no where trying to align the PS original front fender. Pulled both off for paint. DS back on no issue. PS a choice of 1&3/4” too low at the radiator support or 1&3/4 gap at the bottom of the door. Triangulating from cab hood stops to top of radiator,support shows the 1&3/4 difference side to side.
I’m about to remove the radiator support body mount on PS and open up that cam-o-worms.
Both came off clean w/ no binding. Kept track of how many shims by bolt. All cab and radiator body bushings ok by measurement. Did metal replacement by welding in rust replacement ,but nothing that would warp a panel. Any help would save my sanity.
 

Doppleganger

Full Access Member
Joined
May 24, 2019
Posts
11,701
Reaction score
54,099
Location
OH-MI: Just like it sounds
First Name
Chris
Truck Year
1985
Truck Model
K20
Engine Size
5.7
@Keith Seymore posted the way they did it originally on the assembly line - IIRC involved leaving the radiator support loose whole assembling the front clip. Maybe he'll repeat it here?
 

Scott91370

Full Access Member
Joined
Apr 2, 2018
Posts
926
Reaction score
902
Location
Burleson, Tx
First Name
Scott
Truck Year
1985
Truck Model
Sierra1500
Engine Size
350
Mine, which is all original parts, look similar to posts 1 and 16. The gaps weren't great from the factory.
 

TotalyHucked

Full Access Member
Joined
Feb 24, 2020
Posts
2,667
Reaction score
8,714
Location
Auburn, Georgia
First Name
Zach
Truck Year
1985
Truck Model
Sierra 1500
Engine Size
5.3
Assembling and lining up a front clip can be a maddening experience for sure. The few I've helped with, we always left ALL the bolts very loose (including the rad support bushing/bolts). Start working everything around till you get close and start snugging up hardware a little at a time. Just like bolting down a cylinder head or a wheel, work around all the bolts slowly till you get very close to everything being tight. The last ones you want to tighten are the rad support bushings. But we all know these trucks were never great to start with, you'll never have perfect gaps without adding metal in certain areas and taking away in others.

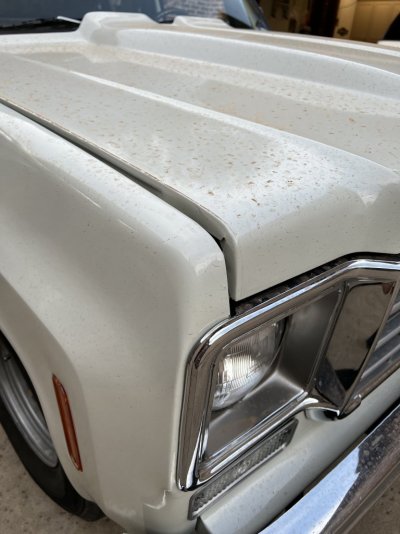
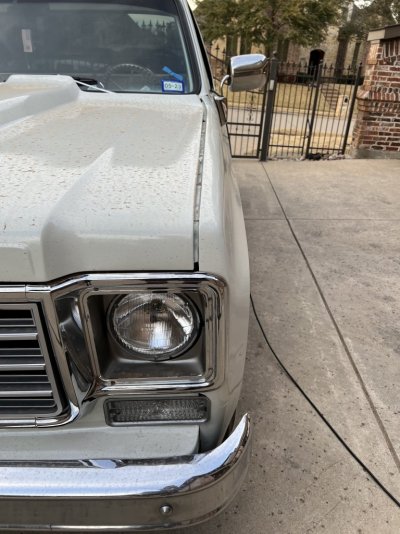
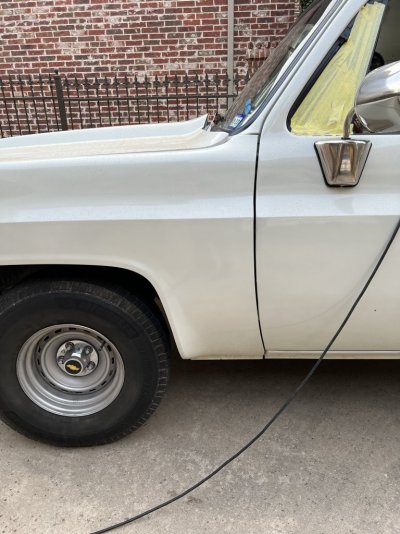
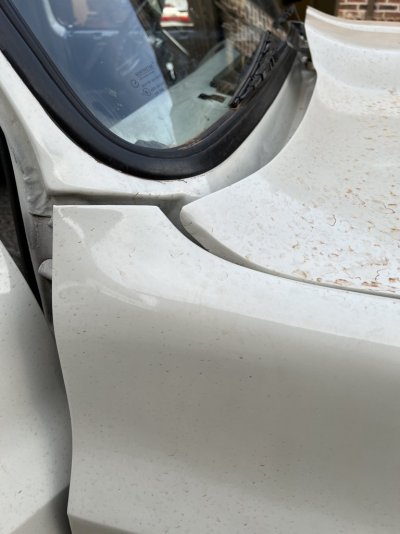
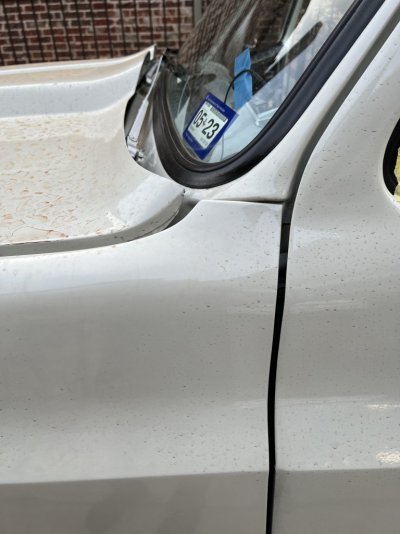
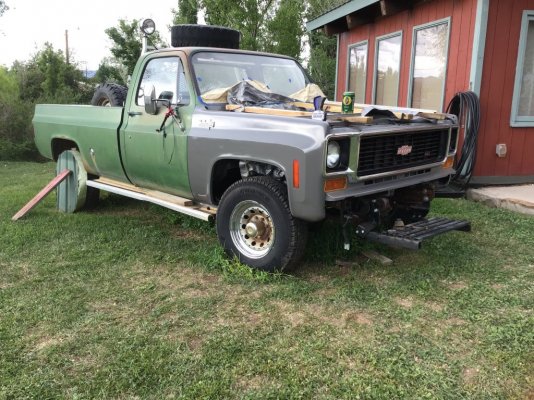
For reference, here's a few pictures of our shop truck ('76) and my personal '85 and their gaps. The got vastly better with the '81-up trucks. You can see how different the 2 sides are at the A-pillar.
You must be registered for see images attach

You must be registered for see images attach

You must be registered for see images attach

You must be registered for see images attach
 

TotalyHucked

Full Access Member
Joined
Feb 24, 2020
Posts
2,667
Reaction score
8,714
Location
Auburn, Georgia
First Name
Zach
Truck Year
1985
Truck Model
Sierra 1500
Engine Size
5.3
You can see the fender to door fitment, the driver's side as never been apart and the doors shut perfect. You can see how the gaps still suck

You must be registered for see images attach

You must be registered for see images attach


You are right about where they meet the core support, there's no adjustment there unfortunately.
You must be registered for see images attach
 

TotalyHucked

Full Access Member
Joined
Feb 24, 2020
Posts
2,667
Reaction score
8,714
Location
Auburn, Georgia
First Name
Zach
Truck Year
1985
Truck Model
Sierra 1500
Engine Size
5.3
My hood has been off but nothing else on the front clip/cab have ever been taken apart. My hood does need a little adjustment
You must be registered for see images attach

You must be registered for see images attach

You must be registered for see images attach

You must be registered for see images attach
 

TotalyHucked

Full Access Member
Joined
Feb 24, 2020
Posts
2,667
Reaction score
8,714
Location
Auburn, Georgia
First Name
Zach
Truck Year
1985
Truck Model
Sierra 1500
Engine Size
5.3
You must be registered for see images attach

You must be registered for see images attach
 

Copymutt

Full Access Member
Joined
Jan 17, 2020
Posts
189
Reaction score
562
Location
Colorado
First Name
Jim
Truck Year
74
Truck Model
K20
Engine Size
350
For better or worse I removed the radiator support bushing on the PS. Very close to being true gaps now! Until you attach the bumper. I’ll continue to fuss w/ it including loosening the DS rad support bushing. Bugs me that everything was good B4 I pulled the fenders.
Being a plow truck I smacked a few ice piles, but I don’t find any sign of bent frame.
You must be registered for see images attach
 

Copymutt

Full Access Member
Joined
Jan 17, 2020
Posts
189
Reaction score
562
Location
Colorado
First Name
Jim
Truck Year
74
Truck Model
K20
Engine Size
350
Making progress, both fenders have decent gaps. Hood is drying, but will require more work. Didn't see the hail damage. Fitment of turn lenses couldn't be much worse. I’ll section out the supporting valance stand offs to bring into alignment.
 

Attachments

  • IMG_3246.jpeg
    IMG_3246.jpeg
    96.2 KB · Views: 32
  • IMG_3244.jpeg
    IMG_3244.jpeg
    256.6 KB · Views: 32
  • IMG_3243.jpeg
    IMG_3243.jpeg
    189.7 KB · Views: 32

Latest posts

Forum statistics

Threads
42,029
Posts
907,698
Members
33,522
Latest member
Laqota
Top