Drip Rail Starting to Detach

Disclaimer: Links on this page pointing to Amazon, eBay and other sites may include affiliate code. If you click them and make a purchase, we may earn a small commission.

JamesSam

Full Access Member
Joined
Feb 15, 2023
Posts
1,159
Reaction score
3,139
Location
VA
First Name
Sam
Truck Year
1987
Truck Model
Silverado V10
Engine Size
5.7 L 350 v8
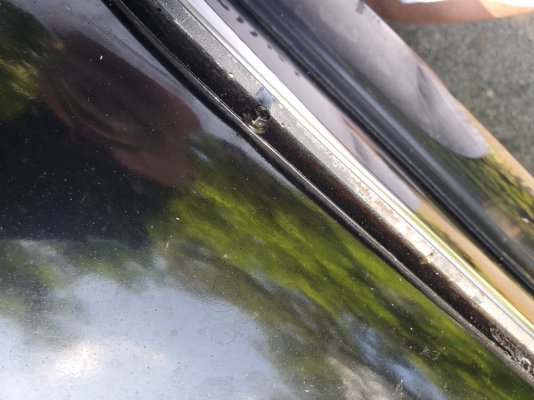
It has been raining where I am in VA like a mother the last couple weeks. One day recently after the rain and a good forecast of 2 sunny days I gave the truck a proper wash to have a drive. When I jumped on the side step to wax the roof I noticed sun shining through behind the drip rail molding... see image...Is this because I need new molding retainer or should I seal it up with something? Or do I just need to tighten up the screws?
You must be registered for see images attach
 

Attachments

  • 20230626_162944.jpg
    20230626_162944.jpg
    152.6 KB · Views: 48

Bennyt

Full Access Member
Joined
May 17, 2019
Posts
1,042
Reaction score
1,459
Location
Surprise
First Name
Ben
Truck Year
1977
Truck Model
C10
Engine Size
350
I'd start by tightening the screws. Since you are only snugging up a bit you should be able to get an open-ended wrench in. Other than cosmetics, I don't think you'll notice a difference.

If you decide to take off, you'll need to pull the chrome/ SS trim off the actual drip rail and then you can use a socket.

I bought new driprails and they didn't come with any sealant, so I used some 3M tape to seal/ adhere along with the screws.
 

Camar068

Supporting Member
Supporting Member
Joined
Feb 5, 2014
Posts
4,158
Reaction score
3,018
Location
Kentucky
First Name
David
Truck Year
1986
Truck Model
K10/LM7 5.3/4L60e/np208/3.73/32"
Engine Size
10 yrs Air Force
yes get a small wrench set and tighten them. When I went to remove them, I didn't have what I needed and had to borrow my small set from work. I forget the size. No you can't get a socket on them....at least mine anyway lol.
 

PrairieDrifter

Full Access Member
Joined
Dec 28, 2014
Posts
3,468
Reaction score
4,590
Location
North Dakota
First Name
Mason
Truck Year
84,79,77,70,48
Truck Model
Suburban k10, bonanza k10, c30 C&C, c10, gmc 1/2ton
Engine Size
350, 350, 350, 350, 350
I was able to get a socket on most of mine. They had some type of seal on them from factory. I just used a little bit of outdoor silicone on the bottoms of em and screwed em back on.

You will leak water like that, it really does help that it's sealed underneath.
 

JamesSam

Full Access Member
Joined
Feb 15, 2023
Posts
1,159
Reaction score
3,139
Location
VA
First Name
Sam
Truck Year
1987
Truck Model
Silverado V10
Engine Size
5.7 L 350 v8
Yes... the "screws" have a nut type head. The spaces that are seperating from the cab look like there is some type of soft material that has dissipated from age/elements.
From what I have seen maybe this used to be the material the retainer under the molding used to be made of?
 

Grit dog

Full Access Member
Joined
May 18, 2020
Posts
5,998
Reaction score
9,969
Location
Washington
First Name
Todd
Truck Year
1986
Truck Model
K20
Engine Size
454
A regular open end works on them.
If they’re not stripped out, just snug them up for now. Very gently.
Not hard to remove them and you could put a new seal in there. I’d use some double sided trim tape and make sure you stick em back in the right spot the first time. Lol
Actually, leave the backing on the truck side except cut and fold out a small tag of the backing at each screw hole. Then get all the screws started without it all sticking to the truck. Then peel out the backing before tightening the screws.
 

JamesSam

Full Access Member
Joined
Feb 15, 2023
Posts
1,159
Reaction score
3,139
Location
VA
First Name
Sam
Truck Year
1987
Truck Model
Silverado V10
Engine Size
5.7 L 350 v8
I'd start by tightening the screws. Since you are only snugging up a bit you should be able to get an open-ended wrench in. Other than cosmetics, I don't think you'll notice a difference.

If you decide to take off, you'll need to pull the chrome/ SS trim off the actual drip rail and then you can use a socket.

I bought new driprails and they didn't come with any sealant, so I used some 3M tape to seal/ adhere along with the screws.
A regular open end works on them.
If they’re not stripped out, just snug them up for now. Very gently.
Not hard to remove them and you could put a new seal in there. I’d use some double sided trim tape and make sure you stick em back in the right spot the first time. Lol
Actually, leave the backing on the truck side except cut and fold out a small tag of the backing at each screw hole. Then get all the screws started without it all sticking to the truck. Then peel out the backing before tightening the screws.

So the right thing to do would be remove the chrome trim, take out all the screws, put the 3M tape in with each screw that goes back in, put the chrome trim back on, and then seal the spaces with some type of caulk or seam sealer...correct?
 

Radiohead

That guy on the Columbia
Joined
Mar 17, 2022
Posts
1,851
Reaction score
6,015
Location
Low Earth Orbit where it's safer
First Name
Eric
Truck Year
MCMLXXIX
Truck Model
C-20 Silverado Camper Special
Engine Size
454 crazy cubes, or 7.4 luscious litres
Yes. Sort of.
And hope none of the screw holes decides to 'screw' with you.

This is one job where a light touch brings all the smiles.

The 3M tape is the sealer in your presentation
 

JamesSam

Full Access Member
Joined
Feb 15, 2023
Posts
1,159
Reaction score
3,139
Location
VA
First Name
Sam
Truck Year
1987
Truck Model
Silverado V10
Engine Size
5.7 L 350 v8
Yes. Sort of.
And hope none of the screw holes decides to 'screw' with you.

This is one job where a light touch brings all the smiles.

The 3M tape is the sealer in your presentation
Radiohead, Is there a specific 3M tape you would recommend?
 

JamesSam

Full Access Member
Joined
Feb 15, 2023
Posts
1,159
Reaction score
3,139
Location
VA
First Name
Sam
Truck Year
1987
Truck Model
Silverado V10
Engine Size
5.7 L 350 v8
Radiohead, Is there a specific 3M tape you would recommend?
I have seen stuff that is not the 3M brand at the car parts places and other stuff at hardware stores buy 3M and other brands. What has worked best for you? My truck is black and I have seen this color by a few brands..
 

Radiohead

That guy on the Columbia
Joined
Mar 17, 2022
Posts
1,851
Reaction score
6,015
Location
Low Earth Orbit where it's safer
First Name
Eric
Truck Year
MCMLXXIX
Truck Model
C-20 Silverado Camper Special
Engine Size
454 crazy cubes, or 7.4 luscious litres
I'm not sure which particular part number, hope someone else has that info. I figure as long as it's not a cellular type of double sided tape it should be ok. Even a thin rubber strip, pre holed and juiced up with a light smear of rtv would seem better than anything with a less solid construction. Mine are looking really hard and I haven't gotten around to it yet, so I'm watching the thread like I suspect many are.
 

Grit dog

Full Access Member
Joined
May 18, 2020
Posts
5,998
Reaction score
9,969
Location
Washington
First Name
Todd
Truck Year
1986
Truck Model
K20
Engine Size
454
The tape should be relatively thin. Like for well, mounting automotive trim.
And not wider than the flange on the gutters.
OE was/is black although not double sided tape as mine came off 90% stuck to the trim and definitely not bonded to the truck.
Idk if I mentioned it earlier, I did not stick mine back on after painting the truck. There was enough original on them to keep it from being metal to metal.
So I painted the screws and put a small dab of rtv in each location before screwing them back in.
Honestly if they’re in good shape, the screws may not even be needed if you use double sided tape.

3M. Not the place to save $5 on no name tape. Amazon next day at your door
 

Latest posts

Forum statistics

Threads
42,156
Posts
910,232
Members
33,649
Latest member
MikeD
Top