Brake shoe placement?

Disclaimer: Links on this page pointing to Amazon, eBay and other sites may include affiliate code. If you click them and make a purchase, we may earn a small commission.

Joined
Mar 27, 2023
Posts
35
Reaction score
10
Location
Richmond, VA
First Name
Andrew
Truck Year
1987
Truck Model
R10
Engine Size
305
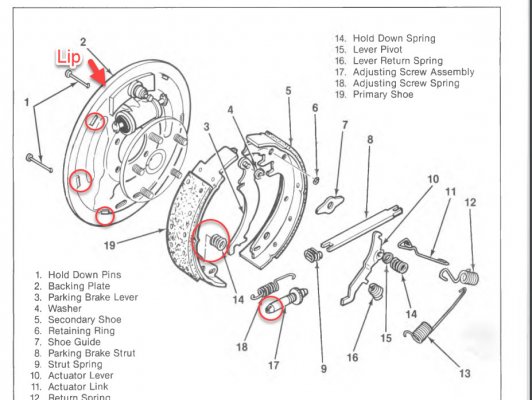
What's up square body friends? So, I have been enjoying myself doing my first drum brake job on my 87 R10. I have found amazing videos on Youtube and I'm about 90% there but that 10% is driving me nuts. A few things eating at me.....

1) Do the shoes sit deep in the lip of the backing plate or do they need to come out from that and rest on those contact points? In my mind, if they sit in the lip, they will not expand out and contact the drum and/or the lip will carve a groove in the shoes.

2) I am having trouble getting my old pins to go all the way into the brake cylinder so they are just kind of hanging there while I try to install the shoes. Is that due to pressure? Is there a way to relieve it so the pins go all the way in? Will it just sort itself out with use?

3) I have installed those two pins that you push through the back of the backing plate and hold down with springs. The one on the right seems nice and snug but the one on the left doesn't seem quite as tight. Same pin, same spring. What could I be doing wrong there?

4) I also want to replace all the brake fluid in the process. Is it true that I shouldn't let the master cylinder go completely dry in the process?

5) In part 17, is there a trick to getting that circled part to screw out?
 

Attachments

  • brakes.jpg
    brakes.jpg
    109.4 KB · Views: 33

PrairieDrifter

Full Access Member
Joined
Dec 28, 2014
Posts
3,463
Reaction score
4,577
Location
North Dakota
First Name
Mason
Truck Year
84,79,77,70,48
Truck Model
Suburban k10, bonanza k10, c30 C&C, c10, gmc 1/2ton
Engine Size
350, 350, 350, 350, 350
1- They sit up on those contact patches, you need a small amount of lube on those spots.

2- They just kind of hang there. Nothing you can do. You'll feel them bottom out solid, they do slide in a little bit. They're pretty solid when everything is together.

3- They should be different springs. one has the adjuster arm assembly on the shoe.

4- Try your very best to not let it go dry, it's not the end of the world, just means more work bleeding. It's not very hard to keep it topped off, you can bleed a good little bit without drying the master. Trickier when wanting to change all the fluid.

5- A couple good pliers and they just unthread. Maybe a little heat from a torch.
You must be registered for see images attach
 
Last edited:

fast 99

Full Access Member
Joined
Dec 31, 2021
Posts
1,629
Reaction score
2,207
Location
Spokane, Washington
First Name
Brian
Truck Year
81,85
Truck Model
K20
Engine Size
350
Install the hold-down pins then line up shoe with wheel cylinder rod and push it in. There is a light spring behind the cylinder piston, while holding cylinder rod in install brake return spring. Keep in mind self-adjuster arm is under anchor spring on one side. Shown in above picture. It's kind of a fire drill lining all of it up but after doing a couple time it's pretty easy. You will need a brake spring pliers. Forget the bleeding until shoes are on. The gravity bleed until clean fluid comes out. Master will need to be refilled a couple times, do not let it run dry. Larger/longer shoe goes on rear. Use high temperature grease on shoe pads and self-adjuster threads. Install the lower self-adjuster spring them the adjuster. Just pull on one of the shoes to spread them out it will slide in fairly easily. Installed wrong, adjuster system will be inoperable. Self-adjuster should be screwed all the way in for assembly then adjusted out to fit drum.

For future reference if unsure how brakes are assembled leave one side together. After 30 years I still do that occasionally oddball overdesigned vehicles.
 
Joined
Mar 27, 2023
Posts
35
Reaction score
10
Location
Richmond, VA
First Name
Andrew
Truck Year
1987
Truck Model
R10
Engine Size
305
I think I am good now and thank you for the replies! The picture gave me that extra confidence. It is a lot sturdier now that it is all together. Now I am just struggling to get the drum over all of it.

Also, there is a little brass cup that goes in the hole on the left, under the yellow spring. I could not get one to fit in the hole under the green spring. Is that a problem?
 

fast 99

Full Access Member
Joined
Dec 31, 2021
Posts
1,629
Reaction score
2,207
Location
Spokane, Washington
First Name
Brian
Truck Year
81,85
Truck Model
K20
Engine Size
350
Many times, those holes in new offshore shoes need to be cleaned out or deburred.
 

PrairieDrifter

Full Access Member
Joined
Dec 28, 2014
Posts
3,463
Reaction score
4,577
Location
North Dakota
First Name
Mason
Truck Year
84,79,77,70,48
Truck Model
Suburban k10, bonanza k10, c30 C&C, c10, gmc 1/2ton
Engine Size
350, 350, 350, 350, 350
I think I am good now and thank you for the replies! The picture gave me that extra confidence. It is a lot sturdier now that it is all together. Now I am just struggling to get the drum over all of it.

Also, there is a little brass cup that goes in the hole on the left, under the yellow spring. I could not get one to fit in the hole under the green spring. Is that a problem?
I wanna say only the yellow springs get one. But now I'm blanking on the spot lol. Check the kit or the parts you have and see how many are there. If there are four, two of them should have a different "pin" size I believe.

To slip the drum on when everything is new, you have to back the adjuster all the way down.
 

Ricko1966

Full Access Member
Joined
Apr 11, 2017
Posts
4,067
Reaction score
5,918
Location
kansas
First Name
Rick
Truck Year
1975
Truck Model
c20
Engine Size
350
How are you planning on getting the old fluid out?
 
Joined
Mar 27, 2023
Posts
35
Reaction score
10
Location
Richmond, VA
First Name
Andrew
Truck Year
1987
Truck Model
R10
Engine Size
305
Many times, those holes in new offshore shoes need to be cleaned out or deburred.
I wanna say only the yellow springs get one. But now I'm blanking on the spot lol. Check the kit or the parts you have and see how many are there. If there are four, two of them should have a different "pin" size I believe.

To slip the drum on when everything is new, you have to back the adjuster all the way down.
It's all back together. The adjuster is all the way down and I even opened the bleeder screw to get the pins in the wheel cylinder pushed in further. Is there another tip for getting the drum back on besides beating the ever loving **** out of the old one with a hammer in frustration?
 

fast 99

Full Access Member
Joined
Dec 31, 2021
Posts
1,629
Reaction score
2,207
Location
Spokane, Washington
First Name
Brian
Truck Year
81,85
Truck Model
K20
Engine Size
350
DO NOT beat it on. Provide a picture of the brakes. Maybe we can see something wrong. Correct brake drum?
 

85K304SPD

Full Access Member
Joined
Mar 29, 2022
Posts
396
Reaction score
591
Location
Las Cruces, NM
First Name
Richard
Truck Year
1985
Truck Model
K30
Engine Size
383
Turn the star adjuster all the way in. If it still doesn't fit, you have something wrong. Please show pictures to get help.
 

PrairieDrifter

Full Access Member
Joined
Dec 28, 2014
Posts
3,463
Reaction score
4,577
Location
North Dakota
First Name
Mason
Truck Year
84,79,77,70,48
Truck Model
Suburban k10, bonanza k10, c30 C&C, c10, gmc 1/2ton
Engine Size
350, 350, 350, 350, 350
As mentioned above. As well as are the shoes correct? Paired correctly? Correct position? Pics.
 

Ricko1966

Full Access Member
Joined
Apr 11, 2017
Posts
4,067
Reaction score
5,918
Location
kansas
First Name
Rick
Truck Year
1975
Truck Model
c20
Engine Size
350
Hey there. I was planning on bleeding both sides and replacing the fluid in the master cylinder a little at a time until it runs clean.
There are several ways of bleeding brakes,gravity bleed,pump and bleed,pressure bleed,vacuum bleed,injector bleed. I've probably forgotten 1 or 2 .
 

scrap--metal

Full Access Member
Joined
Sep 15, 2021
Posts
678
Reaction score
1,266
Location
MN
First Name
Calvin
Truck Year
'85, '81
Truck Model
K10, K20
Engine Size
305, 350
@305_Square_Body Did you get it figured out over the weekend?

It's all back together. The adjuster is all the way down and I even opened the bleeder screw to get the pins in the wheel cylinder pushed in further. Is there another tip for getting the drum back on besides beating the ever loving **** out of the old one with a hammer in frustration?

I went through this struggle on my umpteenth brake shoe replacement last year... Undo the brake line from the wheel cylinder to get the pins to fully compress within the wheel cylinder. Then the shoes will come in and the drum will fit.

I don't understand why having the bleeder screw open wouldn't accomplish the same thing, but this was my experience on my Monte last spring.
 
Joined
Mar 27, 2023
Posts
35
Reaction score
10
Location
Richmond, VA
First Name
Andrew
Truck Year
1987
Truck Model
R10
Engine Size
305
@305_Square_Body Did you get it figured out over the weekend?


I went through this struggle on my umpteenth brake shoe replacement last year... Undo the brake line from the wheel cylinder to get the pins to fully compress within the wheel cylinder. Then the shoes will come in and the drum will fit.

I don't understand why having the bleeder screw open wouldn't accomplish the same thing, but this was my experience on my Monte last spring.
A guy helped me out. Had to grind down the bar that fits between the shoes, that is under the wheel cylinder.
 

Latest posts

Forum statistics

Threads
42,137
Posts
909,886
Members
33,633
Latest member
satansdad
Top