Made a new tool

Disclaimer: Links on this page pointing to Amazon, eBay and other sites may include affiliate code. If you click them and make a purchase, we may earn a small commission.

Mr Clean

Super Moderator
Staff member
Marine Corps Moderator
Joined
Aug 18, 2010
Posts
11,315
Reaction score
13,896
Location
North East Texas
First Name
Shawn
Truck Year
1982 & 1985
Truck Model
K10 Extra Cab w/ Proper SWB, & 85 K5 Blazer
Engine Size
454 BBC, & 383 Stroker
I love to build my own tools. Built several over the years. I wanted a nice BIG bench vice that I could really hammer on, and I didn't want to spend $1000+ dollars, so I built my own. Expensive part was the 1" threaded rod and coupling nut. Got scrap metal for it from stuff I had lying around and from a welding shop. It's a little slow to operate with standard course threaded rod, so I left a nut on the end so I could zip it in and out with my impact. I use a 1 1/2" wrench when I really want to clamp down
You must be registered for see images attach
Dude that is awesome...:cheers:
 

Big Ray

Full Access Member
Joined
Oct 14, 2022
Posts
1,243
Reaction score
4,263
Location
North Carolina
First Name
Ray
Truck Year
1979
Truck Model
K5
Engine Size
400
I have a holley with pretty bad corrosion(galvanic, aluminum parts, i think) and the carb is a double pumper, older one, and looks nice on the top/outside, but the baseplate wouldnt be a flatmachined surface and the butterflys are pretty bad(I dont think thats realistic to repair?) so the idea of a carb stand is pretty cool.. and I could display it maybe.. polish up the pretty parts?
You must be registered for see images attach

If its not realistically repairable or of any definite use value then I think it would look pretty nice cleaned up at least and a conversation piece?
It it's not salvageable it'll make fine garage art!
 

AuroraGirl

Full Access Member
Joined
Sep 8, 2019
Posts
10,710
Reaction score
8,239
Location
Northern Wisconsin
First Name
Taylor
Truck Year
1978, 1980
Truck Model
K10, K25
Engine Size
400(?), 350
It it's not salvageable it'll make fine garage art!
True I like the Holley logo, vintage design and then of course it could and will polish nicely and double pumpers nice and the darker aluminum look vs the color qjets take on and vs the chromy of edelbrocks it feels subdued too
 

Ricko1966

Full Access Member
Joined
Apr 11, 2017
Posts
9,955
Reaction score
19,109
Location
kansas
First Name
Rick
Truck Year
1975
Truck Model
c20
Engine Size
350
Tools for drilling sbc fuel pump pushrod. Jigs Ive found on the internet for anyone that wants to try drilling a fuel pump rod.Turns out its hit and miss on how later model blocks were finished ,so the jig that works for 1,may not work on another.It seems some have bolt holes and a partially drilled push rod hole,some have bolt holes but no pushrod hole at all some have no bolt holes or pushrod hole. That last jig locates on the timing cover pad.All could be fabbed using a bare block with the pushrod hole to reverse engineer the pushrod angle and bolt locations.The L shaped jig for drilling the bolt holes could easily be fabbed using a piece of steel strap approx.3 inches longer than the aluminum pictured with a 3x3 piece of angle welded or bolted to it. The jig for drilling the push rod hole is self explanatory.
 

Attachments

  • Screenshot_2022-12-14_011945.jpg
    Screenshot_2022-12-14_011945.jpg
    69.5 KB · Views: 94
  • Screenshot_2022-12-14_014903.jpg
    Screenshot_2022-12-14_014903.jpg
    50 KB · Views: 96
Last edited:

Ricko1966

Full Access Member
Joined
Apr 11, 2017
Posts
9,955
Reaction score
19,109
Location
kansas
First Name
Rick
Truck Year
1975
Truck Model
c20
Engine Size
350
Okay,I've talked about this before but finally got around to taking a picture. That's a homemade noodles light/test light. That's about 12ft of 2 conductor speaker wire,2 leds twisted in opposite polarity,remember leds are polarity sensitive, they won't light if they get power reversed that's why two twisted in opposite polarities. 2 T pins. You slide the t pins in the backside of the connector you don't even have disconnect anything,string the wire somewhere safe and hold the bulb end down with the wiper blade. Now you can see from the drivers seat if you have a working circuit,you can even test drive for intermittent problems. If I had been thinking I would have used 2 different colors,hooked it both ways and noted which light lit with power in which direction,so I'd know which side was power and what side was ground. Ignore the bread twist tie,it's just holding the bundle. I need 2 new LEDs and radio shack is gone,and the ones I bought from. Ebay are junk. Where do I go? P.S.. it's LED so it's safe for the ECM.
 

Attachments

  • Screenshot_2023-07-04_203249.jpg
    Screenshot_2023-07-04_203249.jpg
    47.6 KB · Views: 103

HotWheelsBurban

Full Access Member
Joined
Mar 31, 2023
Posts
3,907
Reaction score
11,023
Location
Houston, Texas
First Name
Carol
Truck Year
1990
Truck Model
R2500 Suburban
Engine Size
350
Left to right.

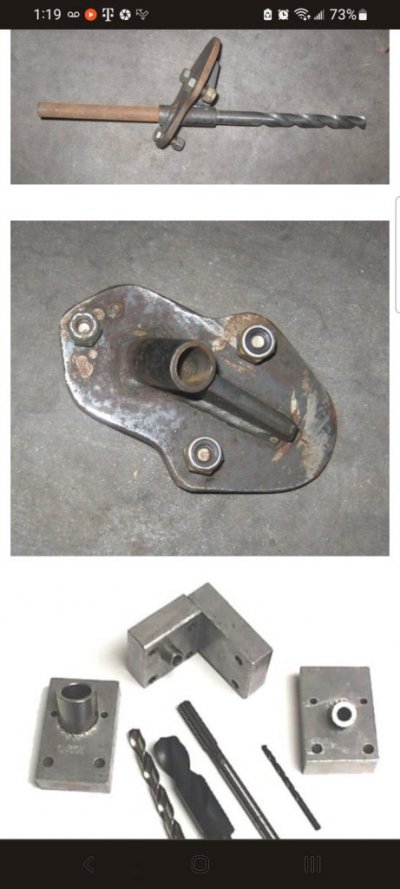
Fancy bolt ground down to 3/8" square for turning sockets in really tight places, often with the socket cut short on a lathe. Has seen plenty of use since the initial job it was made for.

Socket turned down to fit exhaust pipe bolts on a 1997 Taurus when I changed the oil pan gasket. Not used on anything since.

1980's Buick V6 Diesel injector nut wrench. Has come in handy without further modification on a lot of impossible to get to with normal tools 5/8" stuff. Somewhere I also have the 1980's Buick V6 Diesel intake runner head bolt access plug 5/8" to 9/16" male to male hex tool. Originally welded a 9/16" nut onto a 9/16" bolt. Twisted off like a wet noodle. So I super glued a 9/16" nut onto the head of a 5/8" bolt then used that as a guide to grind the 5/8" head down to 9/16" then welded a 5/8" nut onto the threaded end. The plugs came out easy, and I've used it a few times on threaded plugs on other things. The car's owner had head gaskets replaced but the numpty that changed them didn't get the heads quite tight enough and one injector nut was a tad loose, causing a little leak and a knock and steam out the exhaust. Those tools were done in the 1980's.

Don't recall what the 7/8" wrench was bent up for, but it does get pressed into use on occasion and IIRC has been 'torch modified' more than once.

The last item, I have no idea for what I needed that size socket with two little nubs on the end, but I'm sure it was important because I gave it a spritz of gold paint.

There have been many others over the years, usually crafted out of various bits and bobs of bolts, nuts, and pieces of metal. Mostly modified again for the next one off need and eventually either scrapped or made a permanent part of something. C10MixMaster's transmission tools are pure luxury compared to what I've used on automatic clutch packs. A curved washer off a Mustang II lower arm strut bushing, a length of 1/2" threaded rod and two nuts, a piece of flat metal with a hole in the middle and both halves of a slightly flattened old crankshaft bearing. Hold the rod in the bench vise, assemble everything onto it with the bearing halves adjusted for access if it's an inside snap ring, turn top nut until things are loose enough to get the rings out.

Similar tale with a GM steering wheel lock plate compressor. Cut hole in middle of thick enough flat steel, heat and bend ends down. Make the ends just the right height to where the nut will screw on a bit over one turn so when it's run down to compress the spring there's enough room to get a couple of picks in at the ring. Probably my most used homemade tool.

If'n you don't know, there's a lot of interchangeable parts between 1980's GM and MoPar steering columns. The four mounting bolt holes on the bottom are the same. If you don't care about having a steering lock you can toss the plate and a GM wheel and horn contact ring fit right onto a MoPar column. Did that in a 1941 Hudson pickup hotrod with a 1985 Cimarron wheel on a mid 80's MoPar RWD (IIRC New Yorker) column and used a Chevette column mount to attach it to the MoPar pedal and brake booster support. No idea *why* I'd kept that Chevette steering column for so long but it finally got to go buh-bye after donating the mount that was on it. The reason for the Cimarron wheel was because it was an inch less diameter and a lot flatter, very important in a 1941 Hudson pickup cab that is just the front half of a sedan when they should have been lopping the back ends off coupes or broughams. (But that's how all the car chassis 1930's and 1940's pickups were done, so Hudson did it too.)

You must be registered for see images attach
IIRC Saginaw built the tilt columns for Mopar.....I know the ones I've been in look really similar.
 

Hunter79764

Full Access Member
Joined
Sep 1, 2021
Posts
529
Reaction score
930
Location
Grand Prairie, TX
First Name
Shawn
Truck Year
1987
Truck Model
Suburban V20
Engine Size
350
I need 2 new LEDs and radio shack is gone,and the ones I bought from. Ebay are junk. Where do I go? P.S.. it's LED so it's safe for the ECM.
I get everything from Amazon... Something like this might be easiest. If you wanted a mini project, you can get the bare LED's and a handful of resistors and make a Christmas Tree style light that shows you if you have 4v, 9v, 12v or 14v (I'm just throwing out some levels that might be useful) and which polarity it is.

I've rigged up similar setups but it's always been temporary. I ought to do like you have here and make a permanent tool. Good idea.


Ricko1966

Full Access Member
Joined
Apr 11, 2017
Posts
9,955
Reaction score
19,109
Location
kansas
First Name
Rick
Truck Year
1975
Truck Model
c20
Engine Size
350
I get everything from Amazon... Something like this might be easiest. If you wanted a mini project, you can get the bare LED's and a handful of resistors and make a Christmas Tree style light that shows you if you have 4v, 9v, 12v or 14v (I'm just throwing out some levels that might be useful) and which polarity it is.

I've rigged up similar setups but it's always been temporary. I ought to do like you have here and make a permanent tool. Good idea.

Thank you.
 

Ricko1966

Full Access Member
Joined
Apr 11, 2017
Posts
9,955
Reaction score
19,109
Location
kansas
First Name
Rick
Truck Year
1975
Truck Model
c20
Engine Size
350
I was putting a charger up the other day and didn't know if everybody knew this trick. You could use napkin rings or short pieces of pcv but the toilet paper tubes are fancy enough for me. I like it cause I can just pull the cord and I've got it ,and putting it back up is easy,no looking for tape,no having tangled cords next time you go to use it.
 

Attachments

  • Screenshot_2023-07-06_225900.jpg
    Screenshot_2023-07-06_225900.jpg
    114.5 KB · Views: 109
Last edited:

Copymutt

Full Access Member
Joined
Jan 17, 2020
Posts
236
Reaction score
714
Location
Colorado
First Name
Jim
Truck Year
74
Truck Model
K20
Engine Size
350
Forge and first tool it made.
tongs have a habit of poor grasp on hot steel. Mig welded old file faces on working bite.
You must be registered for see images attach
 

Copymutt

Full Access Member
Joined
Jan 17, 2020
Posts
236
Reaction score
714
Location
Colorado
First Name
Jim
Truck Year
74
Truck Model
K20
Engine Size
350
Stir plate for yeast propagation.
You must be registered for see images attach
 

Forum statistics

Threads
48,419
Posts
1,067,016
Members
42,807
Latest member
bajadiver
Top