Tire carrier and HiLift...

Disclaimer: Links on this page pointing to Amazon, eBay and other sites may include affiliate code. If you click them and make a purchase, we may earn a small commission.

8T6K5

Full Access Member
Joined
Jun 22, 2012
Posts
1,128
Reaction score
112
Location
AZ
First Name
Jerry
Truck Year
1986
Truck Model
K5
Engine Size
L98 350 TPI
So Im set to head to the other side of town tomorrow afternoon for a CL deal. Im trading a sub box with 2 12's and a 360W Alpine amp for a Fab-Tech bed mount spare tire carrier and a 48" cast HiLift.

Plan is to pull the rear seat and intsall the mount inside the cab, up towards the console. Im sure a few of you are asking WTF? Why? The K5 is not my DD, more of a grocery getter, tailgating, whatever. I have another ride available if I ever need to transport more than 2 people.

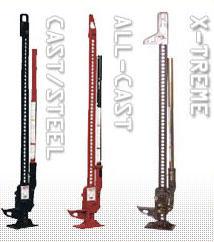
Second half of my plan is to mount a 48" (60lbs?) HiLift to the pass side panel. I pulled it off today knowing that it wouldnt hold with out help. I pulled a panel off today and discovered there's about a 1" lip on the rail. I figure I'll make a template and back the panel with some 1/4 - 1/2" plywood with a 1" reveal and stick that under the lip. So basically my panel will be 1/4 - 1/2".

Will probably need to buy longer bolts for the mounts, but after I mark my mounts Ill run a second strip of plywood across them, probably like 6"X24". Im also going to buy all new screws from the panel about 1/4" longer too. That should hold a 60lb hilift...???

I figure I may as well stuff some fiberglass insulation back there as well.

If it works out Ill prep the other side for what ever....a wet bar maybe?

This is as close as I can get to describing what I want to do... my tire will not be nearly as high, and imaging a HiLift on the pass side rear panel..

You must be registered for see images attach


...are those panels cherry wood?

Just a few more pics of the beautiful 72' K5

You must be registered for see images attach


That exhaust the the Bees Knees!!!!! I will go out of my way to have that on mine when the time comes.

You must be registered for see images attach
 

89Suburban

Supporting Member
Supporting Member
Joined
Dec 7, 2010
Posts
24,545
Reaction score
5,862
Location
Southeast PA
First Name
Paw Paw
Truck Year
2007
Truck Model
Chevrolet Tahoe LT
Engine Size
5.3, 4WD
JCW sells those pipes.
 

crazy4offroad

Equal Opportunity Destroyer
Joined
Jul 30, 2010
Posts
8,468
Reaction score
1,070
Location
West BY-GOD Virginia
First Name
Curt
Truck Year
1979
Truck Model
K-10
Engine Size
350/SM465/NP205
I have the 60" Hi-Lift and it is more in the neighborhood of 45 to 50#. I fabricated some mounts out of heavy gauge sheetmetal to stand the jack out a couple inches from the bedside, with a bolt sicking out welded in place, and use wingnuts to secure it in place. Each mount is held to the bedside with 6 self-drilling sheetmetal bolts. It may be overkill but I rest easier knowing they aren't coming off. My only concern would be how hard you 'wheel. Would ~40# of metal jarring around be likely to pull loose from plywood? Likely, with time.

By the way that '72 is gorgeous, slathered in awesomeness. I have a single bit axe I'm also wanting to mount. Chose single bit so the back of the axe can be used as a large hammer, which came in real handy once for straightening a friend's bent wheel, bent so severely it was hitting the tierod. I also want to mount a trench shovel. And another thing that would be handy to have is a piece of steel at least 12"x12"x1/8" or a little thicker, since the Hi-lift jack's footprint is so small it WILL sink in soft soil trying to jack up your rig. I like the plans you got, cant wait to see them progress!
:waytogo:
 

8T6K5

Full Access Member
Joined
Jun 22, 2012
Posts
1,128
Reaction score
112
Location
AZ
First Name
Jerry
Truck Year
1986
Truck Model
K5
Engine Size
L98 350 TPI
I fabricated some mounts out of heavy gauge sheetmetal to stand the jack out a couple inches from the bedside, with a bolt sicking out welded in place, and use wingnuts to secure it in place. Each mount is held to the bedside with 6 self-drilling sheetmetal bolts.

Sounds like the ones I intend to use.....

You must be registered for see images


Not having a welder limits my ability to fab somethiing more stout. Ha, I just thought of something to add....

I might be over thinking this and will probably spend more hours with it than I need to, but....keeps me busy.

BTW, dont wheel nearly as hard as I imagine you do. Matter of fact not much at all.
 
Last edited:

Driver4r

Full Access Member
Joined
Jun 21, 2012
Posts
3,087
Reaction score
40
Location
Nebraska
First Name
Trevor
Truck Year
76,74
Truck Model
k10,c20
Engine Size
355/th350/np203, 454/th350/ff-rear
no offence but whats a high-lift?
 

bucket

Super Moderator
Staff member
Super Moderator
Joined
Aug 3, 2010
Posts
29,165
Reaction score
24,183
Location
Usually not in Ohio
First Name
Andy
Truck Year
'77, '78, '79, '84, '88
Truck Model
K5 thru K30
Engine Size
350-454
Hi-Lift:

You must be registered for see images attach


Basically it's a big heavy duty bumper jack.
 

RetroC10Sport

Supporting Member
Supporting Member
Joined
Sep 29, 2010
Posts
17,094
Reaction score
2,220
Location
Green Bastard Parts Unknown
First Name
Jay
Truck Year
2001
Truck Model
pontiac aztek
Engine Size
3.4
You must be registered for see images attach

You must be registered for see images attach
 

8T6K5

Full Access Member
Joined
Jun 22, 2012
Posts
1,128
Reaction score
112
Location
AZ
First Name
Jerry
Truck Year
1986
Truck Model
K5
Engine Size
L98 350 TPI
OK guys, I dove into the project today after work.

Left for work with this...

picture.php


Actually, the tire was already out, but I cam home with this...

picture.php


Tire, mount, speakers gone......seat, gone too....

picture.php


Cleaned the tire carrier and gave it a fresh coat of paint...

picture.php


Will get to the HiLift soon, it will be a more teadious (sp?) task.

Heres the pass side panel and how I expect the HiLift to be mounted...

picture.php


Thats a 48", I think 60" would've been too much.

Got a little cleaning to do...

picture.php


Then, just because....

picture.php
 

8T6K5

Full Access Member
Joined
Jun 22, 2012
Posts
1,128
Reaction score
112
Location
AZ
First Name
Jerry
Truck Year
1986
Truck Model
K5
Engine Size
L98 350 TPI
So here is how I was planning on mounting the tire carrier....

picture.php


Pretty much centered and pushed up as far as possible. No obstructions underneath, easy to get to.


Then I thought........ What if I push the front mount over the lip and mount it to the "hump"? There's nothing under it right there, easy to get to......but the rear mounts are very close to the OE seat catchers. Gonna have to look a little harder, but it makes a huge difference on how high the tire sits......

picture.php


Hard to tell in that pic, but I just need to dry fit the tire in there... and make sure my center console will still open.
 

crazy4offroad

Equal Opportunity Destroyer
Joined
Jul 30, 2010
Posts
8,468
Reaction score
1,070
Location
West BY-GOD Virginia
First Name
Curt
Truck Year
1979
Truck Model
K-10
Engine Size
350/SM465/NP205
You may want more opinions on that insulation than just mine, but I think it is a bad idea. It will hold condensation and promote rust.
 

8T6K5

Full Access Member
Joined
Jun 22, 2012
Posts
1,128
Reaction score
112
Location
AZ
First Name
Jerry
Truck Year
1986
Truck Model
K5
Engine Size
L98 350 TPI
I appreciate the tip and if I lived in a more humid-colder climate I might not. I dont think it will be an issues here in AZ, or at least the effects wont be realized for many many years.

I was able to get the mount locked down today....

picture.php


Im glad I decided to drop the front mount in front of the lip. It really brought the tire down to a less obtrusive angle. I didnt account for the mouth itself to be lower to the ground and the butterfly end was hitting the floor before it got the tire tight. Hard to lop off about 4", problem solved.

35X12.5X15

picture.php


Couple shots of the mounts...

picture.php


picture.php


picture.php


Cant really go much further on the pass side panel until I pick up the mounts. Didnt get by in time on Sat, not open til Tues.

Started cutting the templates...

picture.php


Worked late tonight, got the drivers side panel done.... Really feels stout. I think Ill be in good shape with the hilift mount.
 

89Suburban

Supporting Member
Supporting Member
Joined
Dec 7, 2010
Posts
24,545
Reaction score
5,862
Location
Southeast PA
First Name
Paw Paw
Truck Year
2007
Truck Model
Chevrolet Tahoe LT
Engine Size
5.3, 4WD
Good job, I can't believe how rust free under the cab looks, I am so jealous. Let us know later what a difference that insulation makes behind the panels. I am curious.

Are you running speakers in those rear panels? :popcorn:
 

8T6K5

Full Access Member
Joined
Jun 22, 2012
Posts
1,128
Reaction score
112
Location
AZ
First Name
Jerry
Truck Year
1986
Truck Model
K5
Engine Size
L98 350 TPI
I definately think the insulation has helped, in conjunction with other things. One being that there also is 1/2 OSB behind the panel. Rear seat was a squeaker, OE tire mount is metal on metal at a points... new mount is not. Locking the panel down with new screws (the top row goes into the osb, the rest just like normal.

A few months ago I did new cab/tailgate seals along with front/rear window channels help a lot too. I ran a quick errand in it this morning and It sounded much better. I had the windows down to enjoy the cool 90* temps we had.

As far as the speakers, I put the ones I had back in, but didnt hook them back up. 1) the subs and amp are gone. 2) there are no rear speakers. 3) I didnt like the quality of wire used for the middle speakers - and the screens keep falling off. Basically the rest of the system was ethnically engineered so Ive decided to do without for now. I do plan on redoing it all, just not right now.

Need to address the steering gear box and the valve cover gaskets asap.

The errand I ran this morning..... scored this off CL cheap!
 

Attachments

  • photoxx.jpg
    photoxx.jpg
    42.4 KB · Views: 108

8T6K5

Full Access Member
Joined
Jun 22, 2012
Posts
1,128
Reaction score
112
Location
AZ
First Name
Jerry
Truck Year
1986
Truck Model
K5
Engine Size
L98 350 TPI
And here is the final product....

Firstm, the brackets Im using. HiLift brand. As you can see the bolts that come with them arent meant to go through 1.5" OSB. I bought 2" carriage bolts to use and stepped two washers with a locking nut.

The actual mounting bolts have holes in the ends for small padlocks if you choose.

I put some rubber pads on them where there would be metal-metal contact.

You must be registered for see images
[/IMG]

While most of the panel backing is now 3/4" OSB, I doubled it up at the mounting points with 6X6 scrap....

You must be registered for see images
[/IMG]

Heres the panel installed. I like I said, did the drivers side the other night. When installing them I replaced all the screws, using wood screws for the top row because they will actually go into the OSB. I used plain for the others, but .5" longer...

You must be registered for see images
[/IMG]

And now, 48" HiLift mounted...

You must be registered for see images
[/IMG]

You must be registered for see images
[/IMG]

You must be registered for see images
[/IMG]

The mounts are pretty stout. I dont see me wheeling hard enough for them to fail. Had to do a test run....

picture.php
 

Latest posts

Forum statistics

Threads
42,246
Posts
912,026
Members
33,747
Latest member
alysco
Top