Rear Sway Bar for my C10 longbed

Disclaimer: Links on this page pointing to Amazon, eBay and other sites may include affiliate code. If you click them and make a purchase, we may earn a small commission.

Raider L

Full Access Member
Joined
Sep 1, 2020
Posts
1,892
Reaction score
996
Location
Shreveport, LA
First Name
William
Truck Year
1974
Truck Model
C10
Engine Size
355
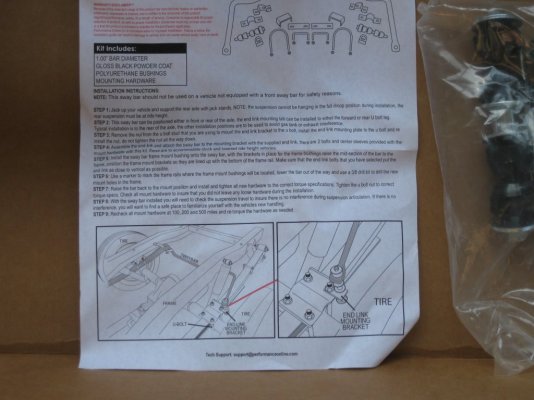
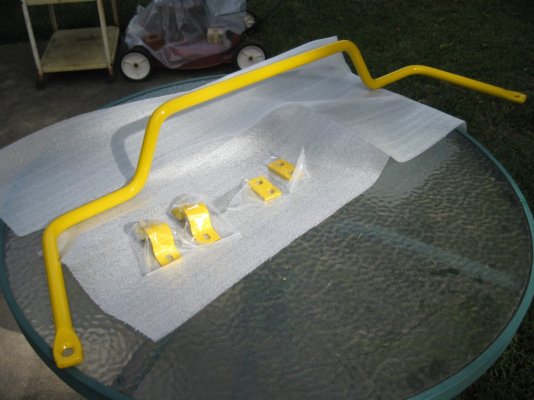
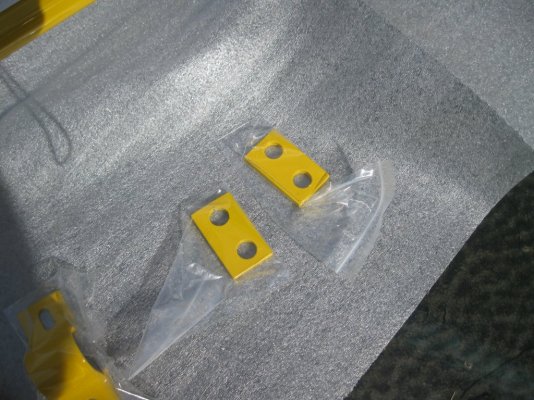
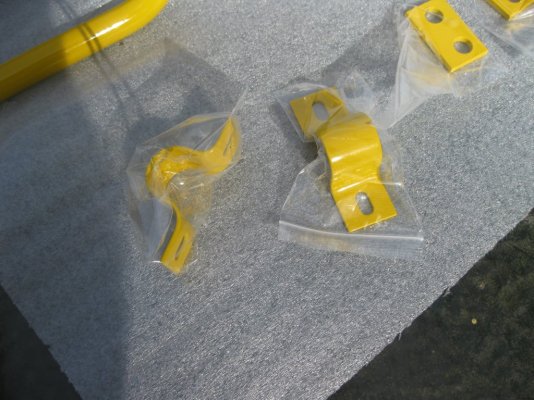
Well, after I saw my electric bill for last month I figured I had better pull the trigger before I run out of extra money, and buy the last suspension part for my truck and that would be a rear sway bar. I've been doing a lot of studying and reading hot rod magazines (not Hot Rod magazine) in order to understand what it is I need to do. It ought to be interesting and fun to install. It's the Western Chassis p/n RSBK7387 for 1973-1987 Chevy-GMC trucks. It's 1" in diameter which will compliment my 1 1/8" bar I have in the front. It does have the polyurethane bushings for the end bolts that go through the frame but I've been reading some articles about you don't want to have squishiness at those points. What is better is a solid link to the frame and the only one who makes a bar with solid links is Ridetech and those things are very expensive, but I might try to figure out a way to rig up somekind of a solid link for my bar. We'll see. It wasn't to expensive, it was $180.65 so that's not to bad, but the shipping was $35.00 and will come by whoever they can get it to ship as soon as possible. Initially they ship FedEx and would take 4 days. So we'll see there as well. I wish I knew how to transfer a pic of it, I'm not that computer savy so you'll have to go to Western Chassis and look up that part number.
When I get it in I'll take a pic of it and the install. It comes powder coated Black but I think I want to get it powder coated Yellow because my other suspension parts back there are Yellow. It'll be cool and we'll see how it controls this 'ol longbed sway.
 

Raider L

Full Access Member
Joined
Sep 1, 2020
Posts
1,892
Reaction score
996
Location
Shreveport, LA
First Name
William
Truck Year
1974
Truck Model
C10
Engine Size
355
I heard from Western Chassis today and it's been shipped! Yea!! Estimated delivery is next Thursday, 9-23-21 Man, I wish I knew how to "cut and paste" and all that. But heck, with this program change I don't know if any of that would work anyway. I can't even put a photo on the page without it first posting it large and then the program makes a little picture under my post. I don't have the computer skills to understand how to load my pictures where that won't happen, or maybe that wouldn't matter. I got to where I could work the old program good and they come along with a new thing I can't work. I don't have enough skills as it is, and now a change. I don't like it but whatever.
 

Raider L

Full Access Member
Joined
Sep 1, 2020
Posts
1,892
Reaction score
996
Location
Shreveport, LA
First Name
William
Truck Year
1974
Truck Model
C10
Engine Size
355
Well, it wasn't supposed to get here until Thursday but it came today!! YEA! I knew that Western chassis used POL suspension parts at a bit lower price, hey that's fine with me. I like POL stuff. If I ever won the lottery I'd rip my whole suspension out and do one of those tubular A arm coil over Mustang rack and pinion steering front suspensions with the performance front crossmember replacement, and the rear 4 link whole nine yards suspensions all made by QA1! Absolutely THE best suspensions in the world! But boy do you pay for it. Just the front end alone is almost $4,000!! But it includes lowering the truck about 3" overall. Now, back to reality. This is my bar made by POL, good stuff!
You must be registered for see images attach
End label above.
You must be registered for see images attach
It is so well packed. That's those strips of thick paper packing. I don't know how they got those wads pressed together so tight.
You must be registered for see images attach
Dah,Daaa! The bar came Black powder coated. I'm going to get it and the bar bushing brackets powder coated Red.
You must be registered for see images attach
Here's the bag of hardware, above. Imagine my puzzlement when I didn't see "U" bolts in there. I was thinking, "Oh, I better not open it in case I have to send it back." But no, it's all good. I started thinking they had sent me the wrong bar. But what they sent me was not the kind of bar they showed on the Western Chassis site. It's the correct bar for my truck but it's the kind that attaches to the frame in the back above the differential and not to the differential tubes. I had to read the instructions a couple of times before I understood how to install it. It's cool. It'll be interesting to see how it goes in. I kept looking for those "U" bolts, there aren't any, but all the other common hardware is there. The only problem is the instructions SUCK! There is pretty clear on the how to's but it doesn't show hardly at all where any of this hardware goes.
 
Last edited:

Raider L

Full Access Member
Joined
Sep 1, 2020
Posts
1,892
Reaction score
996
Location
Shreveport, LA
First Name
William
Truck Year
1974
Truck Model
C10
Engine Size
355
I'll try and get it powder coated this week and depending on what I feel like I'll start putting it in this week end or the beginning of next week. I need to round up some help. I don't think I can get this in by myself with the shape I'm in though I can do some things. Crawling around under the truck and getting up and down under the truck that's what wrecks me fast. I'll do the work I can and have fun doing it.
Here's those instructions. This is all it shows. It doesn't show the bar attachment, where those long bolts included go, better detail on the end link stacking or anything. Maybe I can contact POL and they can email me better diagrams. And look at the diagram of the bar, that's not the one in the box! Even though the one in the box is okay. I was thinking, "Well, maybe the drawing of the bar on this paper is like a general sway bar drawing and not specific to what I got." Well, obviously. I contact POL.
 

Attachments

  • POL rear sway bar install 006.jpg
    POL rear sway bar install 006.jpg
    130.5 KB · Views: 139
Last edited:

bluex

Full Access Member
Joined
May 9, 2013
Posts
1,841
Reaction score
2,149
Location
Spartanburg SC
First Name
Paul
Truck Year
1978
Truck Model
C15
Engine Size
350
POL purchased Western Chassis a few years ago. Its a shame because rather than elevate the POL line to the quality that WC used to have they lowered WC named products to POL standards and their ****** customer service....
 

Raider L

Full Access Member
Joined
Sep 1, 2020
Posts
1,892
Reaction score
996
Location
Shreveport, LA
First Name
William
Truck Year
1974
Truck Model
C10
Engine Size
355
@bluex,

Yeah, I know. It seems you can't get the quality of product and good service from companies we've all heard some time ago were so good. What the heck happen to the ones we find out aren't what we thought they were supposed to be? I don't know, corporate greed? They don't care if you don't like it, they have plenty of business, if you go some where else, good riddance?? Boy, I'll tell you, I've found that out to my disgust. Yeah, I didn't go back to them and I never got a letter from the company apologizing and asking me to return, kiss my a** or nothing. It's a shame. And the sad part is it really doesn't mean that the more money you spend the better product you get, although it does make some difference, but paying more doesn't mean you get better service either, although there are exceptions.
But why should you have to pay an arm and a leg to get a good product and good service when all ranges of cost for products and service used to be the norm! What happen that only the most costly is where good product and service is the only place that is found in America? Although I have found excellent products and service in the most obscure companies that hardly no one know of. But they were hard to find and in some cases I stumbled across them. So, they're out there but how do you find them? I don't know. Like I said many I found by accident. They weren't advertised anywhere that I was looking, and I never heard about them from people in the business, or anything like that, but they are out there. It's like, good luck!
 

Raider L

Full Access Member
Joined
Sep 1, 2020
Posts
1,892
Reaction score
996
Location
Shreveport, LA
First Name
William
Truck Year
1974
Truck Model
C10
Engine Size
355
Well, I took the sway bar and the two bushing brackets to the powder coater today. And I told them to coat it Yellow, that's so it will match my Super Lift traction bars that are Yellow. The eye end of the bar and the end link will attach over on one corner nuts of the top leaf spring mounting plate and it'll kinda look like it's all one thing.
I sent an email to Western Chassis and asked them about those real long bolts 7 1/2" that are in the hardware bag, * see pic above
If anyone has put in a rear sway bar that has those real long bolts before I would appreciate it if you would chime in, here under this thread, and tell me what they are for. The end link bushings are on a shorter bolt already and it measures 5 1/2" long. *You can see them through the bag in pic above. Reading the instructions it seems to me that the end link bushings are on the bolt I think should be used, I guess, I've never done this before in the rear so I don't know.
I was looking up under the back end yesterday looking at the space under there where the bar is to locate and the instructions suggest the bar should come from the rear of the differential and not from the front of it going back. Wait a minute, let me restate that so it's not confusing.
1. Okay, mounting the bar as suggested, the bar goes up to the frame behind the differential and the end links go to the back, off the inside corner, of the leaf spring mounting plate.
2. Mounting the bar the other way is, the bar mounts to the frame forward of the differential and the end links go to the front, off the inside corner, of the leaf spring mounting plate. Can ya'll visualize that?
So looking under there it appears to be more crowded behind the rear end, but in front of the rear end is clearer but the drive shaft might be in the way. Now that I think about it, my driveshaft safety loop is there also so it could interfere. I think I'll put the bar as suggested, behind the differential.
See that's the deal, you have to get under there and wave the thing around looking to see where it looks like it wants to be mounted best. That's alright. I'm sure whichever way it goes it'll look cool.
Also, those spindlely looking bolts that came with the bar for the end link bolts didn't even measure 5/16", like barely over 19/64" I don't know how much ya'll've read about sway bars but from what I've read and looked at, end links want to be solid, not looking like the first corner I take they'll bend in half. So I went out to my friendly fastener hardware store and bought 3/8" grade 8 bolts, so I'd get the gold anodized finish on them everyone likes to see, to replace those little biddy looking bolts the end links came with.
Now, if some engineer would like to tell me, here, why a thinner bolt works better as an end link bolt rather than a bolt that fits the inside of the bushing and fits the washers, I'm all ears!
 
Last edited:

skysurfer

Full Access Member
Joined
Oct 23, 2010
Posts
2,648
Reaction score
2,019
Location
west coast
First Name
John
Truck Year
1989 Suburban
Truck Model
V2500
Engine Size
5.7/TH400/NP241C
I sent an email to Western Chassis and asked them about those real long bolts 7 1/2" that are in the hardware bag, * see pic above
If anyone has put in a rear sway bar that has those real long bolts before I would appreciate it if you would chime in, here under this thread, and tell me what they are for. The end link bushings are on a shorter bolt already and it measures 5 1/2" long.
Step 4 in the instructions answers your question. They supplied two different length bolts for the end links depending on the ride height of your truck. The goal is to have the bar sit as parallel to the ground (front to back) as possible.

When I added a 4" lift to mine, the bar was angled up at the forward end because the end links were too short. I bought some longer ones online but, as you've noticed, the diameter of the hardware was on the skimpy side. They lasted about a month before I noticed they were bent out of shape. I ended up making my own to the correct length with all-thread, fender washers, lock nuts, and some galvanized tube slipped over the all-thread for added rigidity.


You must be registered for see images attach
 

Raider L

Full Access Member
Joined
Sep 1, 2020
Posts
1,892
Reaction score
996
Location
Shreveport, LA
First Name
William
Truck Year
1974
Truck Model
C10
Engine Size
355
@skysurfer,

Thanks!! Yeah I noticed that in the instructions but it went right over my head due to not having to do this before I had no idea what it was referring to. It did say something about the bar end needed to be level but not ever seeing that physically from doing it, I didn't know. But since you told me what that refers to and your picture, now I see what it means. When I went to my fastener store, they supply fasteners for every kind of industrial and automotive thing there is, I got grade 8 3/8" bolts, both sizes to replace those skinny things that came with the bar. It's like I said I didn't want to look back there after a days driving and see those bolts bent over. That would freak me out! In the bushings there is a 3/8" diameter hole and the 3/8" bolts fit it perfectly, it just slides through the hole.

Man, that is a big a** bolt yours takes!

Have you ever seen or heard of the kind of bar like mine where it bolts to the frame behind the rear end and attaches to the leaf spring mounting plate? What was weird is the picture of the bar I ordered was the kind that attaches to the rear end axle tubes. I was really looking forward to attaching it like that, not up on the frame and have to drill holes for the bar bushing brackets. I wasn't expecting to have to do any kind of drilling because I would be having to put this under my truck by myself, not have to try and get my son under there with me to hold up the thing while I drill holes and hope they aren't off where thay need to be. Attaching to the axle tube I wouldn't need any help at all and that would have made it much more of an enjoyable effort for me, because he works and has a realtor business and he doesn't have alot of time especially to be crawling around under my truck.
 

Raider L

Full Access Member
Joined
Sep 1, 2020
Posts
1,892
Reaction score
996
Location
Shreveport, LA
First Name
William
Truck Year
1974
Truck Model
C10
Engine Size
355
I went over to the powder coater today to give him a couple of little plates I forgot and fortunately he wasn't quite done yet so that was good. I'll pick it all up Monday afternoon. But from what I saw it looks GREAT!! That's the perfect Yellow.
 

skysurfer

Full Access Member
Joined
Oct 23, 2010
Posts
2,648
Reaction score
2,019
Location
west coast
First Name
John
Truck Year
1989 Suburban
Truck Model
V2500
Engine Size
5.7/TH400/NP241C
Have you ever seen or heard of the kind of bar like mine where it bolts to the frame behind the rear end and attaches to the leaf spring mounting plate? What was weird is the picture of the bar I ordered was the kind that attaches to the rear end axle tubes.
I've installed a few aftermarket bars and all of them attached to the axle tubes. Yours looks like it was styled more like the factory bars that were available on the C/K 30 series. Maybe somebody can post a pic if they have a 1 ton with a sway bar for reference.

Knowing the bars limit body roll by resisting the twist across it's width, it makes sense to me that they are more effective by being attached to the axle tubes near the pumpkin. I couldn't get a clear idea from the instructions you have, but it looks like maybe they attach to the frame rails where the bar turns forward? I'm thinking it would accomplish the same thing, but without a center attachment point the bar would have less support and be more likely to twist, the end result being more body roll. I really don't know, I have to assume that the guys that designed this know a heck of a lot more about it than I do but I'm curious to see the finished installation.
 

Raider L

Full Access Member
Joined
Sep 1, 2020
Posts
1,892
Reaction score
996
Location
Shreveport, LA
First Name
William
Truck Year
1974
Truck Model
C10
Engine Size
355
@skysurfer,

Well, that's what's kinda weird about this bar. It wasn't what the picture showed I was buying. What I thought I was getting was the kind that attaches to the rear end axle tubes. But when I opened the box I got to wondering about what I got when I couldn't find the "U" bolts and all that hardware you get. So, I had to get the instructions out to see what it was I did get.

And that's right, the bar does attach to the frame behind the rear end, then the arms go forward down to the mount plate of the leaf springs, my mount plate is on top of the leafs. Actually the O.E. mounting plate is gone and in it's place is the rear mounting plate for my traction bars. They are made by Super Lift. Super Lift doesn't make those traction bars anymore, to bad because they are adjustable and are heavy duty. There are pics of them on this site under this section in one of my earlier posts showing them after I put in new polyurethane bushings, and repainted them. They are like ladder bars.

Anyway, there is these little plates that came with the bar that are installed under a back corner nut on the leaf spring mounting plate, (my traction bar mounting plate) and that's where the end links go, one on each side you know. Then you lift the bar up to the frame and place the bar bushing bracket up against the frame, mark the holes, drill the holes, and bolt the bar bushings on the frame. And if the bar ends, as it's installed on top of the end link, you know like it goes, is level with the frame then you're good to go. Tighten everything up for final tightening.

So the action is, as the center of the leaf spring rises on one side, it lifts that end link and the bar twists against the one on the other side that is either not going down or is going down thus putting pressure against the action of the twist keeping the frame from whinding up. Does that sound about right? I mean, I know how sway bars work, but I was wondering if that all the above made sense to you.
 

skysurfer

Full Access Member
Joined
Oct 23, 2010
Posts
2,648
Reaction score
2,019
Location
west coast
First Name
John
Truck Year
1989 Suburban
Truck Model
V2500
Engine Size
5.7/TH400/NP241C
Yeah, I see how they are accomplishing the same thing, but in a different manner. Only thought I had on that mounting system is that a larger diameter bar would be called for to make up for the absence of mid-span support. Looking forward to pics and your impression on how it works.
 

Raider L

Full Access Member
Joined
Sep 1, 2020
Posts
1,892
Reaction score
996
Location
Shreveport, LA
First Name
William
Truck Year
1974
Truck Model
C10
Engine Size
355
I picked my bar up from the powder coating shop today. It looks great. I finally was able to find the bar bushings I needed from Energy Suspension last night so I'll be ordering them in a few days after I get paid. But I'm still on the hunt for link bushings. I can get them from
Energy Suspension, but I'm waiting on the tech guys to give me some more info about other choices of some different sizes link bushing.

They're kinda screwy with their sizing, but it's not because they don't have enough of them that's just it, they've got a million different sizes, it's just getting the tech guys to look. Sometimes they can be lazy. I've had years of experience with dealing with Energy Suspension and most all the time they're pretty good in helping you find what you need. But one time I had a problem with my traction bar bushings and I ended up ordering them from a store in Ohio because we found out Energy put the right bushings in the wrong boxes. And I finally found the right ones at that store in Ohio because all the stores in Texas where most of my stuff comes from had got the wrong boxes. Isn't that something. The Texas stores, Dalla, Ft. Worth, San Antonio, looked through like over twenty boxes and they were all wrong and they had to send them all back to Energy.

Those little plates are what you attach to the leaf spring mounting plate, on the corner. Then you put the end link in a hole in the plate. And the bar brackets pic.
 

Attachments

  • Yellow powder coating 002.jpg
    Yellow powder coating 002.jpg
    130.8 KB · Views: 111
  • Yellow powder coating 003.jpg
    Yellow powder coating 003.jpg
    221.7 KB · Views: 70
  • Yellow powder coating 004.jpg
    Yellow powder coating 004.jpg
    186.2 KB · Views: 79

Latest posts

Forum statistics

Threads
42,129
Posts
909,780
Members
33,624
Latest member
CTGAP
Top