Intake Manifold Install

Disclaimer: Links on this page pointing to Amazon, eBay and other sites may include affiliate code. If you click them and make a purchase, we may earn a small commission.

DoubleDingo

Full Access Member
Joined
Jul 3, 2012
Posts
10,189
Reaction score
14,502
Location
Right where I am
First Name
Bagoomba
Truck Year
1981, 1965
Truck Model
81-C20 Silverado Camper Special-TH400-4.10s; 65-C20 with 4:57 gears and Borg Warner Overdrive
Engine Size
Carb'ed Vortec 350; 1972 L48 350
Ultra black. There is a difference in the compositions. The ultra came out shortly after GM went to GMS, their gasket less assembly product, the ultra line was supposed to be the aftermarket equivalent and I am a firm believer that it is a way better product than regular red,black,blue..
Thanks for clarifying. When I say black rtv, I meant ultra black. It's been a few sleeps since I had to do that project and I forgot the "ultra" part. Ultra Black is the bees knees
 

Bextreme04

Full Access Member
Joined
May 13, 2019
Posts
4,192
Reaction score
5,096
Location
Oregon
First Name
Eric
Truck Year
1980
Truck Model
K25
Engine Size
350-4bbl
Definitely ultra black or gray if you are using regular RTV. If you do use those, make sure you FOLLOW THE DIRECTIONS. They say to put a big bead on a very clean surface, then set the intake manifold on there and hand tighten the bolts until you see a little squish. Then let it sit FOR ONE HOUR. Once it has sat for long enough to start setting up, torque it to spec. Then you MUST WAIT 24 HOURS BEFORE RETURNING TO SERVICE.

If you can't afford to let the truck sit for 24 hours, then use "The Right Stuff" 90 minute gasket maker. Use the stuff in a regular squeeze tube, not the aerosol'd "easy" cans. I used the black right stuff in a tube and it worked perfect. No leaks at all. You put a good bead on a clean surface and then set the manifold on and hand tighten the bolts to squeeze a little, then let it set for an hour. Torque to spec and then let set for another 30 minutes before it is good to go.
https://www.autozone.com/sealants-g...MklFX0ExAtSX8roedpYaAvPXEALw_wcB&gclsrc=aw.ds
 

Mango

Full Access Member
Joined
Dec 22, 2021
Posts
189
Reaction score
141
Location
JacksonWyoming
First Name
Gil
Truck Year
1989
Truck Model
1500
Engine Size
350
@DoubleDingo when you repaired, replaced the RTV did you install new gaskets or use the same ones?
I did not let it set long enough before torquing the bolts, let it sit for a day before running it no leaks at the time
Thanks
 

DoubleDingo

Full Access Member
Joined
Jul 3, 2012
Posts
10,189
Reaction score
14,502
Location
Right where I am
First Name
Bagoomba
Truck Year
1981, 1965
Truck Model
81-C20 Silverado Camper Special-TH400-4.10s; 65-C20 with 4:57 gears and Borg Warner Overdrive
Engine Size
Carb'ed Vortec 350; 1972 L48 350
Yes, I got new gaskets. For me, if it's installed, those gaskets are done. In my case the engine was ran a while before I figured out the cause of the leak. But, even if I had installed the intake and realized I had missed something before running the engine, it would have been a new set of gaskets going in.
 

Rusty Nail

Full Access Member
Joined
Jan 29, 2015
Posts
9,789
Reaction score
9,685
Location
the other side of the internet
First Name
Rusty
Truck Year
1977
Truck Model
C20
Engine Size
350sbc
@Rusty Nail
Should just pull it off and clean the RTV use black RTV and put it back using same gaskets?

Dude. Surely the 2nd time around will be easier, dontcha reckon?
I don't know why you're pickin on me Charlie Brown..

xc_hide_links_from_guests_guests_error_hide_media

Why I gotta be on the hook for suggesting you cause another big mess? Sheesh!

Well, you could look at it like this: it's already making a big mess - how bad could it be? If the "China wall" is leaking there ain't no other way to fix it aside from doing it over.
Old dude up there Dingo had some good advice about tightening, that's for sure. AND THEN other old dude Ricko gave solid info about the pooky.

I will be able to add about the proper tightening sequence. Dude I'll even go fetch a diagram for you. I want to help and I want you to suceed. CORRECTION..
WE want to see you suceed. I'm fairly confident that I can speak for the others in this context especially. :)

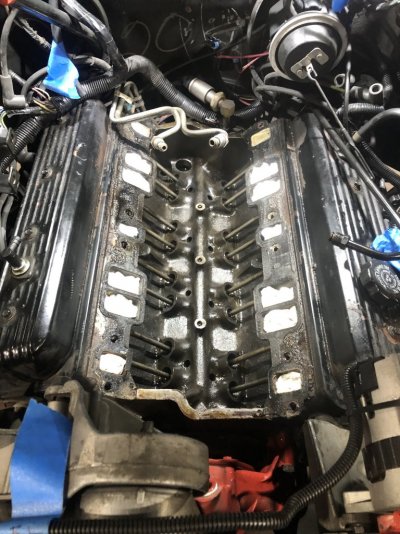
I suggest to let the pooky "set up" after you put it on the wall - for longer than you think you should. It should 'skin' and look like it is starting to dry BEFORE you install the manifold. That part is pretty important :imo:

So is following the proper tightening sequence mmmkay? Let's not make it a trifecta. Two times should be enough.
Take your time and go ahead and crawl up there good so you have real control of it and can see everything alright.

Follow this . . In general, you start in the middle and go around towards the outside. If you don't ? It will leak.
Let the pooky skin first. If you don't? It will leak. AND! Use good pooky. I use "the right stuff" like the danged old N.K.O.T.B.
You are! :p

P.S. new gaskets only. Try the felpro #1205s this time.

Hope this helps!
Good luck.


You must be registered for see images attach


xc_hide_links_from_guests_guests_error_hide_media
 
Last edited:

Mango

Full Access Member
Joined
Dec 22, 2021
Posts
189
Reaction score
141
Location
JacksonWyoming
First Name
Gil
Truck Year
1989
Truck Model
1500
Engine Size
350
@RustyNail Double Dingo

How to keep the fuel lines out of the way
 

DoubleDingo

Full Access Member
Joined
Jul 3, 2012
Posts
10,189
Reaction score
14,502
Location
Right where I am
First Name
Bagoomba
Truck Year
1981, 1965
Truck Model
81-C20 Silverado Camper Special-TH400-4.10s; 65-C20 with 4:57 gears and Borg Warner Overdrive
Engine Size
Carb'ed Vortec 350; 1972 L48 350
Didn't see pics of your fuel lines, but I would disconnect and secure them out of the way with a bungie cord or the like. You don't want anything getting in the way when installing the intake.
 

Mango

Full Access Member
Joined
Dec 22, 2021
Posts
189
Reaction score
141
Location
JacksonWyoming
First Name
Gil
Truck Year
1989
Truck Model
1500
Engine Size
350
Fuel Lines Not sure if you can pull this up
 

Attachments

  • IMG_5227.jpeg
    IMG_5227.jpeg
    199.4 KB · Views: 28

DoubleDingo

Full Access Member
Joined
Jul 3, 2012
Posts
10,189
Reaction score
14,502
Location
Right where I am
First Name
Bagoomba
Truck Year
1981, 1965
Truck Model
81-C20 Silverado Camper Special-TH400-4.10s; 65-C20 with 4:57 gears and Borg Warner Overdrive
Engine Size
Carb'ed Vortec 350; 1972 L48 350
Not an inspection checklist, a photo of your engine and the fuel lines. They have to be capable of being disconnected and left out of the way.
 

Mango

Full Access Member
Joined
Dec 22, 2021
Posts
189
Reaction score
141
Location
JacksonWyoming
First Name
Gil
Truck Year
1989
Truck Model
1500
Engine Size
350
@DoubleDingo
My Bad wrong file work related
I posted the correct one this time
 

Attachments

  • IMG_5227.jpeg
    IMG_5227.jpeg
    199.4 KB · Views: 30

DoubleDingo

Full Access Member
Joined
Jul 3, 2012
Posts
10,189
Reaction score
14,502
Location
Right where I am
First Name
Bagoomba
Truck Year
1981, 1965
Truck Model
81-C20 Silverado Camper Special-TH400-4.10s; 65-C20 with 4:57 gears and Borg Warner Overdrive
Engine Size
Carb'ed Vortec 350; 1972 L48 350
I would still use a bungie or some twine to keep them high enough without kinking them
 
Last edited:

Mango

Full Access Member
Joined
Dec 22, 2021
Posts
189
Reaction score
141
Location
JacksonWyoming
First Name
Gil
Truck Year
1989
Truck Model
1500
Engine Size
350
@DoubleDingo
I could get one out of the way but not the other I will have to unbolt the bracket a pain to get it back
 

DoubleDingo

Full Access Member
Joined
Jul 3, 2012
Posts
10,189
Reaction score
14,502
Location
Right where I am
First Name
Bagoomba
Truck Year
1981, 1965
Truck Model
81-C20 Silverado Camper Special-TH400-4.10s; 65-C20 with 4:57 gears and Borg Warner Overdrive
Engine Size
Carb'ed Vortec 350; 1972 L48 350
Dang. There has to be a way, though
 

Forum statistics

Threads
42,140
Posts
910,030
Members
33,642
Latest member
Bhardiman1
Top