2002 - 4.8L to 5.3L or should I go to a 5.7L?

Disclaimer: Links on this page pointing to Amazon, eBay and other sites may include affiliate code. If you click them and make a purchase, we may earn a small commission.

dougbert

Full Access Member
Joined
Nov 2, 2015
Posts
659
Reaction score
174
Location
5535 feet in Utah Mountains
First Name
doug
Truck Year
1984
Truck Model
K1500/nv4500/np241c/33x12.50x16/4.10 Gears 14BFF
Engine Size
5.3L - 2002 Silverado, rebuilt top end, long tube headers
well I forgot I use LibreOffice to make my documents, spreadsheets etc, and I saved the Dropbox link above in *.ODS format and not Microsoft Excel format.

Can others read that link? If not, I will make a copy of the spreadsheet in Excel format and then 'share' that in the next post.

And I have come to a decision point and will not be doing the 5.7L build on this engine. Rather, I will continue to migrate from the 4.8L to a 5.3L. I have the 5.3L crankshaft, Gen IV floating pin rods and I found a $100 set of new OE Gen V 5.3L pistons (missing the wrist pin locks or spirolocks - need to locate a source for them).

Since this will still be an interesting modification for me I think it will worthwhile experiment and hopefully the readers here will agree.

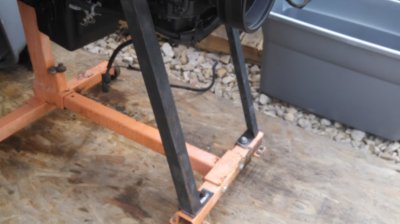
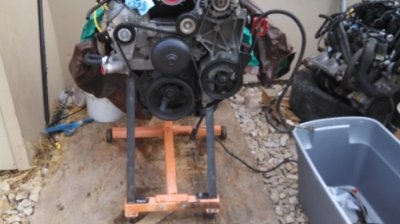
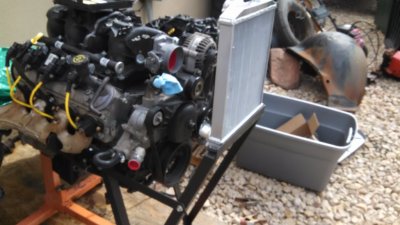
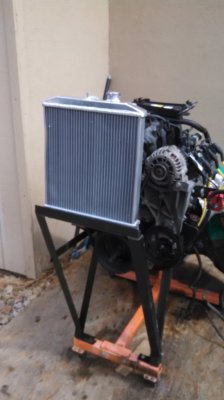
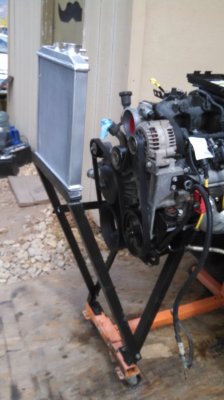
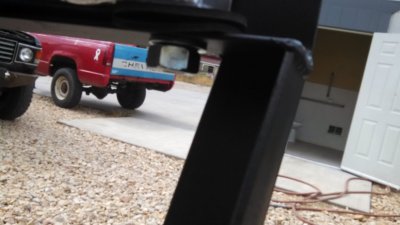
But before that engine rebuild, I have to continue and finish the start stand. I need some angle iron, etc to construct the engine mount supports and radiator support. I need to flash my ECU for this build as well with HPTuner

coming together. This saturday I will be finishing the 84 PU's clutch slave install and report on its thread

dougbert

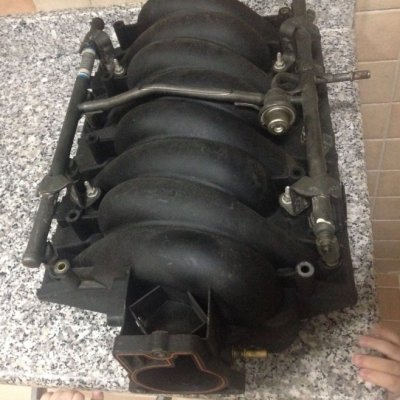
PS here is a pic of the LS6 intake I bought for $350, coming from Kuwait of all places - and they are selling more, what are they doing over there? Not concerned about getting screwed too much, since Ebay has a safety net if something goes wrong.

found the following ls6 intake thread on swapping a ls6 intake onto a 5.3 http://www.ls1truck.com/forums/front-page-news/12719-ls6-intake-swap.html

PS2: I found a place that makes several LS swap adapters, misc items and some gaskets: www.ictbillet.com

take a look
 

Attachments

  • ls6 intake.jpg
    ls6 intake.jpg
    93.3 KB · Views: 134
Last edited:

Camar068

Supporting Member
Supporting Member
Joined
Feb 5, 2014
Posts
4,158
Reaction score
3,019
Location
Kentucky
First Name
David
Truck Year
1986
Truck Model
K10/LM7 5.3/4L60e/np208/3.73/32"
Engine Size
10 yrs Air Force
a tip on the valve covers. mine had imperfections in the casting. It had what appeared to be cracks around the studs. That was only at the surface. You can take 80 grit by hand or dremel to the bad areas, then step up to 120, 220, then green scotch brite, then the polishing wheel with green rouge. It really surprised me how well they shine up.

Just a thought that popped in my head reading from the beginning of the thread again.

As for getting it from that area of the world, sorry but I wouldn't. Never know who your feeding money.
 

dougbert

Full Access Member
Joined
Nov 2, 2015
Posts
659
Reaction score
174
Location
5535 feet in Utah Mountains
First Name
doug
Truck Year
1984
Truck Model
K1500/nv4500/np241c/33x12.50x16/4.10 Gears 14BFF
Engine Size
5.3L - 2002 Silverado, rebuilt top end, long tube headers
a tip on the valve covers. mine had imperfections in the casting. It had what appeared to be cracks around the studs. That was only at the surface. You can take 80 grit by hand or dremel to the bad areas, then step up to 120, 220, then green scotch brite, then the polishing wheel with green rouge. It really surprised me how well they shine up.

Just a thought that popped in my head reading from the beginning of the thread again.

As for getting it from that area of the world, sorry but I wouldn't. Never know who your feeding money.


good info. And I understand the concern of the money flow.


When I actually rebuild the short block this winter, I have pondered if I want the natural look or do some really cool color to paint the valve covers. I have the winter to do more pondering and do the work.

Since I got the new knock sensor and ARP water pump bolts yesterday, this morning I installed the sensor and the Dorman harness. BTW I did put RTV under the harness' rubber grommets above the knock sensors almost all the way around, save in just the back part. GM Tech bulletin suggested this to keep water out - especially for those who wash their engines alot. Then I installed the water pump and finally bolted down the intake manifold.

Got the new spark plug wires today, waiting for the plugs themselves.

At this point the next step is to modify the wiring harness with short runs of wires, etc.

I took some more pics, but left my phone at home - notice how we live on smart phones today

dougbert
 

dougbert

Full Access Member
Joined
Nov 2, 2015
Posts
659
Reaction score
174
Location
5535 feet in Utah Mountains
First Name
doug
Truck Year
1984
Truck Model
K1500/nv4500/np241c/33x12.50x16/4.10 Gears 14BFF
Engine Size
5.3L - 2002 Silverado, rebuilt top end, long tube headers
with water pump attached and intake bolted in
 

Attachments

  • IMG_20160916_110304_261[1].jpg
    IMG_20160916_110304_261[1].jpg
    91.9 KB · Views: 127
  • IMG_20160916_110313_309[1].jpg
    IMG_20160916_110313_309[1].jpg
    92.8 KB · Views: 132
  • IMG_20160916_110337_423[1].jpg
    IMG_20160916_110337_423[1].jpg
    91.2 KB · Views: 123

dougbert

Full Access Member
Joined
Nov 2, 2015
Posts
659
Reaction score
174
Location
5535 feet in Utah Mountains
First Name
doug
Truck Year
1984
Truck Model
K1500/nv4500/np241c/33x12.50x16/4.10 Gears 14BFF
Engine Size
5.3L - 2002 Silverado, rebuilt top end, long tube headers
Got some angle iron and worked on making the front support stands to hold up the front of the engine and be a foundation for radiator support.

The pics are of the driver's side support leg. As it got hot, I then started cleaning one of Jake's engines, a 6.0L Gen III LQ4, to help him out. With the water I cooled off, and the sun was going down, so after cleaning was done, I fab'ed the other support arm. Jake had welded the first one, but went home to family, so I left the 2nd arm for him to weld when he gets back.

In the cleaning process, I used 3 cans of Easy Off oven cleaner, 1/2 gallon of Purple Power and 1/2 gallon of Zep 505 Commercial degreaser and cleaner, in that order. This engine had 1/2 inch of grease/dirt in spots. Used brushes, putty knife, and water to clean it. Got 98% of the crud off of it. The goal on the LQ4 is to tear it down, clean it, inspect for a suspected issue, and re-assemble re-using bearings, rings and hopefully most of the gaskets. New spark plugs, new knock sensor cable, new crankseals, and other misc little consumables that need replacing. Possible a hone on the cylinders since it is out.

again doing this for Jake in return for things he does for me AND to learn the 6.0L tear down and rebuild for my experience.

Here are 2 links to 2 videos that AGearHead4Life made on the test stand:

https://www.youtube.com/watch?v=Jrwv61UOgVQ&index=1&list=PLN05l39jxcWCmBA6hC2riAX4eIRcafPVx

https://www.youtube.com/watch?v=1lpuIiPB2sk

dougbert
 

Attachments

  • IMG_20160917_123140_076[1].jpg
    IMG_20160917_123140_076[1].jpg
    93.6 KB · Views: 119
  • IMG_20160917_123144_401[1].jpg
    IMG_20160917_123144_401[1].jpg
    87.5 KB · Views: 119
  • IMG_20160917_123151_134[1].jpg
    IMG_20160917_123151_134[1].jpg
    92 KB · Views: 121
  • IMG_20160917_123202_101[1].jpg
    IMG_20160917_123202_101[1].jpg
    92.3 KB · Views: 126
  • IMG_20160917_124907_566[1].jpg
    IMG_20160917_124907_566[1].jpg
    91.4 KB · Views: 119
Last edited:

74 Shortbed

Full Access Member
Joined
Aug 12, 2013
Posts
6,306
Reaction score
1,411
Location
*
First Name
*
Truck Year
*
Truck Model
*
Engine Size
*
Cool running stand.
 

dougbert

Full Access Member
Joined
Nov 2, 2015
Posts
659
Reaction score
174
Location
5535 feet in Utah Mountains
First Name
doug
Truck Year
1984
Truck Model
K1500/nv4500/np241c/33x12.50x16/4.10 Gears 14BFF
Engine Size
5.3L - 2002 Silverado, rebuilt top end, long tube headers
Got the other support leg installed. Notice the bolts on the support "feet". They are not bolted down, just inserted like a lock pin to prevent the feet from sliding left or right. The feet do not move up, because of the down weight of the engine on to them. Began the fitting of an angle iron under the radiator. The radiator itself has 2 inch down support legs but not threaded nor drilled. Ponder whether to tap or die them, but will use them to attached the support angle iron. Then will add secondary support legs from that base (welded) down to the supports you see in the pics. Those points will be bolted together. Final iron cross arm will lock the radiator supports at a fixed distance from the bottom supports

Installed power steering pump and the new slotted pulley (GM #12605677 - wonderful pulley, as one can access the bolts WITHOUT having to remove the pulley. And this is a GM part too, $25 off of ebay), belt, battery cables. When I do a start I will remove the PS pump and install an idler pulley (bought an idler pulley with spacer, dust cover and bolt from ebay and have a tensioner pulley I will use with the hardware, will need to add a nut to tighten it all down) and a different belt, so I don't have the PS pump moving fluid for no reason. Is nice to work on a clean engine too.

Slowly but surely making progress. When all fab'd up, will paint the new supports black

dougbert
 

Attachments

  • IMG_20160920_110203_997.jpg
    IMG_20160920_110203_997.jpg
    86.2 KB · Views: 118
  • IMG_20160920_110210_921.jpg
    IMG_20160920_110210_921.jpg
    90 KB · Views: 116
Last edited:

dougbert

Full Access Member
Joined
Nov 2, 2015
Posts
659
Reaction score
174
Location
5535 feet in Utah Mountains
First Name
doug
Truck Year
1984
Truck Model
K1500/nv4500/np241c/33x12.50x16/4.10 Gears 14BFF
Engine Size
5.3L - 2002 Silverado, rebuilt top end, long tube headers
Finished up the front radiator support for the test stand. Had Jake weld pieces together and nuts to the angle iron, brushed, cleaned and painted the iron. Used a die and put M12x1.50 threads on the radiator studs. Bought a couple of rubber washers for each side and mounted the radiator.
 

Attachments

  • IMG_20160921_134419_824.jpg
    IMG_20160921_134419_824.jpg
    86.7 KB · Views: 120
  • IMG_20160921_134422_498.jpg
    IMG_20160921_134422_498.jpg
    94.6 KB · Views: 117
  • IMG_20160921_134432_697.jpg
    IMG_20160921_134432_697.jpg
    87 KB · Views: 97
  • IMG_20160921_134437_695.jpg
    IMG_20160921_134437_695.jpg
    89.5 KB · Views: 152

dougbert

Full Access Member
Joined
Nov 2, 2015
Posts
659
Reaction score
174
Location
5535 feet in Utah Mountains
First Name
doug
Truck Year
1984
Truck Model
K1500/nv4500/np241c/33x12.50x16/4.10 Gears 14BFF
Engine Size
5.3L - 2002 Silverado, rebuilt top end, long tube headers
Radiator is secured firmly, but could add a bracing arm if needed in the future. First 2 pics are a threaded radiator stud mounted to the support arm on top of 2 rubber washers.

Items left to do:

1) Exhaust, muffler shows up tomorrow
2) Loop the fuel rail
3) plug vacuum holes
4) Awaiting the Injector Cleaner device
5) Harness
6) Mount fan
7) Battery tray and power hookup
8) Control panel
9) Modify the ECU image via HPTuners

dougbert

PS I messed up a bit, my radiator is higher than Mark's and I see now (by reviewing his video) he offset it to the passenger side, while I put mine directly in the middle. What this means is I will have more problems finding radiator hoses. Oh well.
 

Attachments

  • IMG_20160921_134447_081.jpg
    IMG_20160921_134447_081.jpg
    88 KB · Views: 152
  • IMG_20160921_134449_719.jpg
    IMG_20160921_134449_719.jpg
    88.3 KB · Views: 101
  • IMG_20160921_134455_398.jpg
    IMG_20160921_134455_398.jpg
    91.8 KB · Views: 138
Last edited:

Camar068

Supporting Member
Supporting Member
Joined
Feb 5, 2014
Posts
4,158
Reaction score
3,019
Location
Kentucky
First Name
David
Truck Year
1986
Truck Model
K10/LM7 5.3/4L60e/np208/3.73/32"
Engine Size
10 yrs Air Force
Awesome man, plan to do a solid test on mine prior to putting it in to save time.
 

dougbert

Full Access Member
Joined
Nov 2, 2015
Posts
659
Reaction score
174
Location
5535 feet in Utah Mountains
First Name
doug
Truck Year
1984
Truck Model
K1500/nv4500/np241c/33x12.50x16/4.10 Gears 14BFF
Engine Size
5.3L - 2002 Silverado, rebuilt top end, long tube headers
Fired up HPTuners for the first time with an ECU attached.

Pictured below are:

the dedicated Laptop for HPTuners
the HPTuner MVI device
cables
my ECU standalone harness
and my recent SpareECU purchased (off of ebay) ECU
My table top harness plugged into my DC power bar using Anderson power connectors

for a short while the following ebay link should be visible: http://www.ebay.com/itm/311679969859?_trksid=p2060353.m2749.l2649&ssPageName=STRK:MEBIDX:IT

seller: spareecu

for $90 one can buy an ECU from them, flashed with the most recent firmware (HPTuners calls it OS). You MUST provide a VIN that they will program it with.

I have standardized on the 2002 Silverado Year/Model V8s - last real Gen III year

I read my new ECU and licensed it with a Year/Model HPTuners license, which cost 6 of my 8 credits ($300). With that I can tune all 2002 Silverado V8s: 4.8 5.3 5.7 6.0 and I think the 7.2

My journey has begun
 

Attachments

  • IMG_20160922_145335_063[1].jpg
    IMG_20160922_145335_063[1].jpg
    85.8 KB · Views: 122
  • IMG_20160922_145350_076[1].jpg
    IMG_20160922_145350_076[1].jpg
    87.7 KB · Views: 113
  • IMG_20160922_145355_468[1].jpg
    IMG_20160922_145355_468[1].jpg
    89.7 KB · Views: 224
  • IMG_20160922_145425_546[1].jpg
    IMG_20160922_145425_546[1].jpg
    90 KB · Views: 108

dougbert

Full Access Member
Joined
Nov 2, 2015
Posts
659
Reaction score
174
Location
5535 feet in Utah Mountains
First Name
doug
Truck Year
1984
Truck Model
K1500/nv4500/np241c/33x12.50x16/4.10 Gears 14BFF
Engine Size
5.3L - 2002 Silverado, rebuilt top end, long tube headers
I am very glad to have the HPTuners system.

The 5.3L engine I have installed in my 1984 GMC came with an ECU. It wasn't until yesterday, that I discovered that the ECU was a 4.8L configured one, whose VIN does NOT match the VIN given to me on the engine TAG when I bought the engine last year. How else could one know without a TUNER package?

geezzz

Well today are some pics of some work I did on the test stand and the 4.8L that will be tested shortly:
 

Attachments

  • IMG_20160924_165042_933[1].jpg
    IMG_20160924_165042_933[1].jpg
    83.7 KB · Views: 109
  • IMG_20160924_165050_388[1].jpg
    IMG_20160924_165050_388[1].jpg
    93.1 KB · Views: 111
  • IMG_20160924_165059_445[1].jpg
    IMG_20160924_165059_445[1].jpg
    92.5 KB · Views: 118
  • IMG_20160924_133421_689[1].jpg
    IMG_20160924_133421_689[1].jpg
    94.5 KB · Views: 139

dougbert

Full Access Member
Joined
Nov 2, 2015
Posts
659
Reaction score
174
Location
5535 feet in Utah Mountains
First Name
doug
Truck Year
1984
Truck Model
K1500/nv4500/np241c/33x12.50x16/4.10 Gears 14BFF
Engine Size
5.3L - 2002 Silverado, rebuilt top end, long tube headers
Items left to do:

1) Exhaust : got the muffler, 90 degree elbows and stick, awaiting welding
2) Harness
3) Mount fan
4) Battery tray and power hookup : Cut and awaiting welding
5) create Control panel
6) Modify the ECU image via HPTuners

The Injector cleaner device has arrived, cool item.

I was able to pull the PS pump off and installed the idler pulley and then found a smaller belt to fit. The pulley itself is my old tensioner pulley while the hardware is from the smooth idler pulley I just bought from ebay.

also is the belt number that fits, and an upper hose (MasterPro) for radiator, had to cut it short but it seems to work.
 

Attachments

  • IMG_20160924_190733_906[1].jpg
    IMG_20160924_190733_906[1].jpg
    94.3 KB · Views: 131
  • IMG_20160924_190741_677[1].jpg
    IMG_20160924_190741_677[1].jpg
    96.7 KB · Views: 95
  • IMG_20160924_190716_278[1].jpg
    IMG_20160924_190716_278[1].jpg
    92.3 KB · Views: 117
  • IMG_20160924_165042_933[1].jpg
    IMG_20160924_165042_933[1].jpg
    83.7 KB · Views: 98
Last edited:

Forum statistics

Threads
42,167
Posts
910,511
Members
33,662
Latest member
MenDeeZee
Top