Lowered C10 Helper springs

Disclaimer: Links on this page pointing to Amazon, eBay and other sites may include affiliate code. If you click them and make a purchase, we may earn a small commission.

Squarebody Brian

Junior Member
Joined
Nov 28, 2024
Posts
1
Reaction score
1
Location
Utah
First Name
Brian
Truck Year
1980
Truck Model
C10 Silverado
Engine Size
350
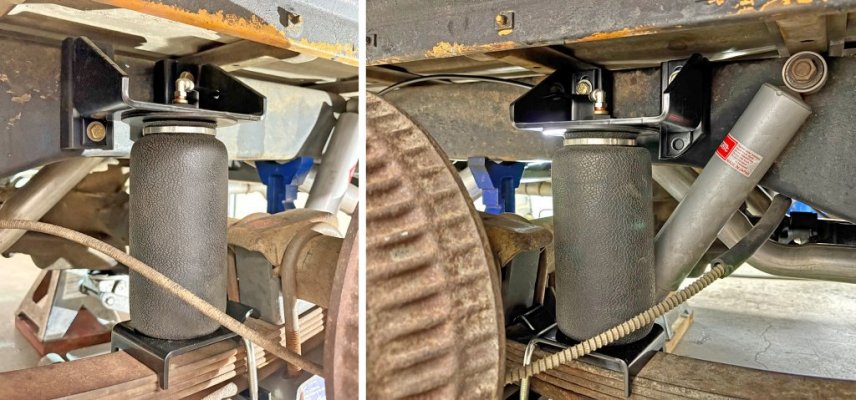
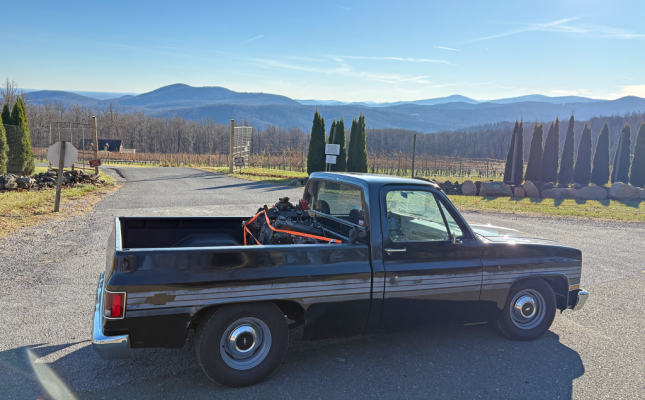
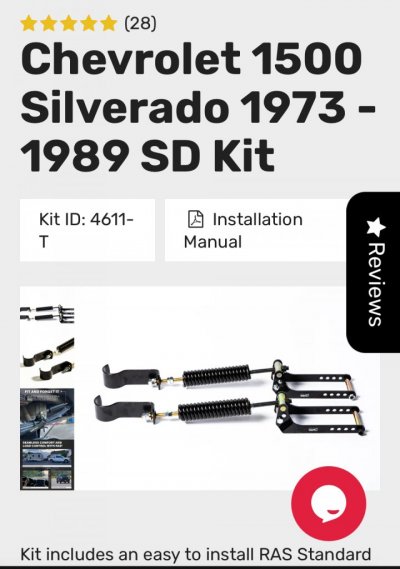
Anyone run Roadactive Suspension spring helper on a lowered square body? I have a small vintage trailer I pull and would like to reduce the sag on these old springs. My truck doesn’t sag much, but it’s enough that I’d like to level it out. The RAS kit looks pretty straight forward, and it looks like it would work with a flip kit. Just seeing if anyone has done this.
 

Attachments

  • IMG_4399.jpeg
    IMG_4399.jpeg
    89.1 KB · Views: 93
  • IMG_4400.jpeg
    IMG_4400.jpeg
    109.6 KB · Views: 82

TotalyHucked

Full Access Member
Joined
Feb 24, 2020
Posts
6,953
Reaction score
25,670
Location
Auburn, Georgia
First Name
Zach
Truck Year
1985
Truck Model
Sierra 1500
Engine Size
5.3
Never tried anything like that, I've always just put helper bags on everything. I used an NBS 1999-2006 (2007 classic) kit designed for use with a flip kit on those trucks. Just had to open up a couple holes and trim off one leg. Ran the lines back to the tag and just inflate them with a battery powered Ryobi inflator. Works great, I've got probably 25k miles on it now with no leaks

You must be registered for see images attach


You must be registered for see images attach


You must be registered for see images attach
 

RaysnCayne

Full Access Member
Joined
Dec 6, 2020
Posts
99
Reaction score
137
Location
Richmond
First Name
Zach
Truck Year
1987
Truck Model
R10 Custom Deluxe
Engine Size
305
Hey @TotalyHucked, now that I'm looking at doing the same thing you've done (this Air Lift kit on an 80s square), I have a few questions for you.

1. Why did you mount the big frame bracket in that orientation (upside down)? The instructions show it flipped the other way. Is there a lot less frame-to-bed clearance on our squares than on an OBS?
2. It looks like you left the "claw" or L-bracket off, the one that slides between the springs and perch to act as a safety catch for the lower bag bracket. Any particular reason for that?
3. Just doing a quick dry mock-up, it looks like the frame bracket needs to come off the frame a good 3/4" to sit directly on top of the spring bracket and square up the bag. Your notch kit plate helps with that a little bit. (I don't have a notch plate.) But did you find the two brackets don't line up the bag (top to bottom) as well?
 

Ricko1966

Full Access Member
Joined
Apr 11, 2017
Posts
9,955
Reaction score
19,108
Location
kansas
First Name
Rick
Truck Year
1975
Truck Model
c20
Engine Size
350
Hey @TotalyHucked, now that I'm looking at doing the same thing you've done (this Air Lift kit on an 80s square), I have a few questions for you.

1. Why did you mount the big frame bracket in that orientation (upside down)? The instructions show it flipped the other way. Is there a lot less frame-to-bed clearance on our squares than on an OBS?
2. It looks like you left the "claw" or L-bracket off, the one that slides between the springs and perch to act as a safety catch for the lower bag bracket. Any particular reason for that?
3. Just doing a quick dry mock-up, it looks like the frame bracket needs to come off the frame a good 3/4" to sit directly on top of the spring bracket and square up the bag. Your notch kit plate helps with that a little bit. (I don't have a notch plate.) But did you find the two brackets don't line up the bag (top to bottom)
 

RaysnCayne

Full Access Member
Joined
Dec 6, 2020
Posts
99
Reaction score
137
Location
Richmond
First Name
Zach
Truck Year
1987
Truck Model
R10 Custom Deluxe
Engine Size
305
I got my Air Lift bags installed on Friday, and then put them to work on Saturday. Drove way too far to pick up two "boat anchor" TBI 305s for possible future use in my rig. (Figure with the way things are going with new vehicles and poor-quality aftermarket replacement parts these days, might not hurt to have a complete back up engine or two. ;))

I spaced my upper mounts off the frame a little bit to get them to line up with the bottom mounts. Speaking of, I wanted to do the "hook plates" under the springs to properly hold the bottom mount in place. But that was a can of worms I didn't have time for (mainly coming up with a new, longer centering pin). I need to see if they moved after my 4.5 round, bumpy! trip. If they haven't, I probably won't mess with that.

I did quickly discover I should've followed the directions with the top bracket orientation. When mounting them this way, I've basically preloaded the bags so if they have any air at all, they effect my ride height (and quality). So I need to flip the top mount around to stretch out the bag so it only effects the ride when there's some weight in the bed.

Other than that, I'm really happy with how well they performed with about 1k pounds in the bed.
 

Attachments

  • IMG_2955.jpg
    IMG_2955.jpg
    138.5 KB · Views: 43
  • Two 305s_1125.png
    Two 305s_1125.png
    1.1 MB · Views: 49
Last edited:

TotalyHucked

Full Access Member
Joined
Feb 24, 2020
Posts
6,953
Reaction score
25,670
Location
Auburn, Georgia
First Name
Zach
Truck Year
1985
Truck Model
Sierra 1500
Engine Size
5.3
Hey @TotalyHucked, now that I'm looking at doing the same thing you've done (this Air Lift kit on an 80s square), I have a few questions for you.

1. Why did you mount the big frame bracket in that orientation (upside down)? The instructions show it flipped the other way. Is there a lot less frame-to-bed clearance on our squares than on an OBS?
2. It looks like you left the "claw" or L-bracket off, the one that slides between the springs and perch to act as a safety catch for the lower bag bracket. Any particular reason for that?
3. Just doing a quick dry mock-up, it looks like the frame bracket needs to come off the frame a good 3/4" to sit directly on top of the spring bracket and square up the bag. Your notch kit plate helps with that a little bit. (I don't have a notch plate.) But did you find the two brackets don't line up the bag (top to bottom) as well?
My bad dude, was out of town for Thanksgiving and didn't get on here at all until today.

1. I had to go back and look on their website since it's been so long, interestingly the pictures on the listing show that upper bracket one way but in the instructions, it's the way I have it. I honestly never opened the instructions cuz I've installed several of these kits over the years. I just positioned the upper bracket how it worked best with my C-notch bolts and positioned it as high as I could.

2. The L-bracket was left off because I simply ran out of time. I was installing these for our first run out to Dino's Git Down and I knew I'd be very loaded. Finished the install the day before we left. I've put over 30k miles on it since then with no issue with the L-bracket not being there, thankfully nothing has moved or shifted at all (I check it regularly).

3. The notch plate did help with alignment some, but I still had to slot the upper hole about 3/4" IIRC toward the outside to get the bag to line up straight. Slow going with a dremel lol

You must be registered for see images attach
 

TotalyHucked

Full Access Member
Joined
Feb 24, 2020
Posts
6,953
Reaction score
25,670
Location
Auburn, Georgia
First Name
Zach
Truck Year
1985
Truck Model
Sierra 1500
Engine Size
5.3
I did quickly discover I should've followed the directions with the top bracket orientation. When mounting them this way, I've basically preloaded the bags so if they have any air at all, they effect my ride height (and quality). So I need to flip the top mount around to stretch out the bag so it only effects the ride when there's some weight in the bed.

Other than that, I'm really happy with how well they performed with about 1k pounds in the bed.
It's hard to say but I think I've got my bracket about 1/4"-3/8" higher than yours, I slotted my bolt holes a little further to get it up a bit more. I can keep 5-8psi in the bags and it doesn't affect my ride quality and probably raises the back of the truck up less than 1/4".

You must be registered for see images attach


You must be registered for see images attach


I was definitely loaded for bear that first Dino's. Most of my toolbox, spare parts, cooler, luggage and some AMD parts headed out for some friends. I figure I was ~1200-1500lbs or so in the bed and worked perfectly.

You must be registered for see images attach
 

RaysnCayne

Full Access Member
Joined
Dec 6, 2020
Posts
99
Reaction score
137
Location
Richmond
First Name
Zach
Truck Year
1987
Truck Model
R10 Custom Deluxe
Engine Size
305
It's hard to say but I think I've got my bracket about 1/4"-3/8" higher than yours, I slotted my bolt holes a little further to get it up a bit more. I can keep 5-8psi in the bags and it doesn't affect my ride quality and probably raises the back of the truck up less than 1/4".

Now that I look closer, I think you do have yours a solid 3/8" higher. And honestly, that might be all the more I need to make it work for my situ. I was kinda thinking flipping them over might give me too much height/distance.
Thanks for the input.
 

Latest posts

Forum statistics

Threads
48,419
Posts
1,067,007
Members
42,806
Latest member
that_orange_c10
Top