lamp sockets factory instrument panel

Disclaimer: Links on this page pointing to Amazon, eBay and other sites may include affiliate code. If you click them and make a purchase, we may earn a small commission.

AuroraGirl

Full Access Member
Joined
Sep 8, 2019
Posts
9,213
Reaction score
6,195
Location
Northern Wisconsin
First Name
Taylor
Truck Year
1978, 1980
Truck Model
K10, K25
Engine Size
400(?), 350
You must be registered for see images attach

I think the original lighting is from that little plastic scoop hood thing that captures light from the illumination coming off the gauges and shows it down. behind the cover you cant see that scoop, and it appears a distinct away thing. maybe thats hwy you cant get the light becausey ou have non standard setup. the back white plastic and the blue black shell face thing would all come to play here to scatter light
You must be registered for see images attach

I would say that probably is the same in the 70s
 

Raider L

Full Access Member
Joined
Sep 1, 2020
Posts
1,892
Reaction score
996
Location
Shreveport, LA
First Name
William
Truck Year
1974
Truck Model
C10
Engine Size
355
@AuroraGirl,

Yeah, I don't even have any of that lighting anymore. I do have the white plastic box, but none of the lighting for it. My Autometer speedo and tach have their own lighting from bulbs in the back of them. So there is "scattering" of light from how the stock white plastic box is designed, probably, and you are right, and I made that point in my post before yours, that I thought the light was coming from some remote source, like the other gauge lighting. Good pictures. Especially the top one. You can really see how the gear indicator and the lower part of the gauges are.

If I had a white plastic box to examine and try to figure out how the light, indirectly, found it's way to the gear indicator. Because even when my truck was stock and I'd be under the dash doing something I couldn't figure it out then. I just thought, well it is what it is. No, engineers are behind this I'll guarantee you! They don't think like we do.

Taylor, do you realize how much money you've got showing in that top picture! Lol! I paid $34.95 for the gear indicator I bought from "Classic Trucks", plus shipping and handling! I'd have a guard standing by that car. It is a car isn't it?

Now, let's get technical. The factory manual calls the thing I keep calling the White plastic box a, "instrument cluster case". There is a metal piece that I did keep so I could screw the case to it then to the dash, but that metal part in front of the case is called the "retainer". It has all the holes cut into it so the gauges can look through it. Then the clear plastic part is obviously the "lens". And all of it screws either together or to the dash.

So whenever I am talking about the white plastic box, I'll call it the "instrument case" from now on. That would be more or less accurate. Yeah, see that's the part I gutted to make room for all the new gauges. So all those boxes and other things for the lights is gone!
 
Last edited:

Raider L

Full Access Member
Joined
Sep 1, 2020
Posts
1,892
Reaction score
996
Location
Shreveport, LA
First Name
William
Truck Year
1974
Truck Model
C10
Engine Size
355
I may make a trip to one of the wrecking yards that say they have some old Caprice cars. I may luck out and find something I could use. Even if I cut a lamp box off the instrument case and mod it in to use, that would be okay. If I try to make somekind of a box out of cardboard I can see "hot glue" coming into play, like @squarelyfe suggests except he was saying to use some RTV, same thing, some sort of adhesive in a spot or two just to hold the thing together. It's not like it's going to be handled a lot. It's just going to sit there and shine light on the indicator and not the floor.
 

Raider L

Full Access Member
Joined
Sep 1, 2020
Posts
1,892
Reaction score
996
Location
Shreveport, LA
First Name
William
Truck Year
1974
Truck Model
C10
Engine Size
355
@AuroraGirl,

I'm thinking about what you were saying about this "hood" thing you mentioned, and I started thinking that maybe somehow the indicator may have got some light from off the clear lens from gauge light reflected back at it. If I can get out to one of the wrecking yards and get my hands on a instrument case then I can examine it and try to figure out how it worked. If it proves out I may get it just to have it for anything else a source of pieces.
 

AuroraGirl

Full Access Member
Joined
Sep 8, 2019
Posts
9,213
Reaction score
6,195
Location
Northern Wisconsin
First Name
Taylor
Truck Year
1978, 1980
Truck Model
K10, K25
Engine Size
400(?), 350
@AuroraGirl,

I'm thinking about what you were saying about this "hood" thing you mentioned, and I started thinking that maybe somehow the indicator may have got some light from off the clear lens from gauge light reflected back at it. If I can get out to one of the wrecking yards and get my hands on a instrument case then I can examine it and try to figure out how it worked. If it proves out I may get it just to have it for anything else a source of pieces.
cant you just get a fiber optic for a similar year square, you may have one in your windshield wiper switch if you have a 73
 

Ellie Niner

Full Access Member
Joined
Aug 7, 2021
Posts
379
Reaction score
613
Location
Tucson, AZ
First Name
Tory
Truck Year
1986
Truck Model
K10 Silverado
Engine Size
LE9 305
Another option might be to use an ashtray light, which would allow you to direct light in one direction without spraying it all over the floor. The picture I posted was just the first thing that came up when I searched; I think it's for an early Mustang... but the design stayed pretty much the same for a lot of American cars from the 1960's through the 80's. You might have to drill out or grind the aperture a bit to get enough light out of it.

My 1991 Lumina has an ashtray light pretty much like this one, and just takes a 194 bulb. The ashtray light on my truck is fiber optic, and uses a special printed circuit socket that leaches some light off of one of the bulbs in the instrument cluster, so that one wouldn't work in your installation.
 

Attachments

  • hw3912_1.3128.jpg
    hw3912_1.3128.jpg
    16.5 KB · Views: 76

squarelyfe

Full Access Member
Joined
Nov 8, 2021
Posts
174
Reaction score
104
Location
NORCAL USA
First Name
Larry
Truck Year
1975
Truck Model
k25
Engine Size
350
If your saying it was too bright maybe try to incorporate a deflector to keep it aimed at the indicator from below facing upwards not out. Like what niner posted
 

Raider L

Full Access Member
Joined
Sep 1, 2020
Posts
1,892
Reaction score
996
Location
Shreveport, LA
First Name
William
Truck Year
1974
Truck Model
C10
Engine Size
355
@AuroraGirl, @squarelyfe,

That's what I plan to do with what I got from one of my local wrecking yards a few minutes ago.
You must be registered for see images attach
The above pic is what I got out of a '88 Suburban! It cost all of 4 bucks! Heck, their prices have been so high lately, I brought a $20. This pic is as is. It still had all the gauges, printed circuit, and most of the bulbs. And it was laying right on the seat! Thank God because the trucks that they showed on their inventory weren't there, a '71 C10. I couldn't find it, and it may have been striped anyway. They had a bunch of late '90's trucks but several of them either didn't have the dash in them or the whole dash was still in the truck and I didn't go there to dismantle a truck, just to grab something quick. You couldn't have asked for anything quicker with it laying on the seat. So, I striped it and laid everything in a nice neat pile so if someone is looking for gauges, gauge clips, the things the gauges push into, and all the rest is there. They'd probably be pis**ed when they see the box is gone. Hey, you snoose you loose.
You must be registered for see images attach
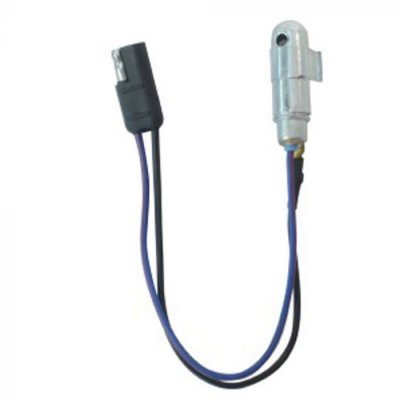
I'll probably use this box and cut it down to what I need and put the bulb in it. I may have to put a dab of hot glue on the socket to hold it in, but that's cool so long as it doesn't fall off that's all I care about.
You must be registered for see images attach
And I stole this! It's the blue film for the bright light bulb.
You must be registered for see images attach
The above pic is how it goes in the box.

If anyone wants what's left over, maybe to repair what they have, or to use some part of it, you can have it. I doubt I'll be needing anymore of it.
 

squarelyfe

Full Access Member
Joined
Nov 8, 2021
Posts
174
Reaction score
104
Location
NORCAL USA
First Name
Larry
Truck Year
1975
Truck Model
k25
Engine Size
350
Looks like someone left their lights on overnight, enough to create heat lol. Looking forward to seeing this mod job.. are you going to rebuild everything into this one or cut off the bulb lock area and fuse it into yours?
 

Raider L

Full Access Member
Joined
Sep 1, 2020
Posts
1,892
Reaction score
996
Location
Shreveport, LA
First Name
William
Truck Year
1974
Truck Model
C10
Engine Size
355
@squarelyfe,

Cut off what I need so that, yes be able to lock the bulb into part of the box of choice that will fit into that space. That may take some engineering to do. we'll see. Film at eleven.
 
Last edited:

Raider L

Full Access Member
Joined
Sep 1, 2020
Posts
1,892
Reaction score
996
Location
Shreveport, LA
First Name
William
Truck Year
1974
Truck Model
C10
Engine Size
355
Pics
You must be registered for see images attach
I've done this ALOT! I've used all kinds of cutting tools over the years when I used to mod computer cases. So I have a lot of experience in cutting and shaping different plastics. I start out seeing how much I can get done with this high speed saw. Well, it looks like I'm going to have to use what I discovered was real good at cutting into just about any shape plastic, and that is a.......
You must be registered for see images attach
ROTO drill! Remember these things? There was commercials on TV when they came out a number of years ago where the guy was cutting out sheet rock for electrical boxes, and then he'd do something similar to a piece of wood, and he would "plunge cut" into a piece of bathroom tile. Remember those commercials? The kit of course came with the motorized hand drill like a Dremel tool. Well, I just bought the bits from Lowe's and used my Dremel tool to cut and shape whatever it was I was working on. These bits are tough, and will cut at any angle, tip first, like the commercials, and edge-wise, anything you want. In the case of this plastic they cut it like a hot knife through butter!
You must be registered for see images attach
I'm just pulling it straight down through the wall of the box. Yeah, there's melted plastic but all you have to do is drag it through what you've already done and the bit cleans it out.
You must be registered for see images attach
See?
 
Last edited:

Raider L

Full Access Member
Joined
Sep 1, 2020
Posts
1,892
Reaction score
996
Location
Shreveport, LA
First Name
William
Truck Year
1974
Truck Model
C10
Engine Size
355
More.
You must be registered for see images attach
The above pic is cutting on the front of the box. I saw that there was some pieces left in the back.
You must be registered for see images attach
Finished with cutting the box out of the instrument case. Sorry, I didn't push those peg board hangers enough out of the way so you could see the parts in the back I cut through. But you get the idea.
You must be registered for see images attach
And this is what the roughed out box looks like. Now I use the drum sander and remove all the excess plastic and get down to just a clean box.
You must be registered for see images attach
You can see all that needs to come off, including not just the melted plastic, but I also have to make the sides of the box the same thickness, which by the looks of it will be 90% of the sanding I'll have to do.

Yeah, I can hear it now, " Man! You destroyed a perfectly good box! Do you know how much those things cost, and that is if you can find them??!!" Well, there were a few more of those cars and Suburbans left out there, you want me to go get you one? There were at least six early '90's Caprice's out at this wrecking yard I went to today. I didn't see them, but I was looking for trucks, and I needed to hurry up and get out of there to beat five o'clock traffic and get home!
 

Raider L

Full Access Member
Joined
Sep 1, 2020
Posts
1,892
Reaction score
996
Location
Shreveport, LA
First Name
William
Truck Year
1974
Truck Model
C10
Engine Size
355
More.
You must be registered for see images attach
Aww! My favorite tool, a 80 grit sanding drum! That sucker will cut through anything. Fast to, depending how hard you push down on it. See, "you're supposed to let the tool do the work." Screw that! I push down as hard as I need to, to get as much work done as fast as the tool will let me. At 25,000 rpm nothing can stop it, including your skin. Ask me how I know! See that deadly little saw blade, (go back to the start of these pics) It's much bigger cousin sent me to the hospital one night. Right after I got the set of saws I was cutting something, and the saw caught in the piece and jumped out of the cut line and before I even knew what happened it cut straight through the web of my thumb and index finger of the hand I was holding the piece with. You could look into my hand in the space of the web between your thumb and index finger. I almost fainted when I looked down and saw into my hand!
You must be registered for see images attach
This pic above is the Stage II shape. Now I've got something that I can modify even more to end up with the finished piece. From here I'll put it up in there where the light is so I can see how much of this I'll need to cut and modify even more so it will fit up in there and not get in the way of anything. Yeah, yeah, sure there are probably ten better ways to do this more efficiently but this is what I'm doing right now. Who knows where this will end up. It's called engineering on the run! See, I want that hole where the light socket snaps into so it'll work like a stock lamp would. Snap in, snap out.
You must be registered for see images attach
The pic above is with the lamp socket snapped into the hole like they go.
You must be registered for see images attach
You don't think there wasn't a lot of plastic to remove to reach what you see I ended up with??
 
Last edited:

Raider L

Full Access Member
Joined
Sep 1, 2020
Posts
1,892
Reaction score
996
Location
Shreveport, LA
First Name
William
Truck Year
1974
Truck Model
C10
Engine Size
355
I decided that light wasn't going to work if I am going to use this box to put a light in. So I needed to make a new one, but this time the wires couldn't be on the underside like the first one I did. The wires were going to have to be on the outside of the socket and that was going to require more precise soldering than the other light did.
You must be registered for see images attach
First locate the blade of one side of the contacts of the bulb and by using another Dremel cutter, cut down into the socket at the blade that contacts the printed circuit. That contact will have to be free to depress as I push the socket into the hole, but have the wire soldered to it so I can tie it into the headlight circuit and this light will come on.
You must be registered for see images attach
Thusly. Now if I can steady my hand enough to get solder onto it and not melt the dang socket I just might be able to pull this off.
You must be registered for see images attach
Hey, it looks a lot worse than it really is. I had to practice while I was doing it! What can I say? I never did fine soldering like this before and really didn't know if I could do it. It's okay. I had to trim off just a little of insulation and then twist the wire end tightly, then bend the wire end 90 degrees so that it will look out towards the end of the blade. The wires will lay along side the socket now and not be sticking out. This will let the whole thing fit tighter up there next to the gear indicator.
You must be registered for see images attach
This wire came out better. I know it doesn't look it but it's soldered okay. In this pic above you can see that the bulb contact blade will depress as the socket is pushed into the hole. I have some "liquid tape" I can put on the wire that will cover it up and protect it.
 
Last edited:

Raider L

Full Access Member
Joined
Sep 1, 2020
Posts
1,892
Reaction score
996
Location
Shreveport, LA
First Name
William
Truck Year
1974
Truck Model
C10
Engine Size
355
More.
You must be registered for see images attach
Here you can see that the blades are depressing just fine and the bulb socket is locked into the hole. The socket is flat down. Now I can take the socket out in the event the bulb burns out, just like a real one. lol.
You must be registered for see images attach
This is a pic of the socket locked in the box.
You must be registered for see images attach
I took that sanding drum and cleaned up the edges of the wire so it wouldn't look so ragged.
You must be registered for see images attach
Here's the first one I did. It's okay and all, but as you can see it would never go in the hole. The wires are soldered on the top of those blades blocking them from going in the hole. I'll cut this light loose and install the other one I just completed. Then I'll get to work on the box install. It ought to be fun.
 
Last edited:

Latest posts

Forum statistics

Threads
42,126
Posts
909,675
Members
33,619
Latest member
SMC2224
Top