lamp sockets factory instrument panel

Disclaimer: Links on this page pointing to Amazon, eBay and other sites may include affiliate code. If you click them and make a purchase, we may earn a small commission.

Raider L

Full Access Member
Joined
Sep 1, 2020
Posts
1,892
Reaction score
994
Location
Shreveport, LA
First Name
William
Truck Year
1974
Truck Model
C10
Engine Size
355
@AuroraGirl,

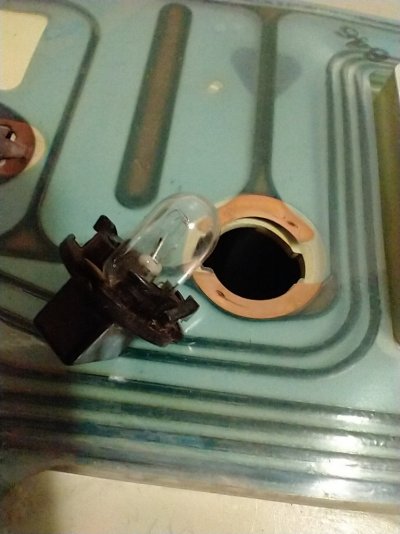
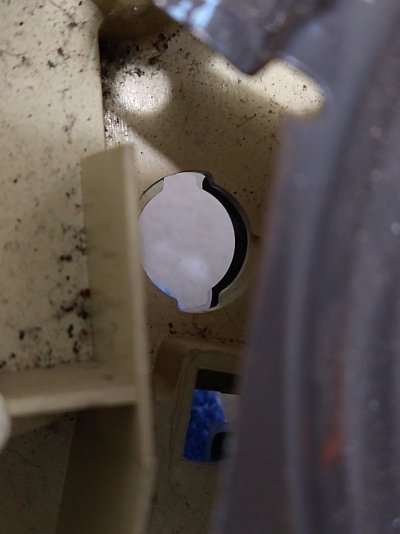
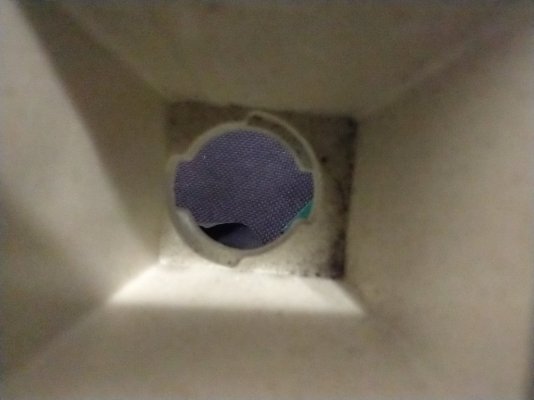
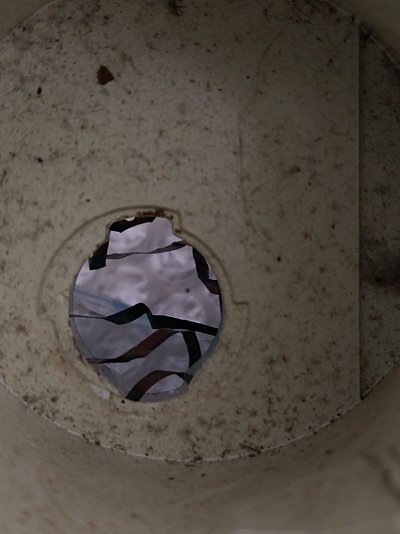
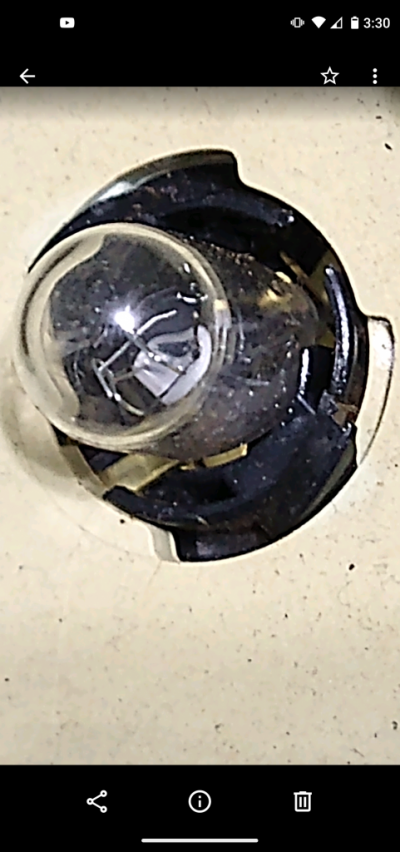
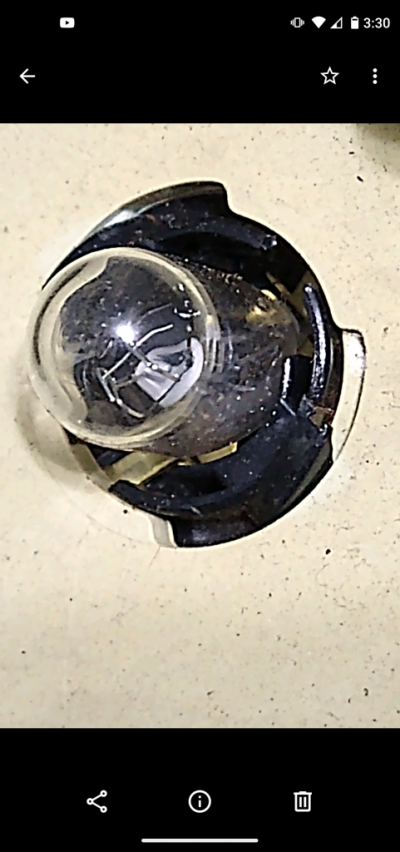
You are the first person I though of to ask this question. Do you have the white, or duck egg green, plastic box that is what the printed circuit lays onto. What I need to see are the bulb holes, up close, so I can see how the bulb is installed into the hole. And a up close pic of how the bulb socket twists into the hole. I want to design a "hood" to put around the gear indicator bulb I made up to illuminmate the gear indicator but my bulb, which is in a factory socket is just zip tied to a hole in the dash to hold it in place to illuminate the lettters on the indicator. I've found that there is a lot more light shining down on the floor so I;'m going to have to make a hood with the papropriate size hole, and more importantly someway to twist the bulb inot the hole to hold the "hood" onto the bulb.
Have you got one of those boxes laying around in your vast array of misc. parts and sundri supplies??
 

Raider L

Full Access Member
Joined
Sep 1, 2020
Posts
1,892
Reaction score
994
Location
Shreveport, LA
First Name
William
Truck Year
1974
Truck Model
C10
Engine Size
355
@AuroraGirl,

Here is a bulb. I may have to modify my design here where the wires are attached to the bulb, but we'll see. I have all kinds of different card board stock. I plan on making some selection from that supply fold the sides up to make a box for the lamp to go into and if I could make it in such a way so I could take the bulb out without destroying the box in case I ever need to change the bulb, all the better. If i have to make the box out of alum. so it will work like the bulb hole in the white plastic box, I will.
You must be registered for see images attach
 

AuroraGirl

Full Access Member
Joined
Sep 8, 2019
Posts
9,201
Reaction score
6,166
Location
Northern Wisconsin
First Name
Taylor
Truck Year
1978, 1980
Truck Model
K10, K25
Engine Size
400(?), 350
You must be registered for see images attach

Closest ive got pic wise, chief.

My 80 gmc cluster hasnt been out in 2 years and if i take it out it will fall apart lol(the backing plastic piece you need a pic of) the 78 probably wouldnt break so badly but it has a speedo cable and a shifter thing Ive never touched those before so i dont knw if it would be hard or not
 

AuroraGirl

Full Access Member
Joined
Sep 8, 2019
Posts
9,201
Reaction score
6,166
Location
Northern Wisconsin
First Name
Taylor
Truck Year
1978, 1980
Truck Model
K10, K25
Engine Size
400(?), 350
You must be registered for see images attach
 

Raider L

Full Access Member
Joined
Sep 1, 2020
Posts
1,892
Reaction score
994
Location
Shreveport, LA
First Name
William
Truck Year
1974
Truck Model
C10
Engine Size
355
@AuroraGirl,

Yeah, I don't want that to happen! And yes, I see those you show in the above pic, but I need a pic of just one of the holes, and how the bulb goes into the hole and "locks" in.

Now, if anyone else who reads this has a back box or whatever it's name is who can take a good clear pic of the hole, then how the bulb twists and locks into place in the hole. This is so I can get my design right.

If anyone is thinking, "Well, just go to the wrecking yard and sneak your camera in with you and take all the pics you want.", there are no old trucks like I'd need to find left around. And you know they aren't going to notify me if they get one in either. And I don't have the time or the money for gas to keep running out to the local wrecking yards looking for a old truck one of these days. We have about six or seven good size wrecking yards around town.

I just need a couple of good clear close up pics of the hole and how the bulb socket goes into the hole. If you look at a socket you'll see there are a couple of lock looking things on each side. How do those go into the hole, and I assume after the socket is twisted there's something, that's what I need to see, and as the bulb is twisted something in the hole comes in contact with those lock things on the socket and the socket locks in place. What does it look like?
 
Last edited:

Raider L

Full Access Member
Joined
Sep 1, 2020
Posts
1,892
Reaction score
994
Location
Shreveport, LA
First Name
William
Truck Year
1974
Truck Model
C10
Engine Size
355
When I was rebuilding my truck i took the white plastic box and cut everything out of the center and just left the perimeter that the instrument bezel screws to. All the instrument holes, lamp pockets, clip holes that are what the gauges pin into, everything was cut out. Now, the center part where the factory speedo and gas gauge were, the part where the clear bezel screws to was left because I needed that part of the clear bezel to put the Autometer speedo and tach into with their install clips that I couldn't install onto the instrument bezel. I then cut 3 5/8" holes into the clear bezel with a big hole saw so the speedo and tach would slip into them and wouldn't stand out any further than the original gauges. Thankfully it worked but left me with a skeleton frame with hardly any of the parts the original white plastic box had on it.

Does our forum have any close up's of the white plastic box in the library or any place like that?
 

squarelyfe

Full Access Member
Joined
Nov 8, 2021
Posts
174
Reaction score
104
Location
NORCAL USA
First Name
Larry
Truck Year
1975
Truck Model
k25
Engine Size
350
Not sure if this is what you're looking for but here is the back of the box where the bulb meets the printed circuit.
 

Attachments

  • IMG_20211214_085135819.jpg
    IMG_20211214_085135819.jpg
    116.8 KB · Views: 93

Raider L

Full Access Member
Joined
Sep 1, 2020
Posts
1,892
Reaction score
994
Location
Shreveport, LA
First Name
William
Truck Year
1974
Truck Model
C10
Engine Size
355
@squarelyfe,

Wow, that's great, but now show me the other side of that hole so I can see how those lock things on the bulb socket lock into the box. Because they have to lock in somehow otherwise the socket would just fall out. Your pic is good because now I know the hole, on the side shown just has cutouts on each side for the locks on the bulb socket. I can do that, but it's the other side that will determine whether I can actually make a way to lock the socket into my cardboard hood.
 

squarelyfe

Full Access Member
Joined
Nov 8, 2021
Posts
174
Reaction score
104
Location
NORCAL USA
First Name
Larry
Truck Year
1975
Truck Model
k25
Engine Size
350
Here you go..
 

Attachments

  • IMG_20211214_152238425.jpg
    IMG_20211214_152238425.jpg
    77.6 KB · Views: 93
  • IMG_20211214_152333206.jpg
    IMG_20211214_152333206.jpg
    90.2 KB · Views: 94
  • IMG_20211214_152247937.jpg
    IMG_20211214_152247937.jpg
    90.7 KB · Views: 94

squarelyfe

Full Access Member
Joined
Nov 8, 2021
Posts
174
Reaction score
104
Location
NORCAL USA
First Name
Larry
Truck Year
1975
Truck Model
k25
Engine Size
350
With the socket locked in
 

Attachments

  • Screenshot_20211214-153016.png
    Screenshot_20211214-153016.png
    610.5 KB · Views: 92
  • Screenshot_20211214-153007.png
    Screenshot_20211214-153007.png
    580.7 KB · Views: 96

squarelyfe

Full Access Member
Joined
Nov 8, 2021
Posts
174
Reaction score
104
Location
NORCAL USA
First Name
Larry
Truck Year
1975
Truck Model
k25
Engine Size
350
I'd have to see this "cardboard" but the socket has a gap between it end stop. It's possible to pinch cardboard down with your fingers and get it to lock but would think moisture won't be your friend down the road. Can you cut a thin plastic sheet up and melt/fuse/bond it like your design? You could always cut the shapes like the factory but use RTV to hold them in. If the bulb goes out you can always pull it apart but that stuff works magic. I've had great results when a coil pack plug connector clip snapped. Place a little by the snap area and it dries without moving but can always get it off later. Show me photos of what you are working with.
 
Last edited:

Raider L

Full Access Member
Joined
Sep 1, 2020
Posts
1,892
Reaction score
994
Location
Shreveport, LA
First Name
William
Truck Year
1974
Truck Model
C10
Engine Size
355
@squarelyfe,

Thanks for your great pictures. That's just what I needed! Yep, that's what I thought it would be. I've worked with these kinds of things and knew it had to have been what your pics show.

I wanted to see what the real thing looked like first before I picked out what I was going to use. so, I haven't picked anything yet. I'm going to let my inventive mind work out those details and then I'll know. It's that ramp the lock thing on the bulb slides up on, that will determine what I use. The way the bulb socket is designed, how the lock device is made puts a lot of tension on the ramp as the bulb is being twisted that locks it. It looks like the lock thing on the bulb socket was made to actually lock into something, not just slide up a ramp putting pressure on that part of the socket. I've seen other "friction" locks on other types of sockets that just had a corresponding ramp on the socket that was like a "interference fit" that would just cause the socket to get tight and you'd know when it was enough. That's why I say I think the socket was designed for some other kind of lock because the socket's lock is more like a spur that "clicks" into somekind of lock and not merely a corresponmding ramp so as to slide up the ramp on the box and tighten the socket that way. Maybe the socket was designed for something else and then the engineers who designed the box said, "No, we've done this.", and the bulb socket engineers looked at it and said, "Ours will work. We've already spent to much time on locking in a bulb socket to have to go back and redesign it to match your box design. Screw it!"

My brain is working on it right now!
 

Raider L

Full Access Member
Joined
Sep 1, 2020
Posts
1,892
Reaction score
994
Location
Shreveport, LA
First Name
William
Truck Year
1974
Truck Model
C10
Engine Size
355
@squarelyfe,

As a matter of fact, I have some plastic out in the shop I keep for various and sundri projects. I would like to go over to Hobby Lobby and see if they've got some sheet plastic of different thicknesses. I could do a good one with some flat sheets of plastic I could glue together. Then again, I went on line last night to the sites of some of our local wrecking yards and they've got several late '80's and early '90's Chevy Caprice's that might have a box in their dashes. Do ya'll think that year would have a similar instrument package like our trucks?? Maybe not the early 90's but then again maybe they would. Even if they're a different design they may have the same kind of bulb enclosure that the same bulb socket would fit. It would be fun tearing into one of those cars. I just have to be watchful due to the fact our wrecking yards have become crazy on their prices in the last ten or so years. Ever since the "clunker buy back" or whatever it was called when the government was buying all the, what they called "clunkers". I think it messed up the minds of the wrecking yard owners. All of a sudden they realized how much they could get for all these wrecks and now they want a fortune for a screw!!
 

squarelyfe

Full Access Member
Joined
Nov 8, 2021
Posts
174
Reaction score
104
Location
NORCAL USA
First Name
Larry
Truck Year
1975
Truck Model
k25
Engine Size
350
* Update: Ok I see you mention the indicator light. If that is what you're trying to accomplish we definitely need to see what is left of the box. I could see a thin cut piece of aluminum slotted to make something like this work. Also if lighting is dim you should try the iridescent needle paint, it will brighten it up. Think I paid $8 for mine from ebay and will improve it a little once lit. You don't have to remove the needles, you can cut a line in a piece of paper and slip it onto the face then paint it.

As for the junk yards I agree it's getting tough depending on where you live. 30-47 yrs later not much is left. People instantly gut the trucks for parts, some being resellers which makes it harder to find something cheap. Private yards use eBay for price comparison which really screws you. So you might as well go online and order, then wait a week for your part to arrive vs not knowing when the next truck could come in and if it even has the part you need.

The indicator bulb location is why the damn things are so dim. Light literally has to bend outward and down if you look at it's placement. A bright white LED bulb would also boost it.
 
Last edited:

Raider L

Full Access Member
Joined
Sep 1, 2020
Posts
1,892
Reaction score
994
Location
Shreveport, LA
First Name
William
Truck Year
1974
Truck Model
C10
Engine Size
355
@squarelyfe,

No, I'm not having a problem with it being dim, as a matter of fact that's the reason why I'm having to make a "hood" for it is to cut down on the light that is now shining on the floor...like a lot. I really never knew where the light for the indicator came from, although it was, like you're saying it seemed to be coming from light for one of the other gauges up there and the light for the indicator seemed to be coming from someplace away from it. Like the light was just "washing" from some other gauge. The actual nearest light is the turn signal bulbs but they are in a box by themselves. And I don't believe there is an opening in that box to wash some light onto the indicator. So, I'm at a loss. That's why I just made up a bulb to put directly on the indicator. And, believe me the indicator needle is lit up good, and the whole scale has light on it now. I just don't want any shining onto the floor like it is.

I'll rig something up for it.
 

Latest posts

Forum statistics

Threads
42,029
Posts
907,655
Members
33,521
Latest member
Laqota
Top