6.7 Cummins Suburban Build

Disclaimer: Links on this page pointing to Amazon, eBay and other sites may include affiliate code. If you click them and make a purchase, we may earn a small commission.

grampsbutler

Full Access Member
Joined
Oct 3, 2021
Posts
55
Reaction score
221
Location
San Diego, CA
First Name
Graham
Truck Year
1984
Truck Model
K10 Suburban
Engine Size
6.2l Diesel
The Starting Point

I've been on this board for a while and have learned a lot from the Squarebody community.

Last week I started on an engine swap build for my 1984 Suburban. I am posting so that others might learn from my mistakes.

The truck is an 84 Suburban K10 with the 6.2l Diesel completely stock. I have owned it 5 years and in that time I have put 15,000 miles on it, installed a 6" lift, but 37" wheels and tires and made various repairs to keep it running. I like truck as is, but the 6.2 is a gutless motor, and the injector pump had developed a fuel leak. From what I understand this is fairly common on these trucks, but it gave me the excuse to take it off the road for a few months to do the swap. I paid 2900 for the truck 5 years ago.

What is going in:
Engine: 6.7L Cummins out of a 2010 dodge ram. Truck had 6200 miles on it when it was wrecked.
Transmission: G56 Transmission Transmission: 6sp transmission out of a 2013 Dodge, it had some miles on it so I did a complete rebuild.
Transfer Case: NP241 out of a 1988 Dodge ram with the passenger side drop. Also did the rebuild on the TC.

I will share details about the rebuild and modifications that I have made to the new drive train separately and in detail. For now I wanted to share the starting point.

My goal with this build is to have a solid family camping/overland vehicle. I don't plan to tow or haul much. I will leave all the emissions stuff in place, and I don't intended to turn up the power. It needs to be able to cruise comfortably at 75 on the freeway and be a capable off-road vehicle. I am not planning to repaint or do the body work. It is a rough truck, which is how I like it. I am planning to install heat and air, which has never worked since I have owned the truck.

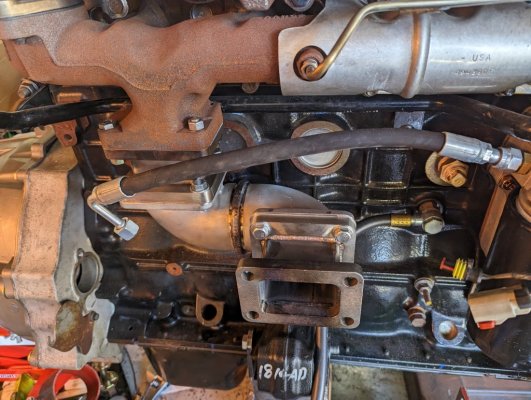
Here are some pictures of the truck before I started tearing into it last weekend.


You must be registered for see images attach

You must be registered for see images attach


You must be registered for see images attach

You must be registered for see images attach
 

grampsbutler

Full Access Member
Joined
Oct 3, 2021
Posts
55
Reaction score
221
Location
San Diego, CA
First Name
Graham
Truck Year
1984
Truck Model
K10 Suburban
Engine Size
6.2l Diesel
Teardown and prep

I removed the front clip from the frame, pulled the old engine, transmission and transfer case. I spent the best part of a day cleaning 30 years of old oil and grime off the frame. Removed the engine mounts and cut the rivets and removed the engine cross member. I also plan to do the steering box reinforcement, so I pulled off the steering box.

This was 2 full long days of work, but I'm very happy with the results.
You must be registered for see images attach
 

grampsbutler

Full Access Member
Joined
Oct 3, 2021
Posts
55
Reaction score
221
Location
San Diego, CA
First Name
Graham
Truck Year
1984
Truck Model
K10 Suburban
Engine Size
6.2l Diesel
Relocating the turbo

The turbo on the 6.7 ISB sits a lot further back and a lot lower than on earlier Cummins. in the stock position it would have interfered with the frame, and been so far back that there would be no room for exhaust without butchering the firewall. I considered switching to an earlier exhaust manifold, but that would have meant getting rid of the EGR system etc etc. I want to run the motor stock.

Soooo today I went about moving the turbo forward ~6 inches and up ~6 inches. I bought a couple of t4 flange elbow joints from Fleabay and fabricated some adapters to go from the T4i exhaust manifold flange to the T4 elbow, and then again back to the turbo. I welded the elbows together so that the turbo mounting surface is approximately perpendicular to the exhaust manifold outlet. As a result I had to re-clock the turbo so that it drains oil and coolant.

I am pretty happy with how it came out. Based on my measurements the exhaust should now have no problem clearing the firewall, and the turbo should also clear the frame. I am very impressed with the quality of the elbow flanges....To my eye they won't constrict flow meaningfully compared to a direct mount.

The downside to the move is that the intake side of the turbo is now fairly tight, so I'll also have to redo the intake at somepoint....... See below some pictures of the modifications.

I am going to have to take a break from the project for the next month for family stuff, but I'll be back on it in August. My timeline for this project is to get the motor in by mid September and have it back on the road by December. I anticipate the finishing jobs to take the bulk of the time.

You must be registered for see images attach
 

Attachments

  • PXL_20230624_223555392.jpg
    PXL_20230624_223555392.jpg
    186.1 KB · Views: 61

grampsbutler

Full Access Member
Joined
Oct 3, 2021
Posts
55
Reaction score
221
Location
San Diego, CA
First Name
Graham
Truck Year
1984
Truck Model
K10 Suburban
Engine Size
6.2l Diesel
Back at it: Getting ready to install the new engine.

I am back from my summer travels, and I'm starting up work on the project again. I am almost ready to install the engine into the frame. For this part of the project I moved the truck from my house to a buddy's shop....for lots of reasons. 1: My driveway is on a hill, and maneuvering the engine on an incline is scary. 2: He will help me with the install. 3: He has access to a forklift which will really help positioning the new engine in the frame. I spent the weekend moving the truck, and power train.

In preparation for the install I designed the engine mounting brackets and cross member. I am trying out an online laser cutting shop (called send cut send) for the parts which are supposed to be delivered early next week.

You must be registered for see images attach
 
Last edited:

grampsbutler

Full Access Member
Joined
Oct 3, 2021
Posts
55
Reaction score
221
Location
San Diego, CA
First Name
Graham
Truck Year
1984
Truck Model
K10 Suburban
Engine Size
6.2l Diesel
Some additional context on engine mount choices:

Originally I was considering going with one of the kits available such as Rob Bonney Fabrication. This choice would have meant going with the 12v style engine mounts. I also considered the chevy mount adapters, but quickly dismissed that idea as very bad......the chevy mounts were overloaded by the 6.2l diesel. Additionally I have heard from various sources that they immediately get irreversibly deformed when loaded with the weight of the Cummins motor.

So I decided to stick with the stock 3rd gen engine mounts, because they have been designed and engineered to be able to bear the load required and are optimized to isolating vibrations for this specific engine. Going custom also gives me the flexibility to mount the engine lower in the frame, which will lessen the likelihood that the transmission hump will need to get trimmed.

Once the parts come in, I'll post some detailed pictures of how it all comes together.
 
Last edited:

grampsbutler

Full Access Member
Joined
Oct 3, 2021
Posts
55
Reaction score
221
Location
San Diego, CA
First Name
Graham
Truck Year
1984
Truck Model
K10 Suburban
Engine Size
6.2l Diesel
Making Progress:

Lots of progress over Labor day weekend. It will take a few days to report all the details and challenges, not all of which are resolved. The short version is that the new motor is in and it runs! There are lots of little details to work out.

I will start with the engine mounts and cross member: The parts came in from sendcutsend.com. They were dimensionally correct and based on my experience I would use them again. Be aware that their advertised lead time is not accurate. They shipped almost a week late, not a big deal in my case, but I would not use them if I were in any type of rush. I was able to fixture and weld up the parts and dry fit them in the frame. This process led revealed a couple of design flaws (my own fault). I had to trim the cross member to give more clearance for the oil pan (see the picture below for how much trimming. It was not a big deal, and preferable compared to waiting on new parts. The finished weldment is very rigid even with the trimming.

At this stage I also trimmed the front cross member to clear the harmonic balancer. I just guessed the amount to trim based on pictures that others have posted of their builds.

Next came positioning the motor in the frame. I did this with the engine mounts removed so that we could get it in approximately the correct spot. Then we bolted in the cross member and engine mounting plates so that we could get the final position of the engine. It ended up being as far back as we could get it about 1/2 inch from the firewall. At this stage I tried to get the transmission at approximately the correct height. This was a tricky compromise, balancing driveline angles (lower = better) with need to keep it high clearance (higher = better). Once happy with the position, we were ready to weld the mounts into the frame.

There will be more to come on what I did for the transmission mounts.

You must be registered for see images attach
 

grampsbutler

Full Access Member
Joined
Oct 3, 2021
Posts
55
Reaction score
221
Location
San Diego, CA
First Name
Graham
Truck Year
1984
Truck Model
K10 Suburban
Engine Size
6.2l Diesel
Transmission mounts:

I used the stock Dodge transmission mount. There is a bracket that bolts to the transmission and then to the stock trans mount. I didn't have one of these, so I had to source a used one on Ebay..... they are a little hard to find ( I guess they are not often replaced). Mopar part number is 52121491AB. The stock transmission mount has three M12 studs to mount to the cross member.

I thought about reusing the Chevy cross member to mount it, but it would have taken quite a bit of modification and some ~2 inch spacers. So we made our own cross member from bent tubing and plate. We started of with a single cross with a plate welded on to mount to the transmission mount. We then decided to add a second cross member under the transfer case to 1: be a bash guard of last resort 2: provide additional frame rigidity.

Pictures of the progress below.
You must be registered for see images attach
 

grampsbutler

Full Access Member
Joined
Oct 3, 2021
Posts
55
Reaction score
221
Location
San Diego, CA
First Name
Graham
Truck Year
1984
Truck Model
K10 Suburban
Engine Size
6.2l Diesel
Transmission tunnel:

I was worried about the transmission tunnel needing to be modified/massaged to accommodate the G56 transmission. From what I understand the G56 is a large transmission and requires cutting the trans tunnel. I didn't have this problem. It actually fits really well with appropriate clearance all round. It helps to keep the engine as low as possible in the frame, but it was just plain luck that it worked out to be enough to clear the tunnel.

I made a cut away in the tunnel for the shifters etc. I plan to make a sheet metal removable cover for the cut away so that I have access to the top of the trans if necessary. I have not been able to get this done yet.

Before:
You must be registered for see images attach


After:

You must be registered for see images attach


After cutting away I made shift levers. This took some trial and error, to get the spacing just right. The shift lever action puts it right between the seat and the dash. I didn't take any pictures of the set up, but will post these once I have time.
 

grampsbutler

Full Access Member
Joined
Oct 3, 2021
Posts
55
Reaction score
221
Location
San Diego, CA
First Name
Graham
Truck Year
1984
Truck Model
K10 Suburban
Engine Size
6.2l Diesel
Radiator choice and set up:

Another weekend and more progress for the books! I got the radiator and core support in the vehicle! It fits but only just.

Radiator choice was something that I made long before the swap. The third gen dodge radiators are huge, 26.5625x32.4375 providing 861.62 square inches. I knew that I was not going to be able to get enough surface area to match the dodge radiator. The standard chevy radiator is 19x28 = is 532 sq inches ---- 38% smaller. The diesel version of the chevy radiator has a larger surface area at 19x34 inches = 646 sq in------ 25% smaller. By going up to a 4 core radiator I am effectively doubling the surface area, but also introducing some inefficiency from going from 2 cores to 4. So in round figures I should get JUST enough cooling with the chevy diesel 4 core aluminium radiator.

The bottom line: the dodge radiator won't fit in the chevy, so the point is a little moot, but it helps me to sleep at night doing some calculations and thinking it through.... The other option would have been to go with the second gen radiator, but that would also have been undersized for the third gen motor, and would have required butchering the radiator core support.

I opted to go with a custom fan shroud with three 12" electric fans. Between the longer engine, and the fatter radiator core there is no room to run the mechanical fan... I only have 1/2 inch to spare with the electrical fans. I am really interested to see how it performs.....My guess is that it will be fine under normal conditions, fine at low speed/power but will start to get hot at higher speeds and long climbs on the freeway.

Back up plan: I can add an additional auxiliary radiator, if heat becomes an issue. I am 75% confident that this won't be necessary, but the plan is there in case I'm wrong.
You must be registered for see images attach
 

grampsbutler

Full Access Member
Joined
Oct 3, 2021
Posts
55
Reaction score
221
Location
San Diego, CA
First Name
Graham
Truck Year
1984
Truck Model
K10 Suburban
Engine Size
6.2l Diesel
Cool project.
Not sure if I missed it? Did you have a plan for the charge air cooler?
You didn't miss it....you are one step ahead of me!

I am going with a generic intercooler from siliconeintakes.com. Mounted in front of the ac condenser. The tricky part is getting the pipes run through the radiator core. I had no problem on the passenger side, but it is really tight on the driver side, because of the way that the radiator sits. I am not sure whether I'll have enough room for the battery tray on the drivers side.......
 

grampsbutler

Full Access Member
Joined
Oct 3, 2021
Posts
55
Reaction score
221
Location
San Diego, CA
First Name
Graham
Truck Year
1984
Truck Model
K10 Suburban
Engine Size
6.2l Diesel
Here are some pictures of the set up..... If you look very carefully, we had to bend the lower mounting tabs to set the intercooler into the cavity behind. I may even still have to modify the grille to get a good fit. Also note how close the elbow gets to the driver side headlight. I'm not totally happy with the setup, but it the best I can do with the size of the radiator. I may change my mind once I get to putting the grille and headlight cowling on.

I am very happy with the upper radiator hose routing. My friend, who is helping me with the build, was responsible for much of the ducting work. He does great work....feel free to ping me for his contact if you need custom work done. He is awesome.

You must be registered for see images attach
 

grampsbutler

Full Access Member
Joined
Oct 3, 2021
Posts
55
Reaction score
221
Location
San Diego, CA
First Name
Graham
Truck Year
1984
Truck Model
K10 Suburban
Engine Size
6.2l Diesel
Serpentine routing and accessories:

Backpedaling a bit: Before starting on the swap I did a lot of measuring, reading etc including on this board. I wanted to get as much prep work done ahead of time before starting on the swap, so that the actual swap could go as smoothly as possible.

The Chevy frame is significantly narrower than the Dodge which makes it hard to accommodate the AC compressor and power steering pump which are normally located low on the side of the engine. Some people have notched their frames to fit these items. I didn't want to do this 1: because it is extra work. 2: it will weaken the frame.

So I went about relocating the accessories. In all cases I stuck with the Dodge accessories.

AC Compressor: Moved from the bottom to the top. I considered the high mount bracket, but eventually just fabricated a custom bracket.

Alternator: Had to rotate it to accommodate the AC compressor.

Power Steering Pump: Moved from the bottom to the top.

All of these changes required a completely new belt routing, new location for the idler, tensioner. I also had to turn down the idler pulley to convert it from being ribbed to smooth. I figured out the idler and tensioner location by trial and error trying to make it fit with the stock belt length.

If I had to do it over, I would probably go for the high mount AC compressor conversion kit. All the custom bracket work, was a real pain, and is probably inferior to the standard high mount set up. This, however, would not address the power steering.

For spacing it worked out great. I was able to drop the motor right in, with good clearances, and no need to trim the frame.

You must be registered for see images attach
 

Latest posts

Forum statistics

Threads
42,137
Posts
909,894
Members
33,633
Latest member
satansdad
Top