Turbo 350 Build

Disclaimer: Links on this page pointing to Amazon, eBay and other sites may include affiliate code. If you click them and make a purchase, we may earn a small commission.

HotRodPC

Administrator
Staff member
Admin
Joined
Aug 29, 2010
Posts
47,014
Reaction score
9,014
Location
OKC, OK
First Name
HotRod
Truck Year
85 K20 LWB
Truck Model
Silverado
Engine Size
454 - Turbo 400 - 3.73
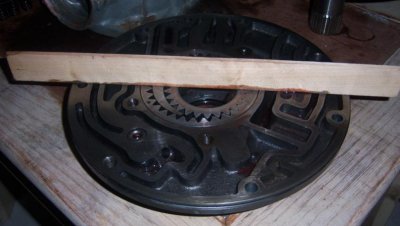
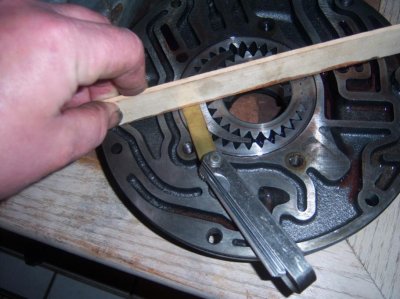
Using a 1/2 socket and racthet, remove the 5 bolts that hold the piston retaining ring over the piston, and the 2 pump halves together.
attachment.php


On the last bolt, you should use one hand to support the front half as you take the bolt out so the front half does not drop. Or have the pump assembly face down in the hole of your table or workbench to support it..
attachment.php


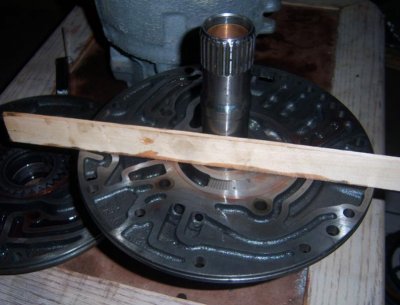
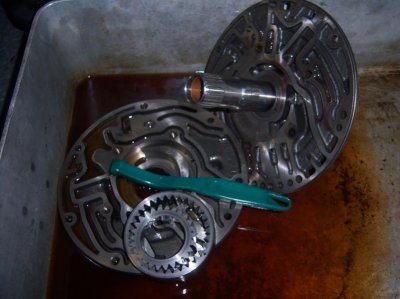
Here are pics of both halves now seperated.
attachment.php


Now, simply lift the back half out of the front half. Notice the Th350 used pump gears rather than a Vane pump like the 700r4 and 4L60-E use. This is certainly considered much stronger than the Vane style pump.
attachment.php


You must be registered for see images attach


You must be registered for see images attach


You must be registered for see images attach


You must be registered for see images attach
 
Last edited:

HotRodPC

Administrator
Staff member
Admin
Joined
Aug 29, 2010
Posts
47,014
Reaction score
9,014
Location
OKC, OK
First Name
HotRod
Truck Year
85 K20 LWB
Truck Model
Silverado
Engine Size
454 - Turbo 400 - 3.73
The rest of the pump can now be disassembled.

Lift the Return Springs, and Retainer out of the pump. Notice this is the newer style in this pump already. The pump was probably replaced last time the previous moron builder rebuilt this transmission since all the other drums were the old style. You don't have to mark This retainer since with the offset bolt pattern, it will only go back together 1 way.
attachment.php


Lift the Intermediate apply piston out of the bore of the pump. Notice 2 lip seals on the piston just like the Forward and Direct drum apply pistons.
attachment.php


Remove the selective thrust washer. Now this is old style. New style uses a Torrington roller bearing instead of thrust washer. Look close, a bit hard to see in the pic if not pointed out, but there is a shim under the thrust washer. Shims come in variable sizes to correct end shaft play. See how there is notch taken off the shim? That is to accomodate the thrust washer tab that will keep the thrust washer from spinning.
attachment.php


Now carefully remove the teflon sealing rings. Why carefully??? These rings are still in perfect condition. If by chance you smash or break one of the new teflon rings, You can go back and choose the best of the best of the old rings. Depending on your kit, and the previos build, it is possible to see metal clad rings here in place of teflon.
attachment.php


You must be registered for see images attach


You must be registered for see images attach


You must be registered for see images attach


You must be registered for see images attach
 
Last edited:

HotRodPC

Administrator
Staff member
Admin
Joined
Aug 29, 2010
Posts
47,014
Reaction score
9,014
Location
OKC, OK
First Name
HotRod
Truck Year
85 K20 LWB
Truck Model
Silverado
Engine Size
454 - Turbo 400 - 3.73
Check and clean the pump. Inspect the pump gears for wear.

Using a straght edge, (And I prefer a metal, mine has been misplaced, you can use about anything) and drag it across the pump body to make sure there is not warpage betwen the 2 halves.
attachment.php


Measure the distance between the srtraight edge and the top of the pump gears. Using the smallest feeler guage I have at .010, the distance is less than that since I can not turn the gears while pressure is on the straight edge. But, I removed the feeler gauge and spin the gears, they do NOT drag on the straight edge. This tells me the gears aren't twisted and clearance is less than .010 which is acceptable.
attachment.php


Also drag the straight edge across the stator half of the pump to make sure its not warped.
attachment.php


Using some kind of solvent and cleaning brush, clean all the junk and old fluid out of the pump halves. Allow to air dry or use a blow gun watching not to blow solvent into into your eyes. I happen to use mineral spirits for cleaning solvent. I buy it from a local chemical company in bulk. I use a 15 gallon metal can with a lid that is fitted with a pump to my homemade solvent tank, and I buy 10 gallons at a time. You can also buy it in a 5 gallon can at Lowe's or Home Depot. As you can tell, its about time for me to buy new solvent. This is looking pretty funky.
attachment.php

You must be registered for see images
 

Attachments

  • th350build 169.jpg
    th350build 169.jpg
    50.8 KB · Views: 412
  • th350build 170.jpg
    th350build 170.jpg
    83.5 KB · Views: 420
  • th350build 172.jpg
    th350build 172.jpg
    56 KB · Views: 386
  • th350build 175.jpg
    th350build 175.jpg
    68.7 KB · Views: 394
Last edited:

HotRodPC

Administrator
Staff member
Admin
Joined
Aug 29, 2010
Posts
47,014
Reaction score
9,014
Location
OKC, OK
First Name
HotRod
Truck Year
85 K20 LWB
Truck Model
Silverado
Engine Size
454 - Turbo 400 - 3.73
After removing the outer seal and front seal from the tranmission ...

I noticed the front pump bushing is galled up pretty bad and should not be used. It might have cleaned up with some emery cloth, but of course that is going to take some meat away from the bushing as bad as this one is.
attachment.php


Here is a tighter photo of the galled bushing. Hard to say what caused this. This is not normal wear at all. It could have been done during sloppy installation of the Torque Converter when the trans was installed last time. The TC may have had a burr on the nose, some debris could have ran through the trans fluid and got caught up between the bushing and the TC nose, possibly even sloppy work pulling the transmission. I didn't pull it, so I don't know. Nevertheless, it has to be replaced in this condition. I'm just happy that I have the bushing in stock from leftovers of a Th400 kit when I rebuilt mine in the 84C20. Again, this is why if you intend to build transmissions, keep all the good spare parts you can. You know when you'll need them in a pinch, and also know what is interchangeable with which units.
attachment.php


I don't have an expensive bushing driver set, so I improvise using a cheap China 3/4in drive socket set to install most bushings, or make a driver out of wood with a round hole saw drill kit. In this case I am using the socket method and a plastic dead blow hammer. Doing it this way requires extreme patience and being gentle. You don't want to tear up the new bushing, and you don't want to go to far or you have to tap it back in the opposite direction. You also want to make sure the bushing is square in position and NOT tilted either way, installed improperly or premature rapid wear, then destruction could result.
attachment.php


The new bushing is installed. Looks much nicer and certainly acceptable now.
attachment.php


Now is also a good time to install the front seal. This is another time there is a "special tool" that could be used and I use another method. You can carefully install the seal with a plactic or rubber hammer, or you can use a chunk of wood over the seal and beat the seal in place. Notice I didn't install the outer O ring on the pump yet. Yes, there is a reason for that. You'll see shortly.
attachment.php


You must be registered for see images attach


You must be registered for see images attach


You must be registered for see images attach


You must be registered for see images attach


You must be registered for see images attach
 
Last edited:

HotRodPC

Administrator
Staff member
Admin
Joined
Aug 29, 2010
Posts
47,014
Reaction score
9,014
Location
OKC, OK
First Name
HotRod
Truck Year
85 K20 LWB
Truck Model
Silverado
Engine Size
454 - Turbo 400 - 3.73
OK, back at the ranch and moving on with the rebuild.. Keep in mind, building transmissions, things are going to happen and you are going to come across things that will need extra attention. This is why it doesn't pay to get in a hurry, or say you're gonna have it done by dark or whatever the case may be. You'll get to see another hurdle to jump further into this build.

Now that the pump is clean, we can start re assembling the pump. It doesn't really matter which order you choose to do it, just be cautious not to tear up what you've done. Here I will install the new teflon sealing rings and selective shim.
attachment.php


Teflon Sealing Rings Installed, Selctive Shim and Thrust washer reinstalled.
attachment.php


Using the same procedure as with the Direct and Forward Drum pistons, using the lip seal tool and plenty of TransJel, set the intermediate piston in its bore
attachment.php


You notice the teflon seals are not staying in place??? This is because I have yet to put TransJel on them to hold them in place.
attachment.php


You must be registered for see images attach


You must be registered for see images attach


You must be registered for see images attach


You must be registered for see images attach
 
Last edited:

HotRodPC

Administrator
Staff member
Admin
Joined
Aug 29, 2010
Posts
47,014
Reaction score
9,014
Location
OKC, OK
First Name
HotRod
Truck Year
85 K20 LWB
Truck Model
Silverado
Engine Size
454 - Turbo 400 - 3.73
With the piston and seals intalled in the rear half of the pump, now back to the front half.

Install the cleaned pump gears, or new set of pump gears if needed. Notice the marks on the gears. These marks are to be facing you, not facing down. Keep in mind, they are not timing marks of any sort. Only thing important is that the markings are both facing you on both gears.
attachment.php


Here is one of those "special tools" that retails for $59. I don't use a pump alignmnet tool. Again, I figured a way to improvise and do without it.
attachment.php


There was a reason why I did not yet install the outer pump O ring. This is why. Put a finger thru the pump, and gently lower it face down into the transmission case as shown.
attachment.php


Set the rear half of the pump into the front half of the pump as shown. Line up the 5 staggard bolts holes, return springs, spring retainer and the 5 bolts that all the pump assembly together. Then snug with a ratchet and socket.
attachment.php


Install 2 or 3 of the pump body to case bolts into the case and hand tighten. This will keep the pump from spinning while you torque it to 15-18 Foot Lbs.
Notice I use a bary type torque wrench for transmissions. They tend to hold calibration even when dropped and you rarely need over 25Ft Lbs for anything on a transmission.
I also use an Inch Lb wrench. Not a Foot Lb. Simply multiply any Ft Lb spec by 12 inches and convert your spec to In Lbs. In this case, I will torque to 200 In Lbs which will give me 16.75 ft lb and is within spec of 15-18 ft lbs. Really, How accurate can a 0-300 Ft Lb click torque wrecnh be at 15 lbs? These 3/8 drive inch lb bar type torque wrench in a name brand non china tool are usually around $20. I highly encourage getting one if you intend to build transmissions. Nothing fancy, nothing expensive, but very effective.
attachment.php


You must be registered for see images attach


You must be registered for see images attach


You must be registered for see images attach


You must be registered for see images attach


You must be registered for see images attach
 
Last edited:

HotRodPC

Administrator
Staff member
Admin
Joined
Aug 29, 2010
Posts
47,014
Reaction score
9,014
Location
OKC, OK
First Name
HotRod
Truck Year
85 K20 LWB
Truck Model
Silverado
Engine Size
454 - Turbo 400 - 3.73
Now is a good time to apply TransJel to the Teflon sealing rings to hold them into position. Sometimes kits come with Metal Clad sealing rings and may require resizing, and it doesn't hurt to do the same to teflon rings to make sure they are well seated into the Tranjel. Again, Notice I do not use the "special tools" to resize the rings.
I am using a hose clamp on the top 2 rings. I am using an old peice of cut radiator hose and a hose clamp on the bottom 4. Very Effective and works well. No need for the expensive $30-$50 resizers.

attachment.php


You must be registered for see images attach
 

HotRodPC

Administrator
Staff member
Admin
Joined
Aug 29, 2010
Posts
47,014
Reaction score
9,014
Location
OKC, OK
First Name
HotRod
Truck Year
85 K20 LWB
Truck Model
Silverado
Engine Size
454 - Turbo 400 - 3.73
Now that the pump assembly is complete, the Forward and Direct drums are complete, we can air test our piston seals to make sure none of them were damaged during installation, or any cracks in pistons that we didn't notice. This also tests the sealing rings around the pump. So if you do have a leak, suspect the sealing rings first. You may have had one slip out of place while stacking the drums.
Using the hole in your work bench or table. Face the pump down into the hole. Then you will slide the Forward and Direct Drum over the pump for air testing.

attachment.php


Set your air compressor to 25 psi. You don't want to blow the seals out, so it is very important to regulate the air pressure. To test the Forward Clutch in the drum, you will apply 25 psi to the hole in the pump shown with a rubber tipped air nozzle. You should see the clutches and steels compress to the pressure plate.
attachment.php


Next is to air test the Direct Clutch. To do this, now remove the Forward Clutch drum from the Direct drum. Again, using 25 psi, hit the hole shown with air and you should see and hear the clutches and steels compress to the pressure plate.
attachment.php


Now putting your thumb over the previously used air test hole, as pointed to with an arrow, put the air nozzle on the hole shown and again, the Direct Clutch should be applied.
attachment.php


The last air test will be the intermediate piston that is in the pump body. Since the intermediate clutches are not installed, all you will see is the piston moving upward as if to apply the intermediate cluthes if they existed.
attachment.php


You must be registered for see images attach


You must be registered for see images attach


You must be registered for see images attach


You must be registered for see images attach


You must be registered for see images attach
 
Last edited:

HotRodPC

Administrator
Staff member
Admin
Joined
Aug 29, 2010
Posts
47,014
Reaction score
9,014
Location
OKC, OK
First Name
HotRod
Truck Year
85 K20 LWB
Truck Model
Silverado
Engine Size
454 - Turbo 400 - 3.73
Now that all of the drum assemblies and pump have been rebuilt and pressure tested, its time to put these assemblies into the case and install the front pump and torque to spec.

Put the Forward and Direct clutch drums back together as 1 unit again, and drop them into the case. This will take some working the drums back and forth to index the Forward clutches with the ring gear that has been previously installed into the case.
Also working the lugs of the direct drum into the sun gear previously installed in the case. Very critical to make sure you have these drums completely seated into their position properly. The good news here is, if you don't when you install the pump, the input shaft will NOT turn because you wouldn't have the needed clearance. So keep that in mind as a way to know that you have them properly installed.

attachment.php


Now install the band that has soaked for at least 20 minutes in transmission fluid. You can also use the band as a guage to know that you have the Forward and Direct clutch assemblies seated properly.
attachment.php


The band anchor will set on the band lugs in the case on the upper portion. The bottom rounded anchor will set freely. You will notice its setting over a hole in the case. This hole is where the band pin comes thru from the valve body area, that has a servo that sets over the pin to apply the band. We'll get to that more later when its time to install the valve body. So for now, its normal to not have the pin there, just be sure the band anchor is setting over the hole.
attachment.php


You must be registered for see images attach


You must be registered for see images attach


You must be registered for see images attach
 
Last edited:

HotRodPC

Administrator
Staff member
Admin
Joined
Aug 29, 2010
Posts
47,014
Reaction score
9,014
Location
OKC, OK
First Name
HotRod
Truck Year
85 K20 LWB
Truck Model
Silverado
Engine Size
454 - Turbo 400 - 3.73
Time for intermediate or 2nd gear clutches. Here is a picture of 2 sets of intermediate clutches. One set is from the orginal trans, the other set it out of the donor trans. The orignal trans was not set up properly. Instead of ending with a wave ring, they doubled up and ended with 2 steels. The pictures did not show it well, but the second steel has been severly overheated. It has blue and yellow colored stains on it since it got so hot. You can imagine how hot steel must get to turn blue and yellow. So I will not be using those steels and they will be thrown away. I'll be suing the steels which are like brand new, out of the donor transmission, along with the proper wave ring.
attachment.php

attachment.php


Remember, these are free floating in the case and are applied using the clutch piston in the rear of the pump, so in this case, the pressure plate goes in first. In a V8 application, there will be 3 intermediate clutches., V6 there will be 2 which also means 1 less steel. So start with pressure plate, then clutch, then steel, clutch, steel, clutch, steel. You will then end with the wave spring.
attachment.php


At this point, its ready to have the pump installed. Notice I have placed the front pump gasket in place. I have also put dabs of TransJel on any spots possible of the backside of the gasket surface to hold it in place so it does not shift while setting the pump in place.
attachment.php


You must be registered for see images attach


You must be registered for see images attach


You must be registered for see images attach


You must be registered for see images attach
 
Last edited:

HotRodPC

Administrator
Staff member
Admin
Joined
Aug 29, 2010
Posts
47,014
Reaction score
9,014
Location
OKC, OK
First Name
HotRod
Truck Year
85 K20 LWB
Truck Model
Silverado
Engine Size
454 - Turbo 400 - 3.73
Finally !!! Time to install the pump. I suggest if you don't feel confident that your end play is going to be correct for thrust washer wear reasons, or that you have changed some thrust washers or Torrington bearings during your build, then leave the pump O ring off the pump. Reason being, you can set the pump in place. Snug up 2 or 3 pump to case bolts and check your end play. If its off, then you can easily remove the pump, and add or remove shims, or change the selective thrust washer to have the right specs. You want your end play to between .010 and .035.
You can check end play by using an expensive dial indicatar apparatus off the bellhousing, or you can improvise like I do and use a clamp or a vice grip method with a feeler guage. To do this, after you have installed the pump, push the input shaft into the case as far as it will go. Then put a clamp or Vise Grip around the input shaft as tight as possible up against the pump stator. Then pull the input shaft out as far as possible and measure with a feeler guage between your clamp and the pump stator. If its within .010 and .035 you are within tolerance. :waytogo:
 

HotRodPC

Administrator
Staff member
Admin
Joined
Aug 29, 2010
Posts
47,014
Reaction score
9,014
Location
OKC, OK
First Name
HotRod
Truck Year
85 K20 LWB
Truck Model
Silverado
Engine Size
454 - Turbo 400 - 3.73
Provided you know your end play is correct. Now make sure you have installed the pump O ring. Have the pump gasket in place in the case, help by TransJel or Vaseline.

Also make sure your sealing rings are still tight in place in their proper grooves with plenty of TransJel. Resize them as previosly suggested if needed.
attachment.php


Gather your 8 pump bolts. Remove the old sealing washers, clean the bolts and make sure the threads are nice and clean. Install the new sealing washers.
attachment.php

Install the pump into position. I like to look thu one of the upper holes of the pump as I guide the pump into position and get it as close as possible so that I don't have to turn the pump and risk moving the pump gasket out of its proper position.
Start all the bolts by hand. This will help insure all bolts are going in properly as you should be able to feel if the bolt is having a problem or the pump is not properly lined up. (And this can be critical, you're about to find out why in the next couple of posts).
attachment.php


Snug all the bolts in a criss cross fashion with a ratchet or speed wrench and a 1/2 socket.
attachment.php


Now is a good time to check your end play if you felt confident it was going to be OK, or if you have not yet done so. Also grab the input shaft and spin it in both directions and make sure it turns freely. Its normal to feel some resistance, and its also normal to feel more resistance in one direction than another due to one way overrun clutches in the transmission. If the input shaft does not turn, this means its bound up and you did not have your drum assemblies properly seated before you installed the band, or your input shaft end play is much to tight. Nevertheless, you MUST remove the pump to investigate what you have done wrong.

Once you feel good about the end play being to spec and the input shaft spins in both directions. Torque the pump bolts to 20-25ft lbs. Using my bar type in lb torque wrench I tighten to 250 in lbs which is just under 21ft lbs.
attachment.php


You must be registered for see images attach


You must be registered for see images attach


You must be registered for see images attach


You must be registered for see images attach


You must be registered for see images attach
 
Last edited:

HotRodPC

Administrator
Staff member
Admin
Joined
Aug 29, 2010
Posts
47,014
Reaction score
9,014
Location
OKC, OK
First Name
HotRod
Truck Year
85 K20 LWB
Truck Model
Silverado
Engine Size
454 - Turbo 400 - 3.73
SUM BISH !!! I hate when this happens. But it does happen, and its not uncommon. As I torqued the 2nd to the last pump bolt, I got to about 100 in lbs, and I felt the bolt give way. I pulled it out and here is what it looked like !!! Although this does not happen on every build. Its not uncommon to have a stripped bolt in either pump to case, or the valve body to case threads. This is why it is very important to make sure all threads are clean and torque properly. I took all the necessary precautions but it still happened.

attachment.php
 

Attachments

  • th350build 256.jpg
    th350build 256.jpg
    96.9 KB · Views: 378
Last edited:

HotRodPC

Administrator
Staff member
Admin
Joined
Aug 29, 2010
Posts
47,014
Reaction score
9,014
Location
OKC, OK
First Name
HotRod
Truck Year
85 K20 LWB
Truck Model
Silverado
Engine Size
454 - Turbo 400 - 3.73
I suggest if you intend to build many transmissions, you just suck it up and go buy the proper HeliCoil kits. They will include 10-15 new threads, the proper drill bit, the proper tap and the HeliCoil install tool. They are not cheap, but they are worth their weight in gold as it beats buying a new trans case or tearing apart your build and starting over. After you have bought the kit, if you need more threads, you can buy the tubes of new threads inserts individually from the kit and again, each tube has at least 10 new threads in it.

attachment.php
 

Attachments

  • th350build 260.jpg
    th350build 260.jpg
    87.5 KB · Views: 371

HotRodPC

Administrator
Staff member
Admin
Joined
Aug 29, 2010
Posts
47,014
Reaction score
9,014
Location
OKC, OK
First Name
HotRod
Truck Year
85 K20 LWB
Truck Model
Silverado
Engine Size
454 - Turbo 400 - 3.73
OK, so here is how we handle this kind of issue. Remember how critical it is to keep all metal shavings out of the transmission. This can literally destroy your new build. Shavings can run through your valve body and hang vavles. They can also chew up bushings and thrust washers. Very Critical to keep the shavings out. Also keep in mind, these will be aluminum shavings, so you won't be able to draw them out since alluminim will not chase a magnet. I also discourage use of air blow gun in this situation.

I am putting a bath towel tightly into the trans case over the intermediate clutch pack to catch any metal shavings. I have also gotten the old pump gasket, and found a portion of the gasket that will block off the pump channels so that shavings do NOT fall into the pump channels.
attachment.php


Carefully and slowly using a variable speed drill, and the drill bit supplied in your HeliCoil kit, drill the damaged threads out. DO NOT go to deep. If you drill to deep, you're done with this case and you will pull your build apart to transfer it to another case. Just about like starting over agian. USE EXTREME CAUTION here. You only get one chance to get it right. Better to go to shallow than to deep. So if you need to pull the bit out and check your progress and go a little deeper a few times, then so be it. DO IT. Also use caution to keep your drill motor and bit straight.
attachment.php


I have a mini vac attatchment kit for my shop vac that I use for things like this. Vacuum out all the shavings you possibly can off the gasket you are using as a block and the towel. This will help prevent any shavings you can get, from falling into the case as you remove the towel and gasket after completed.
attachment.php


Keeping the towel and gasket in place, now I am going to tap the new oversize threads to instert the HeliCoil. In this position, I can not use a T-Bar tap tool because of clearance on the edge of the transmission, so I am using an 8 point 5/16 socket. I realize not everyone has 8pt sockets, but you will have to improvise and find something to turn the tap into the hole while keeping it straight up and down to the drilled hole.
attachment.php


Using the HeliCoil install tool, insert the HeliCoil over the tool, and turn it into the newly drilled and tapped threads just below the surface of the hole. Its very imporant to make sure the threads are a bit recessed instead of sticking up, or your pump will not seat down on the gasket and will be raised where its sitting on the new thread insert.
attachment.php


You must be registered for see images attach


You must be registered for see images attach


You must be registered for see images attach


You must be registered for see images attach


You must be registered for see images attach
 
Last edited:

Forum statistics

Threads
42,156
Posts
910,226
Members
33,649
Latest member
MikeD
Top