

You are using an out of date browser. It may not display this or other websites correctly.
You should upgrade or use an alternative browser.
You should upgrade or use an alternative browser.
Double Dingo's 1965 3/4 Ton "Crusty Biscuit"
- Thread starter DoubleDingo
- Start date
Disclaimer: Links on this page pointing to Amazon, eBay and other sites may include affiliate code. If you click them and make a purchase, we may earn a small commission.
DoubleDingo
Full Access Member
- Joined
- Jul 3, 2012
- Posts
- 10,335
- Reaction score
- 14,821
- Location
- Right where I am
- First Name
- Bagoomba
- Truck Year
- 1981
- Truck Model
- 81-C20 Silverado Camper Special-TH400-4.10s
- Engine Size
- Carb'ed Vortec 350
I'll get some loaded when I get back from vacation. Can't load them my phone and I don't have an online photo account.
Darkrider
Full Access Member
- Joined
- Dec 30, 2015
- Posts
- 204
- Reaction score
- 8
- Location
- Lloydminster Sk Canada
- First Name
- Chris
- Truck Year
- 1984/1986
- Truck Model
- Custom Deluxe/Sierra
- Engine Size
- 350/305
Definitely going to keep watching this thread! Great build so far!
DoubleDingo
Full Access Member
- Joined
- Jul 3, 2012
- Posts
- 10,335
- Reaction score
- 14,821
- Location
- Right where I am
- First Name
- Bagoomba
- Truck Year
- 1981
- Truck Model
- 81-C20 Silverado Camper Special-TH400-4.10s
- Engine Size
- Carb'ed Vortec 350
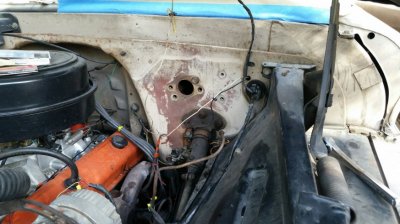
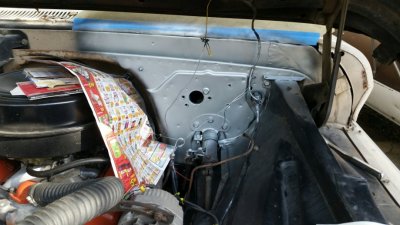
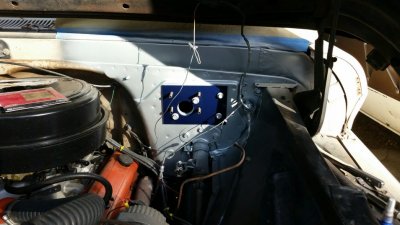
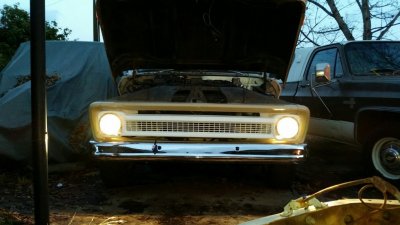
Firewall and Headlights
Here's the latest update. Some shots of the firewall prep before installing the booster and master cylinder. I sanded the existing paint, sprayed some rust reformer on it, and then a few coats of the silver, topped off with the plate I had made so I could bolt up the booster and master cylinder.
The headlights in their current bright glory. It is so much better than it was, now I can actually see when driving at night. Still chasing the brake light issue. I get it working and then it stops again. I believe it's a bad ground because it started working when I replaced the front bulbs and messed with those sockets and wiring.
Attachments
DoubleDingo
Full Access Member
- Joined
- Jul 3, 2012
- Posts
- 10,335
- Reaction score
- 14,821
- Location
- Right where I am
- First Name
- Bagoomba
- Truck Year
- 1981
- Truck Model
- 81-C20 Silverado Camper Special-TH400-4.10s
- Engine Size
- Carb'ed Vortec 350
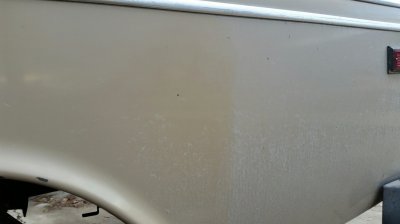
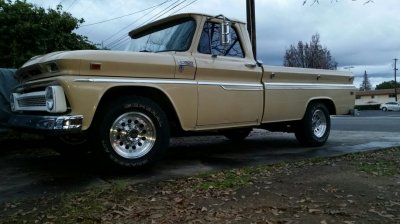
Paint Polishing
The paint polished up well. Was surprised that it did, there was so much oxidation. Still need to polish the stainless steel trim and do a full on waxing of the entire truck. I did wax a small portion of the hood on Christmas to see how it looked. It shined nicely. I didn't like the white grille but it is definitely growing on me. I still may change it to an off-white instead of a pure white. For now it stays white until I have the radiator support fixed. It does add some nice contrast up front. Been getting a lot of thumbs up now that it is shiny.
The paint polished up well. Was surprised that it did, there was so much oxidation. Still need to polish the stainless steel trim and do a full on waxing of the entire truck. I did wax a small portion of the hood on Christmas to see how it looked. It shined nicely. I didn't like the white grille but it is definitely growing on me. I still may change it to an off-white instead of a pure white. For now it stays white until I have the radiator support fixed. It does add some nice contrast up front. Been getting a lot of thumbs up now that it is shiny.
Attachments
foamypirate
Full Access Member
- Joined
- Jul 30, 2010
- Posts
- 3,302
- Reaction score
- 453
- Location
- Central TX
- First Name
- Jake (Mr. Wilson)
- Truck Year
- 1980
- Truck Model
- El Camino, baby!
- Engine Size
- 5.3L/4L60E
Wow, that looks killer! It shined up great! I love the wheel combo too, looks awesome. I'm officially jelly. 
DoubleDingo
Full Access Member
- Joined
- Jul 3, 2012
- Posts
- 10,335
- Reaction score
- 14,821
- Location
- Right where I am
- First Name
- Bagoomba
- Truck Year
- 1981
- Truck Model
- 81-C20 Silverado Camper Special-TH400-4.10s
- Engine Size
- Carb'ed Vortec 350
General BS
Didn't get as much done during my vacation as I intended, decided to tackle some other projects instead. During my days off driving the truck with the overdrive engaged made me appreciate the setup more. The sm420/3.54 Dana 60 swap is going to wait until spring or summer. The freewheeling feature of the current setup while driving in traffic is really nice, only need the clutch to take off from a stop. And the second gear synchro has broken in more, making shifting into second much more friendly. The column linkage is still sticky when cold, but after a few shifts it cooperates more. I think I'll spray something on there besides white lithium grease for the cold months, and also will readjust the linkage to make sure everything is lined up properly.
I was pleasantly surprised at how quick this truck is when hitting the secondaries in first and second. Shouldn't be surprised because of the 4.57 rear end gears, but I don't recall it being so peppy before. The times I've done it the last couple weeks, the cars behind me were left way behind in a hurry. And the second/overdrive gear is a very nice gear, I think it 1.24:1 or something like that. I used it coming down the canyon from Mom and Pops after Thanksgiving, hardly had to use the brakes.
When cleaning up the backyard I stumbled upon more spare parts, so I need to clean them up and get them set aside in their specific category for possible future use. Some of what I found was bed cross supports, more specifically are two that have threaded rod welded to them so a side tank can be installed. Having two tanks when traveling comes in handy when gas stations are sparse or when out in the boondocks, but getting 13-14 mpg right now on the highway isn't bad. I need to try and improve upon that even if it's just one more mpg.
The PO replaced the bed wood about three years ago but some of the planks warped up towards the cab so I am considering redoing the bed in the future. That would be the ideal time to install the extra tank.
That's where the beast is at the moment, more to come, stay tuned.
DoubleDingo
Full Access Member
- Joined
- Jul 3, 2012
- Posts
- 10,335
- Reaction score
- 14,821
- Location
- Right where I am
- First Name
- Bagoomba
- Truck Year
- 1981
- Truck Model
- 81-C20 Silverado Camper Special-TH400-4.10s
- Engine Size
- Carb'ed Vortec 350
Thanks Foamy, I am very pleased with the results. Those tires and wheels do look nice, and the wide tread with grippy lugs helps for maximum traction.
I have been off for 16 days, so now I back to the grind. Had to post up my progress before I started the grind though...lol...
I have been off for 16 days, so now I back to the grind. Had to post up my progress before I started the grind though...lol...
DoubleDingo
Full Access Member
- Joined
- Jul 3, 2012
- Posts
- 10,335
- Reaction score
- 14,821
- Location
- Right where I am
- First Name
- Bagoomba
- Truck Year
- 1981
- Truck Model
- 81-C20 Silverado Camper Special-TH400-4.10s
- Engine Size
- Carb'ed Vortec 350
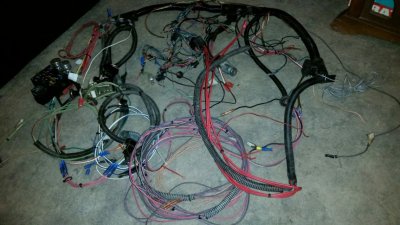
Thought I'd share with all y'all the wiring schematic of the way I wired up my headlights with the relay harness. As you can see I grounded the crap out of it. Factory grounds at the headlights are only to the grille, and the grille is grounded through the bolts at the body connections. Six bolts total. I added dielectric grease to all of the rivet points for the headlight buckets to the grille, and to the bolt connections as well as all of the other grounding points, except at the chassis and engine block. I didn't add those grounding points during this exercise, they were already there, but when I do touch them, they too, will get dielectric grease.
Attachments
Last edited:
Darkrider
Full Access Member
- Joined
- Dec 30, 2015
- Posts
- 204
- Reaction score
- 8
- Location
- Lloydminster Sk Canada
- First Name
- Chris
- Truck Year
- 1984/1986
- Truck Model
- Custom Deluxe/Sierra
- Engine Size
- 350/305
Only one problem with this truck.......
Its not in my driveway!
Its not in my driveway!
DoubleDingo
Full Access Member
- Joined
- Jul 3, 2012
- Posts
- 10,335
- Reaction score
- 14,821
- Location
- Right where I am
- First Name
- Bagoomba
- Truck Year
- 1981
- Truck Model
- 81-C20 Silverado Camper Special-TH400-4.10s
- Engine Size
- Carb'ed Vortec 350
Haven't been on for a while, as I simply haven't done anything to the truck but drive it. Oh wait, I did get new exhaust put on I guess that counts took it from dual to single and had them put the quietest muffler they had on it. I don't like the way they ran the y-pipe, so I need to have them redo that. The way they ran it oil will drain onto the pipe from the oil filter, and it will overheat the brake lines that run behind the cross member, because they ran the passenger side pipe around the front of the oil pan sump, and by doing so, it left a small gap between the pipe and those brake lines and cross member. That muffler didn't seem to quiet it down much, but that may be because the exhaust leak on the passenger side butterfly is still there. I need to swap out that exhaust manifold and put a regular one without the ac mounting cast into it, since the only manifolds that have the ac mounts cast into them now are the 2.5 inch outlet corvette style center dump ramhorns, and that 2.5 inch pipe on the driver's side will be way too close to the brake lines. Now that it's warmed up outside and the days are longer, I can get some stuff done after work. Got lots of little stuff and some big stuff left.
took it from dual to single and had them put the quietest muffler they had on it. I don't like the way they ran the y-pipe, so I need to have them redo that. The way they ran it oil will drain onto the pipe from the oil filter, and it will overheat the brake lines that run behind the cross member, because they ran the passenger side pipe around the front of the oil pan sump, and by doing so, it left a small gap between the pipe and those brake lines and cross member. That muffler didn't seem to quiet it down much, but that may be because the exhaust leak on the passenger side butterfly is still there. I need to swap out that exhaust manifold and put a regular one without the ac mounting cast into it, since the only manifolds that have the ac mounts cast into them now are the 2.5 inch outlet corvette style center dump ramhorns, and that 2.5 inch pipe on the driver's side will be way too close to the brake lines. Now that it's warmed up outside and the days are longer, I can get some stuff done after work. Got lots of little stuff and some big stuff left.DoubleDingo
Full Access Member
- Joined
- Jul 3, 2012
- Posts
- 10,335
- Reaction score
- 14,821
- Location
- Right where I am
- First Name
- Bagoomba
- Truck Year
- 1981
- Truck Model
- 81-C20 Silverado Camper Special-TH400-4.10s
- Engine Size
- Carb'ed Vortec 350
Haven't posted any updates in a while. Been doing some more upgrades. And as with any project on old trucks, there are hurdles and unknowns uncovered, which has definitely been the case here. What started out as a simple remove existing wiring and replace cab mounts and exhaust manifolds has blossomed into many different things.
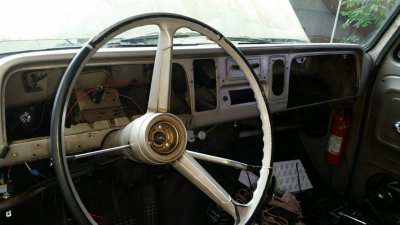
Thus far the new wiring harness that was in Mean Green has been installed in this truck. Cleaned up some of connections utilizing bulkheads because I simply didn't know how to 12 years ago. Now it looks much better under the dash.
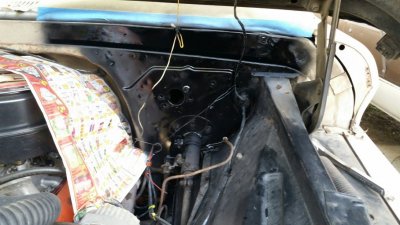
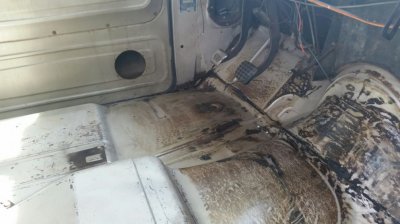
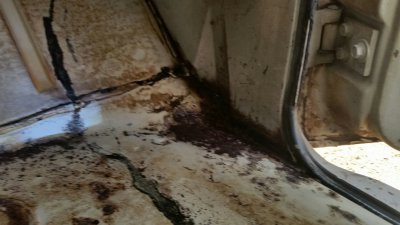
After removing the rubber mat and underlying factory tar paper, I found rust down by the fronts of the doors. Driver's side not so bad, passenger side will be a bear to fix. Haven't ever tackled sheet metal repair, so this will be fun. This project wasn't designed to repair patches of sheet metal, but I have some areas to get to before too long. I did remove the existing seam sealer, cleaned and prepped the metal, killed the rust that was exposed, and resealed the seams. Then added double layer of soundening panels from LMC that I bought years ago. Went single layer under the seat. I hope it helps with heat and noise, the feet got pretty hot last year on summer trips.
Added seat belts, now I can drive around knowing I won't get ejected if something goes awry. I know they work from when I rolled Mean Green on my mom's birthday back in 2005 on my way to church. I don't want to test them again.
Put on a seat cover, now the seat looks much better. Found the SPID behind the seat between the springs and the cushion. It's mostly gone and no way to remove it with destroying it, so it gets to stay there.
Took out the tailight and parking lights bezels/housings and spray painted them with a mirror finish from Rustoleum. That should make them brighter and more visible. Going to properly wire in the side marker lights one of the two previous owner's installed. They had splices about every 8 inches for the parking lights and side markers. I'm lucky the truck didn't burn to the ground the way they had stuff routed. Insulation had worn away and was touching metal. It must have been ground wires, but still, it was a mess. The original harnesses were actually in good shape and I removed them intact, nothing cut.
Removing the cab mount bolts went without any problems. The rear bolts turned without anything breaking, which was nice. The front bolts put up a good fight but also busted loose without incident. For the moment I am switching from the shear-style rear cab mounts to the donut style C10 mounts. If the ride is more harsh I will send my old mounts to Steele Rubber and have them re-vulcanize the shear mounts. Removing the rear mounts from the frame with the cab on is not easy. The rivets put up quite the fight with no room to swing a hammer. But, that's why God invented air hammers right.
The exhaust manifolds, another headache. The exhaust shop made a funky y-pipe that looks cool, but is routed so close to the front cross member that the brake lines would over heat. That, and changing oil would drop oil on the pipes whereas it didn't before. They said they would redo it on their dime, so that's good. I bought some 2.5 inch outlet ram horn manifolds, but then realized having 2.5 inch pipes would also over heat the brake lines on the driver's side. So I dug out my regular ram horns and installed those after removing the AC compressor and underdash unit. Now the bad y-pipe won't bolt up because the outlet on the passenger side as inch off. To remedy that I'll cut off the y-pipe and install the old exhaust from Mean Green in the interim so I can drive it to the exhaust shop.
Almost done with this mess, and should be driving it again this weekend with the back half of a new exhaust system on the driver's side, and the old exhaust system that routes to the passenger side...crazy I know... . That old exhaust system is LOUD, but it will do for a day or two.
That's it in a nutshell. Need to get pictures uploaded now.
Thus far the new wiring harness that was in Mean Green has been installed in this truck. Cleaned up some of connections utilizing bulkheads because I simply didn't know how to 12 years ago. Now it looks much better under the dash.
After removing the rubber mat and underlying factory tar paper, I found rust down by the fronts of the doors. Driver's side not so bad, passenger side will be a bear to fix. Haven't ever tackled sheet metal repair, so this will be fun. This project wasn't designed to repair patches of sheet metal, but I have some areas to get to before too long. I did remove the existing seam sealer, cleaned and prepped the metal, killed the rust that was exposed, and resealed the seams. Then added double layer of soundening panels from LMC that I bought years ago. Went single layer under the seat. I hope it helps with heat and noise, the feet got pretty hot last year on summer trips.
Added seat belts, now I can drive around knowing I won't get ejected if something goes awry. I know they work from when I rolled Mean Green on my mom's birthday back in 2005 on my way to church. I don't want to test them again.
Put on a seat cover, now the seat looks much better. Found the SPID behind the seat between the springs and the cushion. It's mostly gone and no way to remove it with destroying it, so it gets to stay there.
Took out the tailight and parking lights bezels/housings and spray painted them with a mirror finish from Rustoleum. That should make them brighter and more visible. Going to properly wire in the side marker lights one of the two previous owner's installed. They had splices about every 8 inches for the parking lights and side markers. I'm lucky the truck didn't burn to the ground the way they had stuff routed. Insulation had worn away and was touching metal. It must have been ground wires, but still, it was a mess. The original harnesses were actually in good shape and I removed them intact, nothing cut.
Removing the cab mount bolts went without any problems. The rear bolts turned without anything breaking, which was nice. The front bolts put up a good fight but also busted loose without incident. For the moment I am switching from the shear-style rear cab mounts to the donut style C10 mounts. If the ride is more harsh I will send my old mounts to Steele Rubber and have them re-vulcanize the shear mounts. Removing the rear mounts from the frame with the cab on is not easy. The rivets put up quite the fight with no room to swing a hammer. But, that's why God invented air hammers right
.The exhaust manifolds, another headache. The exhaust shop made a funky y-pipe that looks cool, but is routed so close to the front cross member that the brake lines would over heat. That, and changing oil would drop oil on the pipes whereas it didn't before. They said they would redo it on their dime, so that's good. I bought some 2.5 inch outlet ram horn manifolds, but then realized having 2.5 inch pipes would also over heat the brake lines on the driver's side. So I dug out my regular ram horns and installed those after removing the AC compressor and underdash unit. Now the bad y-pipe won't bolt up because the outlet on the passenger side as inch off. To remedy that I'll cut off the y-pipe and install the old exhaust from Mean Green in the interim so I can drive it to the exhaust shop.
Almost done with this mess, and should be driving it again this weekend with the back half of a new exhaust system on the driver's side, and the old exhaust system that routes to the passenger side...crazy I know...
. That old exhaust system is LOUD, but it will do for a day or two. That's it in a nutshell. Need to get pictures uploaded now.
Last edited:
- Joined
- Aug 29, 2010
- Posts
- 47,017
- Reaction score
- 9,027
- Location
- OKC, OK
- First Name
- HotRod
- Truck Year
- 85 K20 LWB
- Truck Model
- Silverado
- Engine Size
- 454 - Turbo 400 - 3.73
Wow, yeah lots going on there. Those old 2 or 2.25 ram horns are fine.
To bad you can't get that SPID label. That would be interesting. It's probably more of a build sheet isn't it? Is it legible now at all? I'd take some good pics of it. Then maybe you can read it on the computer screen. I come across stuff I can't make out all the time. Take a pic, download it, then I can read it.
To bad you can't get that SPID label. That would be interesting. It's probably more of a build sheet isn't it? Is it legible now at all? I'd take some good pics of it. Then maybe you can read it on the computer screen. I come across stuff I can't make out all the time. Take a pic, download it, then I can read it.
DoubleDingo
Full Access Member
- Joined
- Jul 3, 2012
- Posts
- 10,335
- Reaction score
- 14,821
- Location
- Right where I am
- First Name
- Bagoomba
- Truck Year
- 1981
- Truck Model
- 81-C20 Silverado Camper Special-TH400-4.10s
- Engine Size
- Carb'ed Vortec 350
For sure a lot going on. I planned on it being down for a weekend maybe two. Instead it's been just over two months. But with fixing things while it's apart added to the time as you all know. I will get some photos of the SPID/Build sheet and post it when I get to a computer next week. Will get some of the whacky fix the PO did to the passenger side exhaust manifold I removed. And of course some truck porn. I admittedly am horrible about taking pics while in the heat of battle, but I do have some progressive shots of the project thus far.
I have also decided to swap the engine from the 81 to this truck because it is low miles, resealed, has the vortec heads, cam, new timing set, and intake that were earmarked for the other 65 that is now the parts truck. And the main reason for the swap is a vortec long block from Summit, while affordable, it has the one-piece rear main seal, so all my extra flywheels and such can't be used. So to save $2,000, I have a strong vortec 350 in my driveway. So come early fall the swap is scheduled to happen.
I have also decided to swap the engine from the 81 to this truck because it is low miles, resealed, has the vortec heads, cam, new timing set, and intake that were earmarked for the other 65 that is now the parts truck. And the main reason for the swap is a vortec long block from Summit, while affordable, it has the one-piece rear main seal, so all my extra flywheels and such can't be used. So to save $2,000, I have a strong vortec 350 in my driveway. So come early fall the swap is scheduled to happen.
DoubleDingo
Full Access Member
- Joined
- Jul 3, 2012
- Posts
- 10,335
- Reaction score
- 14,821
- Location
- Right where I am
- First Name
- Bagoomba
- Truck Year
- 1981
- Truck Model
- 81-C20 Silverado Camper Special-TH400-4.10s
- Engine Size
- Carb'ed Vortec 350
As I mentioned this was to be a simple project. I didn't think to get photos of the old wiring I removed from under the hood. But as I also mentioned the main harnesses weren't in bad condition, just the add-ons.
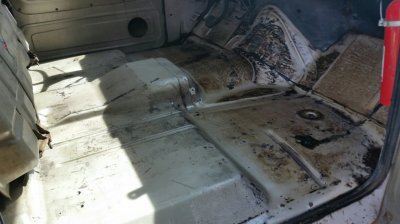
This is the painless wiring harness I got about 12 years for Mean Green. I don't know if better products were available back then, but LMC seemed to have what I needed so I got it, and back then I just followed the instructions. This time I took my time and made some modifications. A pic of the stuff removed. You can see the floor boards aren't bad for being 51 years old. There is a small amout of rust you can barely see on the driver's side. The passenger side, that's the bad one that will cause me fits. I added a lot of seam sealer in the interim to block water from coming the cab. Not sure how it will work.
This is the painless wiring harness I got about 12 years for Mean Green. I don't know if better products were available back then, but LMC seemed to have what I needed so I got it, and back then I just followed the instructions. This time I took my time and made some modifications. A pic of the stuff removed. You can see the floor boards aren't bad for being 51 years old. There is a small amout of rust you can barely see on the driver's side. The passenger side, that's the bad one that will cause me fits. I added a lot of seam sealer in the interim to block water from coming the cab. Not sure how it will work.
Attachments
Similar threads
- Replies
- 8
- Views
- 540
- Replies
- 20
- Views
- 2K
- Replies
- 3
- Views
- 1K