Double Dingo's 1965 3/4 Ton "Crusty Biscuit"

Disclaimer: Links on this page pointing to Amazon, eBay and other sites may include affiliate code. If you click them and make a purchase, we may earn a small commission.

DoubleDingo

Full Access Member
Joined
Jul 3, 2012
Posts
10,323
Reaction score
14,801
Location
Right where I am
First Name
Bagoomba
Truck Year
1981
Truck Model
81-C20 Silverado Camper Special-TH400-4.10s
Engine Size
Carb'ed Vortec 350
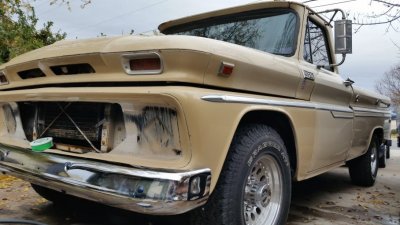
Got the brakes done, well almost. Got to drive it, and it stops a whole lot better, and that's without doing the rears. The rears will get done soon. The front end is aligned, and the truck rides nicer with the newer springs on the front. Was going up to Mom and Pop's on Saturday and the left front developed a bad knocking sound. I suspect the crappy China-made pads are to blame. The sound goes away when the brakes are applied. It sounds like a stampmill at low speeds. Limped the truck home, and yesterday I found other things to do than work on the truck. I'm sure there is damage from the sounds it was making. Reluctant to look, but I will get to it this week. I am hoping the damage is minimal. Have replaced brakes before and have never had the pads make such noise as this one is doing. I am really disappointed in the Classic Performance Products 3/4 ton disc brake conversion kit. The ball joints they provided couldn't be used, the castle nuts was loose on the studs, the tie-rods were crappy, the spindle diameter was wrong and needed to be shaved down to allow the bearings to slide on, the rubber brake hoses were wrong, basically I only used 5-10% of the whole kit. What a waste of money. Had I known what I really needed, I would have just sourced the parts from a junkyard. Lesson learned.
 

DoubleDingo

Full Access Member
Joined
Jul 3, 2012
Posts
10,323
Reaction score
14,801
Location
Right where I am
First Name
Bagoomba
Truck Year
1981
Truck Model
81-C20 Silverado Camper Special-TH400-4.10s
Engine Size
Carb'ed Vortec 350
Well the thumping sound may not be brake related at all. I looked at the left front wheel while home for lunch and all of the lug nuts were loose. I always pray before going on a trip, and the fact I made it home safely is definitely an answered prayer, and I had angels protecting me:angels2:. I was on a dangerous mountain road when the noise developed, and I drove back down that road and all the way home, on what I now know was a loose wheel. Tonight I will jack up that wheel, check the brakes and wheel studs, and then check the wheel to see if it still okay. It may be damaged from being loose, but appeared to be okay when I looked during lunch.
 

DoubleDingo

Full Access Member
Joined
Jul 3, 2012
Posts
10,323
Reaction score
14,801
Location
Right where I am
First Name
Bagoomba
Truck Year
1981
Truck Model
81-C20 Silverado Camper Special-TH400-4.10s
Engine Size
Carb'ed Vortec 350
Last night under the cover of darkness, armed with a flashlight and a breaker bar, I went out to inspect the holes on the left front wheel and the threads of the studs and lug nuts. The holes were mildly hammered and the threads all looked okay, so I tightened everything up and checked the other three wheels since I rotated the tires before finishing the brakes. The right front had come loose a little so I snugged those down. The rears were all tight.

After some research I stumbled upon a nice tidbit of information that I suspect caused my lug nuts to loosen up. I painted the rotors before installing them, and paint can cause a soft mating surface if it's more than 3 mils from what I read. I tend to believe that since both fronts lost their lug nut torque, and with the left side wanting to come loose even more because of the rotation of the wheel, it came loose more than the right did.

I need to take my dremel tool and sand off the paint on the rotors where the wheels contact the mating surfaces, and also make sure the wheels are free of paint. I normally don't check my lug nuts after installing wheels, but I will be adding that practice to my list of things to do when rotating tires or anything that requires removing a wheel. After a few miles I will check the torque of the lug nuts to be on the safe side. The thought of being on that road with a solid rock wall on one side and a drop off to a river on the other, and learning after the fact that a wheel was coming loose and then after getting out of that canyon and going down the road at highway speeds oblivious that the wheel was coming off, I do not want that to ever happen again. And I will make sure each vehicle is equipped with the proper lug nut wrench and etc. at all times. I know the vehicles came like that from the factory and the newer ones in my fleet still have the stuff in the factory locations, but both trucks have had that stuff removed.
 

DoubleDingo

Full Access Member
Joined
Jul 3, 2012
Posts
10,323
Reaction score
14,801
Location
Right where I am
First Name
Bagoomba
Truck Year
1981
Truck Model
81-C20 Silverado Camper Special-TH400-4.10s
Engine Size
Carb'ed Vortec 350
Going to be changing headlights soon. What are your thoughts on adding relays while I'm at it? Is it a really good upgrade for the electrical system? I've never wired in relays, but it looks easy enough.
 

Georgeb

Full Access Member
Joined
Apr 30, 2015
Posts
3,259
Reaction score
214
Location
Wisconsin
First Name
George
Truck Year
2003
Truck Model
K10 Burb Z71
Engine Size
5.3
I have never had paint cause that but I torque all my lug nuts with my torque wrench to ensure I have them tight enough. on my squares I go to 140 lbft. I have seen wheels come off and had one of the kids at the tire shop leave some loose on a customers truck. I caught it on a test drive and had to walk the shoulder to find enough nuts to get it back to the shop.
 

GTME94

Full Access Member
Joined
Jan 20, 2013
Posts
441
Reaction score
31
Location
Metro Detroit/Holland, MI
First Name
Terry
Truck Year
86
Truck Model
C2500 C6P Camper Special
Engine Size
454/TH400/14bff 3.73
Going to be changing headlights soon. What are your thoughts on adding relays while I'm at it? Is it a really good upgrade for the electrical system? I've never wired in relays, but it looks easy enough.

The relays for the headlight made a good improvement for me. I bought the kit from LMC, you might be able to do it yourself cheaper but it was only $30 and definitely worth the cost for the lighting improvement and for me the cost vs time tradeoff was also worth it rather than making my own.
 

DoubleDingo

Full Access Member
Joined
Jul 3, 2012
Posts
10,323
Reaction score
14,801
Location
Right where I am
First Name
Bagoomba
Truck Year
1981
Truck Model
81-C20 Silverado Camper Special-TH400-4.10s
Engine Size
Carb'ed Vortec 350
Yeah I'm going to start using a torque wrench after the research I've done on lug nuts coming loose or being overtightened. I tightened each wheel with a star wrench, and have always had no problems at all. I did spray about 4 to 5 good coats on them. That is the only time that I've painted a brake part, so by maybe having the paint too thick, perhaps it wore down enough to cause what happened? I drove a few miles tonight and everything was still snug as checked with the breaker bar.
 

DoubleDingo

Full Access Member
Joined
Jul 3, 2012
Posts
10,323
Reaction score
14,801
Location
Right where I am
First Name
Bagoomba
Truck Year
1981
Truck Model
81-C20 Silverado Camper Special-TH400-4.10s
Engine Size
Carb'ed Vortec 350
The relays for the headlight made a good improvement for me. I bought the kit from LMC, you might be able to do it yourself cheaper but it was only $30 and definitely worth the cost for the lighting improvement and for me the cost vs time tradeoff was also worth it rather than making my own.


That's what I was wondering. Sounds like it's worth it. I remembered that I have one LMC that I bought years ago. So I'm set.
 

yevgenievich

Full Access Member
Joined
Mar 1, 2014
Posts
4,791
Reaction score
3,329
Location
Texas
First Name
Viktor
Truck Year
sad
Truck Model
very sad
Engine Size
less sad
I had painted brake components before without any side effects of wheels getting loose, but sounds like a possible result
 

DoubleDingo

Full Access Member
Joined
Jul 3, 2012
Posts
10,323
Reaction score
14,801
Location
Right where I am
First Name
Bagoomba
Truck Year
1981
Truck Model
81-C20 Silverado Camper Special-TH400-4.10s
Engine Size
Carb'ed Vortec 350
Saturday I hauled 2 yards of compost to my parents about an hour away. Truck did well stopping which is good because of the twisty mountain roads. Without the auxillary springs installed, the truck squatted pretty good with that load in the back. The amount of squat made the passenger side rear tire to be painfully close to the metal edge of the wheel well of the bed. But the truck drove pretty nice nonetheless and the tire only made contact with the metal one time, and I believe it was from a dip in the road that couldn't be avoided. Only lost momentum on one turn, but that turn is a bear unloaded. It's a hairpin righthand turn that also has a good incline built in to the turn. It probably raises 4 feet from the beigninng to the end of that sharp turn. The truck had a hard time getting rolling again on that turn, but the 4:57's helped. Could have used some granny low there, but it wasn't available. :)

I don't like the pads that came with the brake kit, they overheated a little too easily coming down the grades and I wasn't riding the brakes, nor were they rubbing/sticking. Luckily the truck still stopped well, but the smell of the heated brake pads was evident. For the time being they can stay on, but before I haul another load like that I will be switching them out for something better.

Yesterday I pulled out the LMC relay harness, and it's not a plug and play harness like the instructions say it is. The three prong plug that is supposed to plug into the bulkhead at the radiator support, doesn't match. It's only two wires coming from the dimmer switch to a round 2 prong plug. So what I've come up with after looking over this harness with a fine toothed comb is, one of the wires to that 3 prong plug is the low beam signal to one relay, the second wire is the high beam signal to the other relay, and the third wire grounds the two relays. Sadly the relays are not numbered so I had to research that brand of relays and get the pinout schematic for them. I'll get some pics before I get too far along. I think I have it figured out and will modify the harness accordingly. I did change the headlights without using the relays and now the passenger side is bright while the driver's side is dim, and the BRIGHT indicator on the dash is partly lit now no matter if high beams or low beams are on, so I must have a bad ground or some crossover from the dialectric grease I added to the connectors and bulkheads. I only added a little bit, but it could've oozed over some. Will clean the connections when I install relay harness. That should fix it.
 
Last edited:

DoubleDingo

Full Access Member
Joined
Jul 3, 2012
Posts
10,323
Reaction score
14,801
Location
Right where I am
First Name
Bagoomba
Truck Year
1981
Truck Model
81-C20 Silverado Camper Special-TH400-4.10s
Engine Size
Carb'ed Vortec 350
The following photos show how/what I came up with to get the "plug-and-play-NOT" harness from LMC to work with my setup. Actually it didn't need to be altered too much.

The headlight plugs/connectors appear to be a match to what the shop manual shows for high beam and low beam, so that made figuring out which wire was which for the high beam/low beam signals to the relays. The blue/white wires are the relay ground wires. The 3 prong plug, I just removed the spades from the plastic plug and that will allow me more flexibility to wire this up. I need to see if there is such and animal as a 20 amp Maxi-Fuse so I can protect this harness. The relays are Shori brand and don't come numbered, but I learned how to test relays with a multimeter. One side will have no reading on the ohms (switch-side), and the other will have an ohms reading (coil-side). That doesn't tell me which pin is the 30, 87, 85, or 86, but since they already have the harness wired, I was able to figure out which was 30 & 87, and 85 & 86. I learned a lot about relays in the last couple days, and they don't intimidate me like they used to.

Once I get this wired in I'll snap some finished photos of the install.
 

Attachments

  • HLH-Headlight Connectors.jpg
    HLH-Headlight Connectors.jpg
    98.6 KB · Views: 94
  • HLH-3 Prong Plug.jpg
    HLH-3 Prong Plug.jpg
    87.6 KB · Views: 93
  • HLH-Highbeam and Lowbeam signal wires.jpg
    HLH-Highbeam and Lowbeam signal wires.jpg
    97.5 KB · Views: 89
  • HLH-Relays and Battery Power.jpg
    HLH-Relays and Battery Power.jpg
    98.5 KB · Views: 85
Last edited:

DoubleDingo

Full Access Member
Joined
Jul 3, 2012
Posts
10,323
Reaction score
14,801
Location
Right where I am
First Name
Bagoomba
Truck Year
1981
Truck Model
81-C20 Silverado Camper Special-TH400-4.10s
Engine Size
Carb'ed Vortec 350
I was happy to discover that Maxi Fuse does come in the 20 amp variety. Grabbed a holder and a fuse from Pepboys during lunch. :party36: 
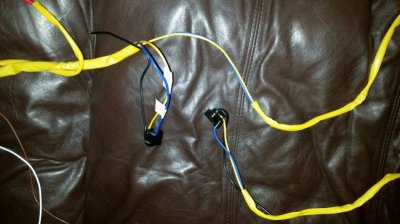
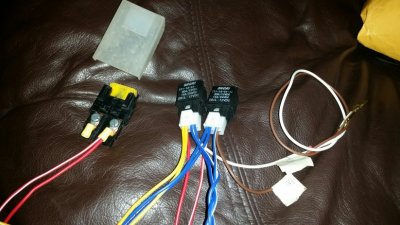
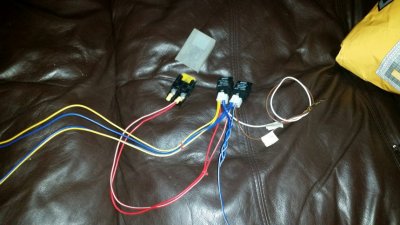
Forgot wire and some split loom, can get that after work. :)
 

DoubleDingo

Full Access Member
Joined
Jul 3, 2012
Posts
10,323
Reaction score
14,801
Location
Right where I am
First Name
Bagoomba
Truck Year
1981
Truck Model
81-C20 Silverado Camper Special-TH400-4.10s
Engine Size
Carb'ed Vortec 350
Last night I was able to get the headlight harness mocked up for how I want to install it on the truck using the maxi fuse.

The braded blue/white wires are the relay grounds, the brown wire is the low beam signal wire, the white wire is the high beam signal wire, the two blue wires are the low beam wires to the headlights, the two yellow wires are the high beam wires to the headlights, and the red/white wires are the relay power wires. The grounds I am going to splice together and run to the engine block, there is a ground wire bolted down there that feeds right back to the battery. Thinking about adding one more ground from the back of the alternator to the engine block, just make sure the whole system is grounded well.

What are your guys thoughts on adding a relay for the running lights? By running lights, I am meaning the parking lights, not daytime running lights. I could buy one and wire it up now that I understand them, but I don't know if the running lights need to have a relay in the circuit.
 

Attachments

  • HLH-Mockup-01.jpg
    HLH-Mockup-01.jpg
    99.8 KB · Views: 81
  • HLH-Mockup-02.jpg
    HLH-Mockup-02.jpg
    99.2 KB · Views: 90
Last edited:

DoubleDingo

Full Access Member
Joined
Jul 3, 2012
Posts
10,323
Reaction score
14,801
Location
Right where I am
First Name
Bagoomba
Truck Year
1981
Truck Model
81-C20 Silverado Camper Special-TH400-4.10s
Engine Size
Carb'ed Vortec 350
I have decided I am going to Mean Green-ify this truck. It will be getting the sm420 and the 3.54 Dana 60. I was hoping the 3-on-the-tree would be fun longer, but with the cooler temps, shifting is sometimes not doable because the linkage is semi-frozen. So I will be replacing brakes and seals on the Dana 60, and when it's done I can swap it all in.

I've calculated the various ratios with and without the gear splitter 27% overdrive, and running the 3.54's will be fine. Don't really need OD with the 3.54's, it runs 2,610 at 70 mph. Now that I know more about camshafts I can get one that will generate more torque for the more severe grades. I like the 3rd overdrive ratio with the 3.54's.

Didn't get the headlight wiring done, ran into a snag Saturday, and then couldn't touch the grille Sunday. Got it assembled and painted. I didn't know the paint needed more prep, so it didn't turn out as well as I wanted it to. But it has to wait 7 days for the paint cure for any sanding or what not, so I will wait to sand it and redo it when I have the core support fixed. Since the grille couldn't be handled, I decided to polish the front end with No.7 polishing compound. What a difference. Rain started so I couldn't finish the hood, but I can't wait to see how it looks completely polished.
 

Attachments

  • Front End Polished.jpg
    Front End Polished.jpg
    100.1 KB · Views: 89
  • Ratios and RPMs.jpg
    Ratios and RPMs.jpg
    100.9 KB · Views: 96

DoubleDingo

Full Access Member
Joined
Jul 3, 2012
Posts
10,323
Reaction score
14,801
Location
Right where I am
First Name
Bagoomba
Truck Year
1981
Truck Model
81-C20 Silverado Camper Special-TH400-4.10s
Engine Size
Carb'ed Vortec 350
I bought this truck back in April 2015 and I knew it would need some work as all old trucks do even if they're restored. Last night I was perusing my photos and documented what has been done to it since taking ownership.

May) I installed a brand new shroud and three core radiator. My 4 core wouldn't fit. I installed the General AT2 tires and aluminum modular wheels.

June) Just drove it.

July) Installed Edelbrock Peformer II Intake Manifold and a Fresh Quadrajet and a Factory Air Cleaner Assembly. Resurfaced the Flywheel from Mean Green. Ended up not needing to replace the clutch or throw out bearing.

August) Painted the Bellhousing from Mean Green GM Dark Blue Metallic. Repositioned the Shroud to clear the fan equal distances all the way around. Rebuilt the Saginaw 3 speed with Borg Warner Overdrive.

September) Installed Factory Driveshaft. Cleaned and Flushed the Cooling System and Relocated the Temperature Sending Unit to the head from the intake manifold.

October) Installed Front Disc Brakes, which included replacing all Ball Joints, Upper and Lower Control Arms, and all Tie-Rods.

November) Completed Front Disc Brake Conversion. Installed New Chrome Front Bumper.

December) Installed Headlight Relay Harness. Assembled, Painted and Installed good Grille from Mean Green. Cleaned and Polished oxidized Paint.

With more days left in December I plan to get a lot more done. :popcorn:
 

Latest posts

Forum statistics

Threads
42,298
Posts
913,278
Members
33,797
Latest member
70meyers
Top