My rear brakes

Disclaimer: Links on this page pointing to Amazon, eBay and other sites may include affiliate code. If you click them and make a purchase, we may earn a small commission.

labbetheking

Member
Joined
Jul 28, 2015
Posts
43
Reaction score
25
Location
Sweden
First Name
Daniel
Truck Year
1978
Truck Model
c10
Engine Size
350
I've just got all my papers on my car so i can get it thru the inspection and i even had to install "inspection glass" on the brake master cylinder (Sweden ftw).

I have no idea if the rear brakes worked before i removed the brake cylinder but i really have no brakes at all now when i'm trying to get all the air out of the brakesystem.
The fronts work perfectly so can it be the prop valve or maybe just the seals on the master cylinder for the rear circuit?

Just trying to figure out what's most likely... it doesn't squirt as much on the rear brakes when i'm trying to eleminate the air.
 

Attachments

  • DSC_0683.jpg
    DSC_0683.jpg
    94.3 KB · Views: 131

firebane

Full Access Member
Joined
Jul 10, 2014
Posts
1,732
Reaction score
29
Location
Calgary, AB
First Name
Curtis
Truck Year
1974
Truck Model
K10
Engine Size
350
I just went through this and had to replace my prop valve and that fixed my rear brakes.
 

yevgenievich

Full Access Member
Joined
Mar 1, 2014
Posts
4,790
Reaction score
3,327
Location
Texas
First Name
Viktor
Truck Year
sad
Truck Model
very sad
Engine Size
less sad
Prop valve might need to be reset. Close the back circuit, open front and hit brake pedal hard. Then retest
 

labbetheking

Member
Joined
Jul 28, 2015
Posts
43
Reaction score
25
Location
Sweden
First Name
Daniel
Truck Year
1978
Truck Model
c10
Engine Size
350
Ok i'll try that and i can do all that on the prop valve? It's location isn't the best tbh :)
Will the back circut open automatically when i hit the brake?
 
Last edited:

yevgenievich

Full Access Member
Joined
Mar 1, 2014
Posts
4,790
Reaction score
3,327
Location
Texas
First Name
Viktor
Truck Year
sad
Truck Model
very sad
Engine Size
less sad
By blocking the circuit just close the bleed screw. Usually would not need to touch the prop valve it self
 

labbetheking

Member
Joined
Jul 28, 2015
Posts
43
Reaction score
25
Location
Sweden
First Name
Daniel
Truck Year
1978
Truck Model
c10
Engine Size
350
Think i'm going crasy here :(

Tried to do as you said but it doesn't seem to work.. i even went so far that i disassembled the rear drum brakes but nothing was wrong there.


One strange thing happened when we tried to remove the air from the rear brakes..just when the brake oil was about to end on the back circut (on the brake cylinder) the rear brake worked for an instant.

Removed rear brake hose from the propotion valve as shown in the picture and cleaned it.. the oil seems to come out there but maybe just not enough?

Is the only option left to change the propotion valve or am i doing wrong when i try to reset it?

Trying my best to explain but i don't usually write or speak english :)
 

Attachments

  • DSC_0696.jpg
    DSC_0696.jpg
    93.9 KB · Views: 127

labbetheking

Member
Joined
Jul 28, 2015
Posts
43
Reaction score
25
Location
Sweden
First Name
Daniel
Truck Year
1978
Truck Model
c10
Engine Size
350
Also when i hit the brake pedal and try to open the bleeding screw on the rear brakes the pedal just moves extremely slow downwards or almost nothing at all (though the oil seems to poor out just alittle bit more when hitting the pedal when opening the screw)...must be the propotiong valve?
 

yevgenievich

Full Access Member
Joined
Mar 1, 2014
Posts
4,790
Reaction score
3,327
Location
Texas
First Name
Viktor
Truck Year
sad
Truck Model
very sad
Engine Size
less sad
If it is failing to reset, then likely need to replace the prop valve. There might be another way to reset the rear circuit, but i would have to search for the info as it was a long time sense I had to work on that issue.
 

rangerman

Full Access Member
Joined
Sep 13, 2015
Posts
52
Reaction score
0
Location
Oklahoma
First Name
Joe
Truck Year
1979
Truck Model
C10
Engine Size
400
Replaced my entire rear brake system and had the same issues, rear brakes wouldnt bleed. Pedal was soft/spongy.

We simply removed the metal line from the rear of the master cylinder, screwed in a old metal line and crimped the end. (We didnt remove the front line to the master cylinder.)

After this is done, quickly hit the brake pedal as hard as you can with your foot. It took 3 or 4 times but the pedal got hard.

Put your line back on your master cylinder and bleed ALL your brakes.

This worked for us.
 
Last edited:

labbetheking

Member
Joined
Jul 28, 2015
Posts
43
Reaction score
25
Location
Sweden
First Name
Daniel
Truck Year
1978
Truck Model
c10
Engine Size
350
Well i ordered a new valve proportion now. Hope that'll solve the problem :)
 

chengny

Full Access Member
Joined
Feb 22, 2012
Posts
4,086
Reaction score
1,008
Location
NH
First Name
Jerry
Truck Year
1986
Truck Model
K3500
Engine Size
350/5.7
Here is what the internals of a GM BPC (brake proportioning combination) valve look like:

You must be registered for see images attach


There is a switch mounted on the valve body. When the spool has shifted away from the normal center position (due to a loss of pressure in one of the hydraulic circuits), it closes the switch - which creates a ground (and illuminates the brake warning light on the dash).

The same lamp is used to indicate that the parking brake is applied.

So, if your brake warning lamp lights up when the parking brake is set (or the key is in the START position) it would indicate that it is working.

And, it would follow that, if it is not constantly illuminated, the BPC valve is centered. This is assuming that the wire to the switch on the BPC valve is connected.

While you are waiting for your new BPC valve to arrive, it might be worthwhile to methodically check for proper flow on the inlet side of the valve. Start at the tubing fitting on the master cylinder end. Loosen it just enough to observe whether there is a good flow out of the master when the brakes are applied. If that is okay, close the fitting up and move to the other end of the tube - where the rear circuit enters the BPC valve. The image above shows it's location - RH side, above the rear circuit outlet tubing. Loosen that fitting and once again check for flow when the brakes are applied. If there is good flow there...it would appear that there is something wrong with the BPC valve.
 

labbetheking

Member
Joined
Jul 28, 2015
Posts
43
Reaction score
25
Location
Sweden
First Name
Daniel
Truck Year
1978
Truck Model
c10
Engine Size
350
Wow thanks i was really wondering how it worked! Recived the proportion vavle today so i think i'll just go ahead and install it.
Any tips before i switch it? Seems to be kinda tricky :p
 

chengny

Full Access Member
Joined
Feb 22, 2012
Posts
4,086
Reaction score
1,008
Location
NH
First Name
Jerry
Truck Year
1986
Truck Model
K3500
Engine Size
350/5.7
To change that valve can be a wicked pain in the butt - mainly just because it involves making up 5 tubing connections in a limited amount of space.

You know how difficult it can be to get the threads of tubing fittings to engage (without cross-threading them). Well in this case, because you have five fittings get started, it is way worse. As each fitting is threaded into the valve body, the entire assembly becomes more rigid and the operation becomes more cumbersome. By the time you are trying to get the final fitting to engage, you feel like throwing your tools down and just drinking beer.

A handful of things I would suggest from experience:

1. Make sure the threads on the fittings are meticulously clean

2. Any paint/rust on the ends of the tubing (at least the last inch or so) is removed

3. BY ALL MEANS - resist the temptation to mount the valve block on the
crossmember first. Doing so will exponentially increase the length of time required to
do the job. Make up all the fittings to the valve body before bolting the valve to the
member (at least get a few of the threads engaged on each fitting).

4. Wear safety glasses - there is a ton of crap just waiting to fall into your eyes.

5. If you don't have any, it is money well spent to buy the necessary sizes of line
wrenches. Open ends will slip and strip the fitting nuts.

6. After you have made up all the fittings, loosen the two inlet lines that lead from the
master (or just leave them loose during assembly). This is your chance to bleed
whatever air you can from those sections. That is where the vast majority of air will
be. Very little brake fluid will be lost from (and very little air will get into) the 3 outlet
lines. I have always found these trucks to be extremely forgiving about reasonable
amounts of air in the brake lines after replacing a component. Within a day or two any
trace amounts of air will bubble out and migrate to the master cylinder - and vent to
atmosphere. I never bleed brakes anymore unless a long section of brake line has
been replaced.

7. When you have all the fittings made up tight (and the air has been bled from the inlet
lines). You still need to mount the valve body to the cross member. It can be a bitch
to line up the mounting bolts. They barely are long enough to get the nuts started
under the best of circumstances - never mind with 5 lengths of steel tubing fighting
against you. I don't usually ever replace OEM fasteners with standard hardware but in
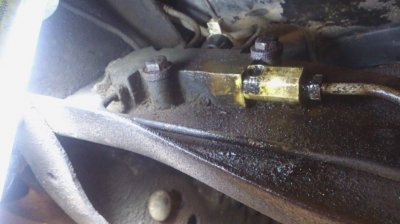
this case I make an exception. I buy two stainless bolts that are just about 1/2"
longer than the OEM (and SS nuts) ones and they make the job of securing the valve
to the member way easier. They just show a few more threads:

You must be registered for see images attach


Many of these hints will not even apply to you - because you are not replacing the brake lines. I have never removed a BPC valve for the purpose of renewing it. It is always the brake lines that I have had to renew - pulling the BPC valve just makes that job easier. Your brake lines will presumably still be bent just as they came from the factory and so will most likely line right up and thread in without a struggle.
 

labbetheking

Member
Joined
Jul 28, 2015
Posts
43
Reaction score
25
Location
Sweden
First Name
Daniel
Truck Year
1978
Truck Model
c10
Engine Size
350
Oh man thanks for the advises! I'm tearing down my bahroom this weekend but hopefully i can get started with the truck on monday.
I will have a cold one ready in the fridge. just in case :)
 

labbetheking

Member
Joined
Jul 28, 2015
Posts
43
Reaction score
25
Location
Sweden
First Name
Daniel
Truck Year
1978
Truck Model
c10
Engine Size
350
Just wanted to tell this even though i'm kinda embarassed :p

The problem i had was that i didn't bleed the brake master cylinder (didn't even know u had to).

So i switched out the proportion valve, brake pipes and even the master cylinder all in vain :((

*cries*
 

Latest posts

Forum statistics

Threads
42,213
Posts
911,430
Members
33,712
Latest member
87R10_Cruising
Top