Radiator question?

Disclaimer: Links on this page pointing to Amazon, eBay and other sites may include affiliate code. If you click them and make a purchase, we may earn a small commission.

dhamp

Full Access Member
Joined
Jan 18, 2011
Posts
1,170
Reaction score
18
Location
Atlanta Area, GA
First Name
Derek
Truck Year
1987
Truck Model
R-10 Custom Deluxe
Engine Size
350
I use Gunk's Engine Bright for my mowers, but all my car/truck engines, I use this. My buddy that works at the dealers always has the guys clean the engine in my DD after servicing. One day I asked what the used and he said it was 1 part PP to 3 parts water. I was expecting him to say they use some high dollar, gotta-have-a-special-license-to-get kinda stuff. I that strength for routine maintenance cleaning. I just did my truck almost 2 weeks ago and used it at 1:2 instead because that engine hasn't been cleaned since it was bought in Dec. 1987. I still had to do it 3 times to get some of that gunk off, but it was trying to used as little pressure as possible when I did it. After the 2nd time, I was getting a little impatient and got the pressure on up and the crap starting sliding right off. I will say that foam is better for seeing what you've sprayed and what you haven't. But I like using this too because I can set the nozzle to a mist setting and it's seep into some really tight places.
 

chengny

Full Access Member
Joined
Feb 22, 2012
Posts
4,086
Reaction score
1,010
Location
NH
First Name
Jerry
Truck Year
1986
Truck Model
K3500
Engine Size
350/5.7
I'm tellin' ya (and I don't usually repeat a suggestion) - get a couple of cans of ZEP heavy duty oven cleaner.

Not so much for final degreasing - but for initially breaking up the real heavy, caked on grime - it's the balls!
 

Gramps

Full Access Member
Joined
Oct 22, 2012
Posts
82
Reaction score
1
Location
Oregon
First Name
Stuart
Truck Year
1978
Truck Model
K20
Engine Size
350
I'm tellin' ya (and I don't usually repeat a suggestion) - get a couple of cans of ZEP heavy duty oven cleaner.

Not so much for final degreasing - but for initially breaking up the real heavy, caked on grime - it's the balls!

ok, I see what your saying, I don't think that engine has ever been cleaned and it's a 35 year old truck, the grease on it is thick and heavy.

so spray the oven cleaner on first to brake up the heavy built up grease and grime, then go after that with the PP?

I have a pressure washer at home I can use, it's it's nothing fancy, an electric one that puts out something like 1500psi good for small jobs.

is this the oven cleaner your talking about?

http://www.homedepot.com/p/ZEP-19-o...Grill-Cleaner-ZUOVGR19/202858011#.Ug1is6ywW2A

I plan on starting the engine cleaning process this weekend.

the radiator is on it's way, I'm guessing it might be here by this weekend
 

chengny

Full Access Member
Joined
Feb 22, 2012
Posts
4,086
Reaction score
1,010
Location
NH
First Name
Jerry
Truck Year
1986
Truck Model
K3500
Engine Size
350/5.7
That's it. Heat the can up in hot water before using - it sprays out much better. Apply to only dry surfaces. Wet makes it slide off.

And try to avoid getting it on your hands. It's highly caustic. If applied full strength to your skin it sucks. It won't kill you, but it will kind of burn.
 

Gramps

Full Access Member
Joined
Oct 22, 2012
Posts
82
Reaction score
1
Location
Oregon
First Name
Stuart
Truck Year
1978
Truck Model
K20
Engine Size
350
That's it. Heat the can up in hot water before using - it sprays out much better. Apply to only dry surfaces. Wet makes it slide off.

And try to avoid getting it on your hands. It's highly caustic. If applied full strength to your skin it sucks. It won't kill you, but it will kind of burn.

ok, I'll pick some up, 3 cans should do it I would think? thanks for the suggestion, I'll get some photos of before, during, and after
 

chengny

Full Access Member
Joined
Feb 22, 2012
Posts
4,086
Reaction score
1,010
Location
NH
First Name
Jerry
Truck Year
1986
Truck Model
K3500
Engine Size
350/5.7
Get a couple of toilet brushes too - with the stiffest bristles you can find. Not the horse shoe shaped kind (with the bristles wrapped around the wire). The kind with the bristles sticking right out of the center shaft work best.

Rough up the surfaces of the grime with the brush before applying the oven cleaner (or any kind of degreaser for that matter). This creates cuts in the muck and lets the solvent penetrate past the surface. It speeds things up.

Also, after applying the solvent (but before rinsing it away - maybe halfway though the application) scrub the grime with the toilet brushes. You get much more mileage out of the solvent that way.


Since we are on the subject of degreasing/cleaning the engine compartment (and anywhere else that has caked on grease) - here is the biggest assist I have ever found:

Use really hot water to wash, rinse and break up the grime.

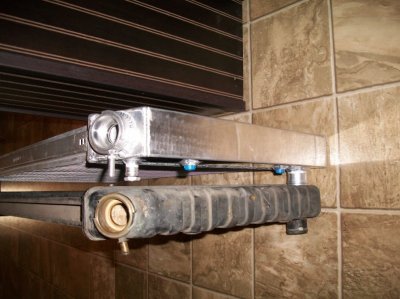
Get a good quality garden hose (cheap ones will develop bulges and burst if used to supply hot water). Check the labels carefully, they will say whether the hose can withstand hot water. Home Depot sells a great Goodyear heavy-duty hot water rated hose for $30:

You must be registered for see images attach


It's real rubber with quality fittings and will last you a lifetime.

Hook it up to a hot water supply. I have plumbed a couple of boiler drain type valves into my hot water lines. But you can use the hot water valve that supplies your washing machine.

Avoid using the drain valve on the bottom of the water heater. It will accept a garden hose but a couple of problems:

The cold water dip tube that replenishes the used hot water goes right to the bottom of the tank. That's right next to the drain valve. So when you tap off the bottom of the tank the cold incoming water is drawn into the drain connection. You lose that real hot water fast.

Another problem is that when you are all done and want to shut the drain valve - it sometimes does not close properly. The drain valves supplied with water heaters these days are almost always cheap plastic. They are designed for one time use - to drain the tank for disposal.

For the few days that you are cleaning the truck, turn the water heater all the way up. That 170 degree water really helps loosen the caked on grime and wash it away.

Tell your household that you raised the hot water temp- the showers will get real hot if the handle is in the normal position. And don't forget to lower it back to normal when you are done cleaning - your gas/electric bill will shoot up.
 

Gramps

Full Access Member
Joined
Oct 22, 2012
Posts
82
Reaction score
1
Location
Oregon
First Name
Stuart
Truck Year
1978
Truck Model
K20
Engine Size
350
good point on the hot water, I have easy access to the washing machine hot water, that's actually closer to where the truck is sitting then the outside faucet, I'll pick up the toilet brush and zep oven cleaner this weekend.

I already have a hot water hose, so I'm good there.

I may be getting ahead of myself a little bit here, (need to clean the engine before I do anything..

but, I want to do a thorough back flush on the cooling system, for the heater core, I figured I could attach the garden hose to it and back flush it until it's flowing good and clean clear water.

the cooling system is a nasty cruddy mess, and I figured if I'm replacing parts, ie: water pump, radiator, thermostat, hoses ect. I might as well do the best I can to completely clean out the block.

I understand there's some cooling chamber drain plugs on the block somewhere? under the truck? I'd like to pull those when I flush it out, I was also going to remove the thermostat and hook a garden house to the upper radiator hose and back flush through the block.

are there any other ideas to thoroughly clean out the block?

Get a couple of toilet brushes too -
Rough up the surfaces of the grime with the brush before applying the oven cleaner

Use really hot water to wash, rinse and break up the grime.

Get a good quality garden hose

Hook it up to a hot water supply.
 
Last edited:

Gramps

Full Access Member
Joined
Oct 22, 2012
Posts
82
Reaction score
1
Location
Oregon
First Name
Stuart
Truck Year
1978
Truck Model
K20
Engine Size
350
ok, I climbed under the truck tonight when I got home and took a couple of pictures of what I think are the block cooling channel plugs.

they look simple and easy to get out to me, but reading on the net about those two block drain plugs, people claim that they can be really nasty to get out.

I want to remove these so I can get a good flush on the block, then replace them with brass 1/4 npt petcocks

am I walking into a battle zone trying to do this? or should I just leave them be and forget about changing them out?
 

Attachments

  • 100_3061.jpg
    100_3061.jpg
    95.5 KB · Views: 112
  • 100_3060.jpg
    100_3060.jpg
    97.7 KB · Views: 137

chengny

Full Access Member
Joined
Feb 22, 2012
Posts
4,086
Reaction score
1,010
Location
NH
First Name
Jerry
Truck Year
1986
Truck Model
K3500
Engine Size
350/5.7
I have always been able to get them out.

Just use a 6-point socket and tap the heads a few times with a hammer before cranking on them.

If they are stubborn, use the old trick of cranking them in the tightening direction first and then try backing them out.

When you pull them be aware that the coolant passages behind them will be absolutely jam packed with sediment. It will take some serious digging just to get a trickle started - and then for quite a while after they will keep getting plugged up again.

But eventually you will get a good solid stream of clear water flowing out. Then, after you flush your cooling system remove them again - but don't be surprised if they are packed solid with more crap.

It is actually a good idea to back flush up through the drain plugs and out the thermostat opening halfway through the cleaning process.

Do it after your initial chemical flush, then chemically flush again. At the end of flushing blow them out the bottom one last time.
 

MrMarty51

Full Access Member
Joined
Oct 25, 2012
Posts
7,524
Reaction score
9,381
Location
Eastern Montana
First Name
Martin
Truck Year
1978
Truck Model
K20
Engine Size
400
but, I want to do a thorough back flush on the cooling system, for the heater core, I figured I could attach the garden hose to it and back flush it until it's flowing good and clean clear water.
After back flushing the heater core, use the air hose, blow back through the core, it will loosen even more crud, switch pipes with the air hose, blow both ways, keep back flushing, both ways and blowing through the core, until it flows clean. Be carefull when beginning to blow through the core, when it is full of water, there will be some resistance but dont increase pressuer until no more or very little resistance is felt.
Blowing air into the lower radiator hose nipple, on the radiator will also loosen a lot of crap.
 

Gramps

Full Access Member
Joined
Oct 22, 2012
Posts
82
Reaction score
1
Location
Oregon
First Name
Stuart
Truck Year
1978
Truck Model
K20
Engine Size
350
Hey, guess what the fed-ex dude just dropped off?

apparently, the little woman had other plans for me today, so we're getting ready to leave to take the dog on a hike, so hopefully I can get into this cooling system revamp later today or maybe tomorrow, I'll get pics of both radiators (old and new) side by side when I get back.
 

Attachments

  • 100_3066.jpg
    100_3066.jpg
    94 KB · Views: 126

HotRodPC

Administrator
Staff member
Admin
Joined
Aug 29, 2010
Posts
47,017
Reaction score
9,029
Location
OKC, OK
First Name
HotRod
Truck Year
85 K20 LWB
Truck Model
Silverado
Engine Size
454 - Turbo 400 - 3.73
Hey, guess what the fed-ex dude just dropped off?

apparently, the little woman had other plans for me today, so we're getting ready to leave to take the dog on a hike, so hopefully I can get into this cooling system revamp later today or maybe tomorrow, I'll get pics of both radiators (old and new) side by side when I get back.

:grd:
 

Gramps

Full Access Member
Joined
Oct 22, 2012
Posts
82
Reaction score
1
Location
Oregon
First Name
Stuart
Truck Year
1978
Truck Model
K20
Engine Size
350
yup, I definitely need to get crank'n on this truck.

here come some more pictures of the new vs old radiators.

one of american eagle claims to fame is that their radiators have more rows of cooling tubes then the copper brass counterparts, so I counted the tubes in both radiators, and yeah, their right

the old 3 row brass copper radiator had 40 rows of 3 tubes, and the new aluminum had 42 rows of 2 tubes, but as you will see in the picture, on the aluminum radiator, the very bottom tubes are blocked off, which leaves the aluminum radiator with 41 rows of working tubes. still 1 more then the copper brass radiators it replaces.

I can't rep ya so I have to spare Mr Marty and just have to give it to you, sorry. :nutkick: :evillol:
 

Attachments

  • 100_3067.jpg
    100_3067.jpg
    95.4 KB · Views: 143
  • 100_3068.jpg
    100_3068.jpg
    95.7 KB · Views: 130
  • 100_3069.jpg
    100_3069.jpg
    97.9 KB · Views: 152
  • 100_3070.jpg
    100_3070.jpg
    97.5 KB · Views: 177

Gramps

Full Access Member
Joined
Oct 22, 2012
Posts
82
Reaction score
1
Location
Oregon
First Name
Stuart
Truck Year
1978
Truck Model
K20
Engine Size
350
here's the blocked row of bottom tubes.

i think the radiator was worth the price and is pretty much, and exact replacement for the old 3 row i took out of the truck
 

Attachments

  • 100_3074.jpg
    100_3074.jpg
    108.6 KB · Views: 129

Forum statistics

Threads
42,323
Posts
913,717
Members
33,821
Latest member
78ALB
Top