Heater Core how to

Disclaimer: Links on this page pointing to Amazon, eBay and other sites may include affiliate code. If you click them and make a purchase, we may earn a small commission.

SirRobyn0

Full Access Member
Joined
Dec 6, 2019
Posts
6,742
Reaction score
11,319
Location
In the woods in Western Washington
First Name
Rob
Truck Year
1984
Truck Model
C20
Engine Size
305
I'm not going to go as far as to call it a tutorial, because I may not make note of every single nut and bolt, so this is a how to. Anyone with a set of hand tools and average mechanical skills should be able to do this no sweat. I'm upgrading this to a 2 beer or 2 whiskey and coke job, but not more than that. It's really not bad the hardest thing is couple tricky bolts and just working with small delicate 40 year stuff. I'm doing this on a 1984 Chevrolet C20 with air conditioning.

First thing is first, the housing under the hood does NOT get removed, you'll be removing the housing under the dash which sounds terrible, but as far as heater cores go these trucks are a breeze. You will want to lay something on your carpet, coolant does not dry well and ethanol glycol coolant especially if it's old tends to be stinky.

It took me 20 minutes to have the box out of the truck and on the work bench in the shop. About 30 minutes to change the core - it should have been less but I had forgotten about some of the tricky linkage and hidden bolts as it has been a long time for me, but I will show you those so it should go more smoothly for you. 15 minutes had the box back in the truck and me pouring coolant back in.

_________________________________________________________________________________

First thing will be to remove the heater hoses from the heater box under the hood. If you need to drive the truck while the core is out simply connect the heater hoses together with a 5/8" to 3/4" connector. Before you remove the heater hoses you can either drain a bit of the coolant or plug the lines with hose plugs or large bolts.

Next empty the contents of the glove box, and remove the 3 or 4 bolts at the hinge. Open the glove box and remove.

Next remove the duct that is just to the left of the glove box and slightly behind the ash tray. 3 1/4" bolts held mine on, it slides out easy. Some folks like to remove the floor distribution box, I don't if you choose not to you just have to be mindful you don't break it off when moving the box in and out.

Working from the outside there are 4 studs with nuts that need to be removed. Do not remove and of the bolts, only the nuts on the studs, the bolt under the hood hold the under hood unit on and we are NOT removing that. When you are looking from under the hood the lower left nut is the only tricky one. A guy could do it with a hand wrench, enough time and enough flexibility but a 18" extension and a wobbly you can get right on it.

Below, Red circles are studs you can see, yellow circles are studs you can't see and represent their approximant location.

You must be registered for see images attach


Next working from the inside again there are two bolts that must be pulled:

Can't see them in the pic but if you look in that general area you'll see them

You must be registered for see images attach


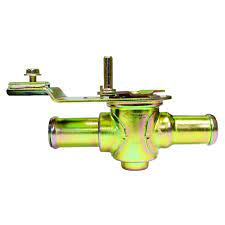
Next pull the heater box off the firewall towards you and down. At that point you'll have easy access to the linkage on the top:

Mark and disconnect the linkages circled in red, leave the other two hooked up.
You must be registered for see images attach


There are three vacuum connections, two kind of on the top and to the back one on the far left. It's pretty hard to get a picture of these as you pull the box, but once you have the linkage unhooked you should be able to lower the box enough to get good hand access and visuals.

From there put your heater box on the work bench. I will work on that in the next post, which I intend to work on right away but I am at the shop so we'll see.
 

Grit dog

Full Access Member
Joined
May 18, 2020
Posts
5,976
Reaction score
9,923
Location
Washington
First Name
Todd
Truck Year
1986
Truck Model
K20
Engine Size
454
I’ll double your money and give you 4 whiskeys to do my truck!
Hell….you can have the whole bottle!

Kiddiing


Not kidding!
Thanks for the write up though! It’s on the rainy day list right now.
 

SirRobyn0

Full Access Member
Joined
Dec 6, 2019
Posts
6,742
Reaction score
11,319
Location
In the woods in Western Washington
First Name
Rob
Truck Year
1984
Truck Model
C20
Engine Size
305
Ok on the bench turn the thing so that the heater core lines are facing up. Take out all of the 9/32" bolts around the perimeter of the housing.

Now there are two tricky ones, under the foam seal at the air inlet:

You must be registered for see images attach


You must be registered for see images attach


What you can do it feel along the foam seal for the soft spots there will be one on the top and one on the bottom, they are recessed so you won't feel the head of the bolt it'll just feel like there is no support for the foam. Get those out.

I didn't take a picture of it when it was on the bench but the link rod in blue now needs to come off. It's very important that it's position gets marked. The once that is taken off the actual rod that runs though the blend door can be withdrawn (pulled) out of the case.
You must be registered for see images attach


Here it is as I'm pulling it out:
You must be registered for see images attach


This is the only really tricky thing about this job. You have to disconnect the middle vacuum canister linkage which is inside the housing by lifting up carefully on the housing and and getting at the bolt with a socket and an extension more in the next post.
 

SirRobyn0

Full Access Member
Joined
Dec 6, 2019
Posts
6,742
Reaction score
11,319
Location
In the woods in Western Washington
First Name
Rob
Truck Year
1984
Truck Model
C20
Engine Size
305
@Grit dog more of it is coming:

Here is how we disconnect it:
You must be registered for see images attach


Oh, someone needs me to do something for the shop. We'll crack the case open in a bit hang on!
 

SirRobyn0

Full Access Member
Joined
Dec 6, 2019
Posts
6,742
Reaction score
11,319
Location
In the woods in Western Washington
First Name
Rob
Truck Year
1984
Truck Model
C20
Engine Size
305
Okay now we are going to separate the case. This is very simple you just lift up on the heater core Inlet hoses on one side and the case half on the other side and it should just pull up and separate off the heater core will stay attached and the larger portion will just sit there on the bench. Set the larger portion aside flip the heater core portion upside down. Now you can remove the heater core there will be three bolts. Unfortunately I didn't think to take pictures of the straps until I'd already taken them off but I think you get the idea the big long strap goes over the side with the heater hose attachments and the clip goes on the opposite side.

You must be registered for see images attach


You must be registered for see images attach
 

SirRobyn0

Full Access Member
Joined
Dec 6, 2019
Posts
6,742
Reaction score
11,319
Location
In the woods in Western Washington
First Name
Rob
Truck Year
1984
Truck Model
C20
Engine Size
305
To install reverse removal instructions lol. Now I'm not going to step by step reinstallation but I am going to give some tips.

New heater cores often aren't exactly the same as the old ones if it fits the hole in the lines go out pretty close to where they came from the factory consider that a win. In my case the strap by the lines fit perfectly the clip on the far side of the heater core fit okay but there were big gaps at Each corner of the heater core where it met the plastic. This isn't a huge problem but if left like that unheated air will go through that area instead of through the core also air will travel the path of least resistance so you're going to get more air going through those small gaps then going through the core and you may not have as hot as you'd like certainly you would not have as hot of air as you could. I used 3M strip chalk to seal those areas. 3M strip chalk is kind of a sticky strip substance it'll stick to itself it'll stick to other things it's great at filling small gaps and cracks where you don't want to put something like silicone which you could also use it would just be a lot harder on you in the future if you had to do the job again. This is the product I'm talking about.

You must be registered for see images attach


You must be registered for see images attach


I have no idea what the availability of that stuff is today I've had it for a long time.

Next tip if your heater box is very dirty inside or if your heater core has puked coolant all over the inside of the box now is the time to clean it up. Coolant takes forever to dry and if you leave a residue of coolant in it and it's smelly coolant you're going to smell it for quite a while. The best thing to clean it up is lacquer thinner and a rag. I would describe lacquer thinner as being similar to brake clean but it dries really really fast and has a really bad fumes while it's drying so use it in a well ventilated place. Also you could use brake clean or even paint thinner probably if you had to you just have to have longer drying times at The Box open if you use something like paint thinner.

Putting the box back together. The hardest thing by far is reaching your hand in there holding the rod for the vacuum actuator and getting the bolt back into it and tightened down in the same position it was when it came out. Yes all of that can be quite a trick but it is doable and definitely the hardest part of putting the box back together.

Installing the box back into the truck there is a foam gasket that goes around the opening of the air Inlet for the heater box this foam gasket needs to be there and needs to be in decent shape. If the gasket is bad you can replace it with like the stick on foam gasket material you can get at the hardware store it's usually designed for doors or narrow camper tape will work. There is also a paper gasket that goes around the entire part that bolts up to the firewall there is a good chance that after 40 years and an application or two of coolant there is nothing left of this gasket that's not really a problem you can just leave it out. If you're so inclined you could cut another gasket from gasket material. Really the only point on that gasket area that is of any importance at all is where the heater hoses run into the truck and the reason is a you could get some hot air passed there which you wouldn't want in the summer when you're running the air. Also if you were to have a heater hose leak right next to the box it could come into the passenger compartment. My suggestion on that is to use that 3M strip tape and just shove it around where the heater lines go through the firewall. Or again you could use silicone gasket maker it would just be harder to do the job with that and look a little crappier.

When you go to install the heater box back in the truck get it kind of shoved up in there and then reattach the vacuum lines then reattach the link rod that you took off then push it up into place and push the studs through the firewall. This is easier said than done often times the studs want to fall out of the heater box or they just don't want to go back through the firewall because they're catching on the carpet or the insulation or who knows what. It's not really hard it's just difficult because of that. Once you get it through go around to the outside of the truck and put one or two nuts on the studs. From there you can work on getting the bolts in place tightening up the studs and reinstalling the reinstalling the air ducts. Which reminds me I do not know why this is but on all of these old trucks I've done there is a gap between the heater box and the duct that goes up to the defrost I don't know if there was originally a gasket there or what. What I do know is they seem to function fine with that gap, so if you notice that gap on installation it's not an issue. Then install the glove box door, reattach the heater hoses, fill the system with coolant fire it up and test it out.

I am going to warn you all I did the last couple posts using voice to text just because I want to get it done and it's quicker. When I get a chance hopefully tonight or tomorrow I will go through it and clean up any mistakes that made. (I think I have all the major mistakes fixed now). Thank you hopefully this has been helpful please feel free to ask questions.
 
Last edited:

SirRobyn0

Full Access Member
Joined
Dec 6, 2019
Posts
6,742
Reaction score
11,319
Location
In the woods in Western Washington
First Name
Rob
Truck Year
1984
Truck Model
C20
Engine Size
305
I’ll double your money and give you 4 whiskeys to do my truck!
Hell….you can have the whole bottle!

Kiddiing


Not kidding!
Thanks for the write up though! It’s on the rainy day list right now.
I had to put two quarts of transmission fluid in a guy's car that works in a building next door after hours for free. He asked if he could bring me any beer I said I don't drink beer but I do like whiskey. I didn't mean for him to bring me any whiskey I didn't think he would do that but like a week later he shows up with a gallon jug of Kirkland whiskey that was pretty awesome.

I was going to try to hold off but it (the heater core) went from bad to worse as you know they do and with it being a daily driver I just didn't feel that bypassing it and waiting for the cold weather to come was a good idea LOL
 
Last edited:

SirRobyn0

Full Access Member
Joined
Dec 6, 2019
Posts
6,742
Reaction score
11,319
Location
In the woods in Western Washington
First Name
Rob
Truck Year
1984
Truck Model
C20
Engine Size
305
Hey guys, a little more heater related info. As you are probably well aware most of these trucks don't shut their heat off very well. What I'm talking about and this seems to be an issue with both A/C and non-A/C equipped trucks, is that with the system shut off, the fan off and the lever on cold if you drive down the road a pretty fair amount of hot air will come rolling out of the floor distribution box, the faster the truck is going the more that comes out. So this seems to have to do with the ram air effect. My truck does this, my dad's did it and all the squarebodies I've driven on a hot day seem to do it, so I think it's a common problem. For me with my truck this resulted in me literally never driving with my windows open or rear slider open opting instead to run the A/C and sliding the hot / cold controller to a comfortable spot. Don't get me wrong, I hate being hot and love my A/C! But on a day like today where it's sunny and 76F and I've got about an hour worth of driving to do on secondary roads it should would be nice to have the windows and slider open, but my feet will get cooked from the hot air!

So I ordered and installed one of these:
You must be registered for see images attach


That's a 5/8" universal heater control valve, balkamp pn#935813, murray # 74827. Installed in the 5/8" heater core inlet hose. I installed it between the fender and the core. It can be used with a cable routed to inside the truck so you can operate it from the drivers seat or it can be operated as a hand valve from under the hood, which is what I will do for now at least. It even has on and off embossed into the metal. So tonight I was able to drive and enjoy the evening air with the windows down and slider open!
 

Attachments

  • 1692946242030.png
    1692946242030.png
    37.5 KB · Views: 31

bucket

Super Moderator
Staff member
Super Moderator
Joined
Aug 3, 2010
Posts
29,108
Reaction score
23,981
Location
Usually not in Ohio
First Name
Andy
Truck Year
'77, '78, '79, '84, '88
Truck Model
K5 thru K30
Engine Size
350-454
You *might* run into some cooling issues running a shut-off that doesn't incorporate a bypass. It shouldn't be a problem since the small block (pre '96) water pump has the bypass hole into the block, but the older Chevrolets with a heater valve incorporated a bypass in the valve. Engineers must have deemed it necessary.
 

SirRobyn0

Full Access Member
Joined
Dec 6, 2019
Posts
6,742
Reaction score
11,319
Location
In the woods in Western Washington
First Name
Rob
Truck Year
1984
Truck Model
C20
Engine Size
305
You *might* run into some cooling issues running a shut-off that doesn't incorporate a bypass. It shouldn't be a problem since the small block (pre '96) water pump has the bypass hole into the block, but the older Chevrolets with a heater valve incorporated a bypass in the valve. Engineers must have deemed it necessary.
I guess my answer is I don't know for sure.

Like you I'm big believer in it's best the way it came from the factory.

I know I could not do this on vortec. But because the water pump bypass I think it'll be ok. I had a friend back in the 90's with 72 C30 350 with a shut off valve under the hood and it was fine. In those days we didn't know any better, but also didn't have a problem. Regardless you make a very good point and I'll be watching out for that closely in the next few days. Thanks.
 

bucket

Super Moderator
Staff member
Super Moderator
Joined
Aug 3, 2010
Posts
29,108
Reaction score
23,981
Location
Usually not in Ohio
First Name
Andy
Truck Year
'77, '78, '79, '84, '88
Truck Model
K5 thru K30
Engine Size
350-454
I guess my answer is I don't know for sure.

Like you I'm big believer in it's best the way it came from the factory.

I know I could not do this on vortec. But because the water pump bypass I think it'll be ok. I had a friend back in the 90's with 72 C30 350 with a shut off valve under the hood and it was fine. In those days we didn't know any better, but also didn't have a problem. Regardless you make a very good point and I'll be watching out for that closely in the next few days. Thanks.

I just remembered that a friend has an '86 T/A that he bought years ago and the previous owner had installed a shut-off on the heater hose. He's never had cooling system issues and the PO must not have either. It was a Florida car.
 

75gmck25

Full Access Member
Joined
Oct 13, 2016
Posts
2,038
Reaction score
1,833
Location
Northern Virginia
First Name
Bruce
Truck Year
1975
Truck Model
K25 Camper Special TH350 NP203
Engine Size
5.7
I would have to check my parts bin to get a parts number, but I once tried using a vacuum operated valve to bypass the heater core. I connected it into the vacuum line for the recirculate vacuum pod, so if I put the A/C into max/recirculate it shut off the water flow to the heater core. I eventually took it out because I still seemed to get residual heat in the plenum, even with the water flow shut off.
 

Forum statistics

Threads
42,137
Posts
909,898
Members
33,635
Latest member
85sqbod
Top