Turbo 400 Build - Mega Carnage to Better than New.

Disclaimer: Links on this page pointing to Amazon, eBay and other sites may include affiliate code. If you click them and make a purchase, we may earn a small commission.

HotRodPC

Administrator
Staff member
Admin
Joined
Aug 29, 2010
Posts
47,014
Reaction score
9,014
Location
OKC, OK
First Name
HotRod
Truck Year
85 K20 LWB
Truck Model
Silverado
Engine Size
454 - Turbo 400 - 3.73
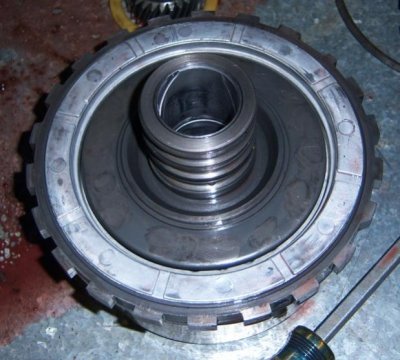
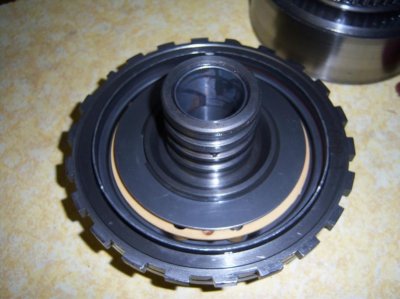
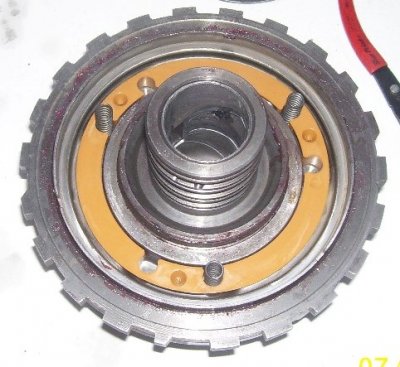
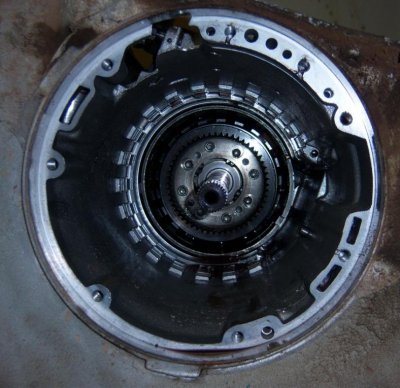
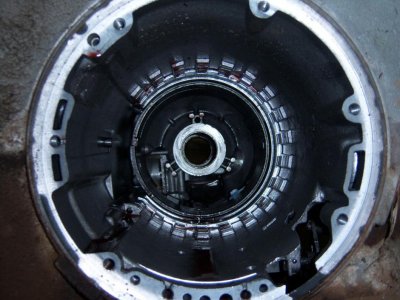
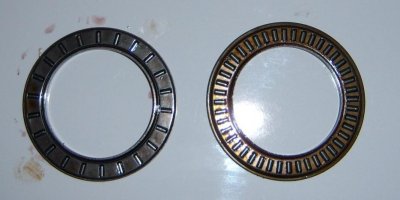
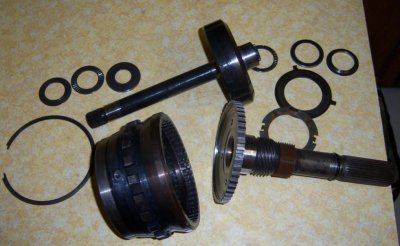
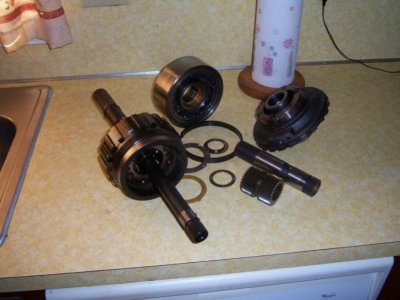
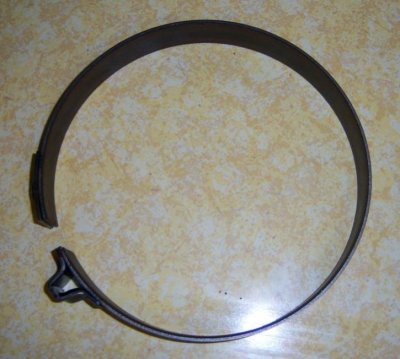
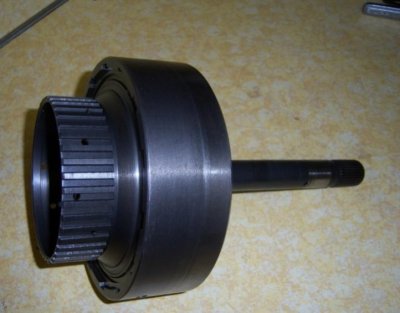
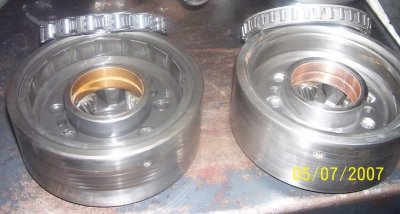
The other updgade, which is a very rare hard to find part. Is the reaction carrier drum for wedge or dog bone element type one way clutch similar to a sprag. Realistically, it is not a necessary upgrade in a Turbo 400. This is what is used for 1st and Reverse. When does something like this come in handy or when you might want to prefer the use of it??? If you are running a drag car, and you launch hard off the line, or if you are using a trans brake in a high performance application. Being that in most cases, and even if towing some weight, you are not leaving very hard in first gear, the roller type is quite strong and effective, just that the wedge element type is even better. Here is a pic I robbed of the differant styles side by side. Again the differance is easy to see. This part is rare and hard to find because it was only used on early Turbo 400's. The first year of THM400 was 1964 and this carried thru only to 1966 for sure and some 1967 models had it. How many 64-67 THM400's do you think are still around??? I do happen to have one that is still OEM and never been cracked open. Its a gold mine transmission. I haven't had the need yet to use it, but will someday. Its also a variable pitch aka switch pitch torque converter trans. It has a solenoid in it to change the stall of the torque converter. It has the standard 1400-1600 stall, then by hitting a switch, the vanes in the TC will adjust and the stall is now 1800-2200. There are also aftermarket converters or you can have one built to your own specs. So lets say you want 1800 stall and then flip the switch and you can now have 2500 stall. NICE idea. Perfect for making a sleeper and that is exactly what I intend to use that trans for someday. Here is the pic of the differant reaction carriers. One on the Left is after 67 for sure, and the better on the right is early 67 on back to 64. Something else you find really fascinating, but I find quite scrary, is where you can find this wedge style low/reverse clutch. You call a GM dealership, chances are they don't have it in stock but can order it and its expensive. BUT, you can go right down to your local FORD, yes, I said FORD stealership and they will likely have it in stock, and because its more common there, it will not cost an arm and a leg compared to the GM stealership. The part is used in 4R100 and most likely E4OD FORD 4 speed overdrive transmissions which are very common models these days. Keep in mind, I am just reffering to the dog bone wedge clutch, not the drum itself. So if you have drum already, go the FORD dealership and get the clutch. You're now set up strong enough for mega hp and a hard launch off of a trans brake. Mind Blowing isn't it???

attachment.php
 

Attachments

  • reactioncarriers.jpg
    reactioncarriers.jpg
    90.2 KB · Views: 411
Last edited:

Irishman999

Full Access Member
Joined
Jul 30, 2010
Posts
6,989
Reaction score
202
Location
Safford Arizona
First Name
Jason
Truck Year
1985
Truck Model
K-1500 High Sierra
Engine Size
305
Thats a great writup, You must have some time in this! I have always wondered what the inside of a automatic looks like.
 

HotRodPC

Administrator
Staff member
Admin
Joined
Aug 29, 2010
Posts
47,014
Reaction score
9,014
Location
OKC, OK
First Name
HotRod
Truck Year
85 K20 LWB
Truck Model
Silverado
Engine Size
454 - Turbo 400 - 3.73
Thats a great writup, You must have some time in this! I have always wondered what the inside of a automatic looks like.
Thanks Iman. Yep, very time consuming, not only to be stopping and washing hands while doing the project in between sections to get pics, but them putting it all together for the forum and finding the pics and editing them to be able to work for upload. Well worth it though even if only 1 or 2 people get some use of it. Its also good to hear feedback from other builders too. Its impossible to know it all, so occasionally, I get an experienced builder that comes across my write ups and adds something I missed, or something I was not aware of or hadn't thought of. So, I don't mind being critiqued if its going to make my next build even better.
 
Last edited:

HotRodPC

Administrator
Staff member
Admin
Joined
Aug 29, 2010
Posts
47,014
Reaction score
9,014
Location
OKC, OK
First Name
HotRod
Truck Year
85 K20 LWB
Truck Model
Silverado
Engine Size
454 - Turbo 400 - 3.73
Now removal of the Center of Support. Notice the differance of the center support in the 69 Model vs the 84 model. The one on the left is from the 69 THM400 the 2 pics on the Right of the 84. Remember, the 84 center support is a little thinner than the support in the 69 to make room for the case saver spacer. This also makes a differnace where the retaining snap ring fits in the case, so the 2 cases are machined differantly in this area. That means the older center support is not interchangable.


Pic #1 Center Support out of 69 THM400.

Pic #2 Center Support out of 84 THM400. Same part, same purpose, just differant syle and NOT interchangable.

Pic #3 Center Support apply piston removed. Notice the familiar destroyed part. Lucky, I happen to have some 400 hard parts laying around, and this was one of them. Now put to good use.
 

Attachments

  • 69Chevelle 046-2.jpg
    69Chevelle 046-2.jpg
    56.2 KB · Views: 179
  • April2409 007.jpg
    April2409 007.jpg
    64.4 KB · Views: 158
  • centersupportdis.jpg
    centersupportdis.jpg
    88.4 KB · Views: 200

HotRodPC

Administrator
Staff member
Admin
Joined
Aug 29, 2010
Posts
47,014
Reaction score
9,014
Location
OKC, OK
First Name
HotRod
Truck Year
85 K20 LWB
Truck Model
Silverado
Engine Size
454 - Turbo 400 - 3.73
Moving along on the disassembly of the 69 Chevelle Donor trans. Now down to the wire and almost to a stripped case. Here are pics of the planetaries removed, and nothing left the but the rear band and the output shaft assembly. Notice a big color difference in this 69 donor trans and the 84 overheated cooked trans. Luckily after the catastophic failure of the 84 trans in the truck since it gave up the ghost, it was done and the PO didn't try to limp it home because he didn't have that option. Otherwise he may have heated it up enough to heat check and crack the case, or get the case lugs so soft they would be damaged.

Pic #1 Planetaries Removed.

Pic #2 Output shaft assembley removed, aloing with the rear selective thrust washer. Only thing remaining now is the band which is just sittining in the case on its lugs. Very nice, clean, rebuilable case.
 

Attachments

  • 69Chevelle 050-2.jpg
    69Chevelle 050-2.jpg
    90.1 KB · Views: 173
  • 69Chevtrans 004.jpg
    69Chevtrans 004.jpg
    92.5 KB · Views: 164

HotRodPC

Administrator
Staff member
Admin
Joined
Aug 29, 2010
Posts
47,014
Reaction score
9,014
Location
OKC, OK
First Name
HotRod
Truck Year
85 K20 LWB
Truck Model
Silverado
Engine Size
454 - Turbo 400 - 3.73
Again, we come across some differant style parts. The needle bearings, reffered to as Torrington Bearings are differant in both transmissions. I think its obvious by the color which ones came out of which transmission. The one that looks burnt in color is from the 84 model, and the nice clean one is out of the 69 model. So that is an obvious upgrade along the years. The newer 84 bearings is the ones I'll be reusing since other than color, they still appear to be in great shape. If memory serves, there are 3 differant places where these bearings are used. There is also known aftermarket torrington bearings to be used in place of some thrust washers. In very high performance applications, and for a very talented builder with knowledge of how to work a machinists lathe, he will use the lathe to modify certain drums to grind out a notch for space of a torringting bearing rather than a thrust washer. You will not find a thrust washer in that transmission at all. It will be all torrington bearings. This is what is reffered to as a rollarized transmission build and is usually quite expensive, but also have many other parts upgraded for strength.
 

Attachments

  • 69Chevelle 055.jpg
    69Chevelle 055.jpg
    47.4 KB · Views: 154

HotRodPC

Administrator
Staff member
Admin
Joined
Aug 29, 2010
Posts
47,014
Reaction score
9,014
Location
OKC, OK
First Name
HotRod
Truck Year
85 K20 LWB
Truck Model
Silverado
Engine Size
454 - Turbo 400 - 3.73
So now I have this bare 69 Chevelle SS Turbo 400 that I paid $50 for and stripped it to a bare case, that I have gutted and kept all the good hard parts, and put what I didn't use on the shelf for stock parts. I don't need it, and someone building a #'s correct 69 Chevelle SS might be interested in it. So I listed it in CL for $100 and included the passenger car output shaft that I'll never use and actually you can use a threaded output shaft for a car, but you can't use a non threaded output shaft for a truck without modifying the driveshaft. Within 30 minutes I got a call asking if I still had it. Sure do. Whats you address, I want it. The guy got here and had forgotten he spent some money and didn't have $100 cash, so he said he'd be right back that he had to run to an ATM machine. I asked what he had, he said $86. I said gimme $80 its yours. Being I'm not greedy, and I only paid $50 for the whole trans, and had just bought my seal kit, filter and another tub of Trans Gel that I didn't need for a total of $30 my cost at OK Trans Supply I figured I was ahead of the game and got it in the hands of someone that is putting it to good use which was my biggest intent. With that, $50 in purchase of the donor trans, and $30 for the kit to renew this transmission with the donor parts including the clutches since the fluid so good and it was so clean inside. I am now at a $0 cost for this build. Then I paid $25 and FREE shipping for the 34 element sprag. So this is now $25 transmission with the good stuff in it and its better than new IMO.


TransTec Seal Kits are about the best money can buy as far as quality, fit and being complete with a couple seals included that you may or may not use depedning on the year model of your build.


TransTec Kits also supply metal sealing rings instead of fiberous soft rings. Much more durable.
 

Attachments

  • T400Kit 002.jpg
    T400Kit 002.jpg
    61.5 KB · Views: 133
  • T400Kit 003.jpg
    T400Kit 003.jpg
    93.4 KB · Views: 148
  • T400Kit 006.jpg
    T400Kit 006.jpg
    64.8 KB · Views: 152

HotRodPC

Administrator
Staff member
Admin
Joined
Aug 29, 2010
Posts
47,014
Reaction score
9,014
Location
OKC, OK
First Name
HotRod
Truck Year
85 K20 LWB
Truck Model
Silverado
Engine Size
454 - Turbo 400 - 3.73
OK, here we go with reassembly !!! You might notice, there are some advantages to not having a wife around. I didn't want to get the garage dirty.

First assembly to go in the case is the planetary gears and center support. This is all assembled into a unit then carefully put in the trans case, and always remeber, the selective thrust washer goes in first. Held in place with Trans Gel or if you didn't want to use TG, then use Vaseline. Vaseline works just as well for Auto Trans assembly IMO. Whatever you do, you don't want to use any kind of grease. White, Black, all purpose, whatever, don't use grease. Vaseline will hold well, lube well for initial use, and then melt down and become part of the fluid and not clog filters, or hang up valves.


Pic #1 & #2 These are the parts that make up the planetary assembly and output shaft.

Pic #3 The assembly is ready to be installed in the case now. Its a bit challenging, to keep it all together and get it installed. You are supposed to use a special holding tool to get this done, but with patience and caution and it can be done without it. I have never used the special tool to do this.

Pic #4 Its now installed in the case. And the bolt from under the valve body is installed and torqued to spec. This assembly can not fall out of the case now. The Center Support stays stationarly and does not move or spin. The shafts go thru it like a tunnel. If you look close, you can see what looks like a big snap ring in front of the CS. That is not a snap ring. It is the case saver spacer, so I used the orignal CS, but I used the componets from the 69 trans in the 86 CS, but was still able to use the case saver spacer. The better of both designs intergrated. BTW The Rear Band and Selective Thrust Washer were installed first before the planet assembly. (Sorry, No Pic !!! )
 

Attachments

  • T400Assembly 036.jpg
    T400Assembly 036.jpg
    82.6 KB · Views: 162
  • T400Assembly 002.jpg
    T400Assembly 002.jpg
    62 KB · Views: 144
  • T400Assembly 005.jpg
    T400Assembly 005.jpg
    50.4 KB · Views: 165
  • T400Assembly 007.jpg
    T400Assembly 007.jpg
    71.3 KB · Views: 191

HotRodPC

Administrator
Staff member
Admin
Joined
Aug 29, 2010
Posts
47,014
Reaction score
9,014
Location
OKC, OK
First Name
HotRod
Truck Year
85 K20 LWB
Truck Model
Silverado
Engine Size
454 - Turbo 400 - 3.73
It may not be noticeable, but I have soaked the clutches in clean trans fluid. As good as that donor Trans looked inside, and the clutches not even being close to 50% worn, I decided to use the clutches and steels out of the donor trans. Also used the bands out of the donor. They show a little wear, but still in great shape and will last for quite some time. The intermediate Clutch pack was installed.

Front Band is Now installed in the case. There are only 2 bands in a Turbo 400, neither are adjustable and not needed since they are operated directly from Servos, one in the valve body, and one big one next to the valve body in the pan. We'll see those later.
 

Attachments

  • T400Assembly 014.jpg
    T400Assembly 014.jpg
    57.4 KB · Views: 136
  • T400Assembly 015.jpg
    T400Assembly 015.jpg
    79.8 KB · Views: 678

HotRodPC

Administrator
Staff member
Admin
Joined
Aug 29, 2010
Posts
47,014
Reaction score
9,014
Location
OKC, OK
First Name
HotRod
Truck Year
85 K20 LWB
Truck Model
Silverado
Engine Size
454 - Turbo 400 - 3.73
This is probably a good place to stop and describe a couple differant lip seal tools. I have used feeler guages before in a big pinch when my tools were at a differant location, so you could do that too, but I don't reccomend it. You can damage a lip seal and not even know it until you have installed the trans and it doesn't work properly. Pretty much an industry standard to make your own, or buy one of these pictured in Pic #1, out of piano wire. I don't use those type. They bend easily, and are short lived tools, so if you choose to use that method or making your own, make 4 of 5 at the same time or buy 4 or 5. Normally maybe 2-3 transmission per tool depending how rough you are on the wire. I found this tool pictured in Pic#2 and Pic #3,at a paint store in the hobby and sculpure section. Honestly, I don't even know what the thing is called, but I bought like 4 of 5 of them, thinking they'd be like the wire tool. NO, still using the same one I bought over 20 years ago and done many transmissions. I have given the others away to good buddies who couldn't find them in a hobby shop. So some people think they are like gold when they finally find them. They have a thin strong tip but are very flexible without bending or breaking. Still must use caution not to tear lip seals, but because they are not near the width of a feeler gueage, they work well and able to make it around the curve in the drums without problems.
 

Attachments

  • lipsealtool.jpg
    lipsealtool.jpg
    3.4 KB · Views: 354
  • liptool 003.jpg
    liptool 003.jpg
    23.8 KB · Views: 150
  • liptool 004.jpg
    liptool 004.jpg
    31.4 KB · Views: 258
Last edited:

HotRodPC

Administrator
Staff member
Admin
Joined
Aug 29, 2010
Posts
47,014
Reaction score
9,014
Location
OKC, OK
First Name
HotRod
Truck Year
85 K20 LWB
Truck Model
Silverado
Engine Size
454 - Turbo 400 - 3.73
Back at the build, and you'll also see how a table top clutch spring compressor works.
Next to assemble is the direct drum that has the upgraded sprag that I will be using. Using a clutch spring compressor or home made tool of some sort, you must compress the springs and retainer to be able to pull the apply piston out of the drum to replace the lip seals. Without a good seal, the piston can not apply pressue to compress the clutches against the pressure plate, to engage the drum. One side of the drums holds the intermediate sprag, the other side, or inside the drum, holds the direct drive clutch pack.

Pic #1 Now you know what this tool is used for. This is what is used to compress the springs for disassembly and reassembly of the clutch drum for seal replacement.

Pic #2 Here are all the components of this one drum. Yep, it all fits in there nice and neat !!!

Pic #3 This is what is looks like completly assembled. You have seen the other side already. Member, its got the sprag gear, 34 element sprag, retainer and snap ring, and where the spiral upgraded snap ring is used.

Pic #4 This is what is looks like in the case. However, it will be coming back out, because it installs with the forward clutch drum and input shaft as one complete assembley similar to how the planetary assembly including the output shaft was installed. I like to do this first, so I can see that the drum is going to line with band properly, and the intermediate clutches are lined up so that install of the complete assembly will go smoothly
 

Attachments

  • T400Assembly 022.jpg
    T400Assembly 022.jpg
    70.7 KB · Views: 155
  • T400Assembly 024.jpg
    T400Assembly 024.jpg
    65.8 KB · Views: 163
  • T400Assembly 019.jpg
    T400Assembly 019.jpg
    71.4 KB · Views: 150
  • T400Assembly 028.jpg
    T400Assembly 028.jpg
    88.6 KB · Views: 711

HotRodPC

Administrator
Staff member
Admin
Joined
Aug 29, 2010
Posts
47,014
Reaction score
9,014
Location
OKC, OK
First Name
HotRod
Truck Year
85 K20 LWB
Truck Model
Silverado
Engine Size
454 - Turbo 400 - 3.73
This is the forward clutch drum and the input shaft. Pretty much the same procedure as the direct clutch drum with exception, I don't have to remove the input shaft with my clutch spring comprssor tool since there is a hole in the base of the tool, and you use this tool over a table or workbench that has a hole it in also. This way the input shaft goes thru the hole and able to disassemble the apply piston and replace the lip seals without removing the shaft.

Pic #1 Components of the Forward Clutch Drum.

Pic #2 Forward Drum Completed with all new lip seals. The Direct clutch drum is now mated over the shown splines of the forward clutch drum, and installed into the case as an assembly. (Sorry, no pics)

Pic #3 Now the pump is installed. No pics of its disassembly, cleaning and seal replacement. Its fairly easy, and no special tooks are required to do it. Notice there are only 6 Pump bolts on the 84 Case, but there are 8 bolts on the 69 Donor Trans. This means the pumps are NOT interchangeable. I am not certain of the reason behind that design change.
 

Attachments

  • T400Assembly 032.jpg
    T400Assembly 032.jpg
    65.2 KB · Views: 149
  • T400Assembly 030.jpg
    T400Assembly 030.jpg
    40.5 KB · Views: 127
  • T400Assembly 033.jpg
    T400Assembly 033.jpg
    70.2 KB · Views: 147

HotRodPC

Administrator
Staff member
Admin
Joined
Aug 29, 2010
Posts
47,014
Reaction score
9,014
Location
OKC, OK
First Name
HotRod
Truck Year
85 K20 LWB
Truck Model
Silverado
Engine Size
454 - Turbo 400 - 3.73
So now the pump it torqued to spec, time to roll it over and install check balls, servo's for the bands, and any line filter baskets that may be available. Then then a paper gasket, the valve body plate, another paper gasket then the valve body. Sorry, here is where I got short on pics, so I did not get pics of the valve body apart and cleaning in solvent, then blown dry with compressed air and allowed to sit a bit.

Pic #1 The case is really discolored from the previous burn up. But hopefully, not that it matters, with all new fluid and getting used and hot, the fluid will clean it and it make it nice and shiney inside like the donor was.

Pic #2 Filter and Modulator now installed. Keep in minidm there are 2 differant filter types for Turbo 400. This type pictured, and the long skinny meal type with pick up.

Pic #3 Bolt on truck yolk now installed. That oughta do it with exception of the pan and just about ready for install.
 

Attachments

  • T400Assembly 040.jpg
    T400Assembly 040.jpg
    46 KB · Views: 153
  • T400Assembly 044.jpg
    T400Assembly 044.jpg
    53.9 KB · Views: 158
  • T400Assembly 046.jpg
    T400Assembly 046.jpg
    60 KB · Views: 134

HotRodPC

Administrator
Staff member
Admin
Joined
Aug 29, 2010
Posts
47,014
Reaction score
9,014
Location
OKC, OK
First Name
HotRod
Truck Year
85 K20 LWB
Truck Model
Silverado
Engine Size
454 - Turbo 400 - 3.73
Pan Installed and ready for install. Because that donor trans looked so good inside, I also used the torque converter that came with the transmission. So here is the scoop on this trans rebuild. As bad of shape as it was in, I got off with a cheap rebuild. Spent $50 for the donor used trans with the good sprag drum and upgraded parts to the center support. $30 for seal kit and filter, $25 for the 34 element sprag. Total = $105. Then I sold the donor trans case for $80. Net Total $25 for a great working upgraded Turbo 400.

Pic #1 I certainly prefer the deep pan. This is standard OEM for the truck, but the donor came with the shallow pan. I trashed it because of its condition anyway.

Pic #2 BTW, This is not one of my household end tables. It was converted long ago for a mobile indoor workbench, that stays in the garage until I work on something in the house. It also has a hole drilled in it for use with the Clutch Spring Compressor tool. And just to settle the wives down, notice all the parts assembled in the house, are clean parts. Actually killing 2 birds with one stone. Keeping an auto trans clean is very important, and you should always have a clean area for reassembly. 2nd, It was really cold in the garage at the time this was being built and it was much warmer in the house.


Pic #3 My trans jack was loaned out to a bud who was putting a clutch in his truck. So I got stuck intalling this one the old fashioned way. Happen to have had a semi warm day, and I had to take advantage of it, and not wait for my trans jack since cold weather was in the forecast.

You must be registered for see images attach


You must be registered for see images attach


You must be registered for see images attach
 

HotRodPC

Administrator
Staff member
Admin
Joined
Aug 29, 2010
Posts
47,014
Reaction score
9,014
Location
OKC, OK
First Name
HotRod
Truck Year
85 K20 LWB
Truck Model
Silverado
Engine Size
454 - Turbo 400 - 3.73
Last ones !!! Trans has been installed. Flushed out the cooling lines and radaitor trans cooler tank to get all the nastiness I could out of it. Spent $30 on trans fluid and trans is working great. Probably just over 10,000 miles on it now and its had 2 real good work outs towing heavy loads across state lines with wussy wagon 3.21 gears in the rear end. It held up fine. I'd be suprised if I didn't get 100K out of that trans. Now its all done.
Stay tuned for a 700r4 build someday. Hopefully soon, for the 85 K10 project. Personally, I don't have alot of faith in a 700r4 for strength, but I am seeking out all the upgrade possibilities I can for this 700r4 build to make it much stonger than OEM.
 

Attachments

  • T400Assembly 058.jpg
    T400Assembly 058.jpg
    66.1 KB · Views: 132
  • T400Assembly 063.jpg
    T400Assembly 063.jpg
    44.1 KB · Views: 125

Latest posts

Forum statistics

Threads
42,140
Posts
910,036
Members
33,642
Latest member
Bhardiman1
Top