Holley 600 tune/vacuum

Disclaimer: Links on this page pointing to Amazon, eBay and other sites may include affiliate code. If you click them and make a purchase, we may earn a small commission.

Deezy

Junior Member
Joined
Nov 19, 2016
Posts
26
Reaction score
1
Location
Virginia
First Name
Blair
Truck Year
1983
Truck Model
C-10
Engine Size
350
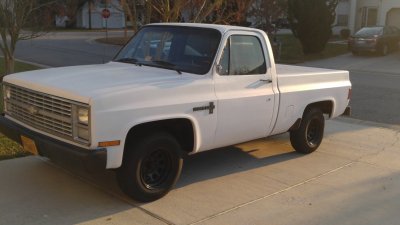
Hey all! New to the forum, new to working on anything older than a 96, and my first time coming back to GM since my 85 Jimmy S-10 (had it when I was 16, never worked on it myself).

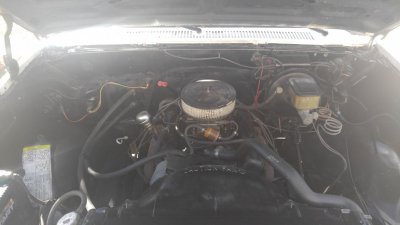
I picked up an 83 C-10 automatic here in Virginia and after having it about 3 weeks I have figured out I need to play with the fuel system a bit. Truck runs fine, needs about half choke to start if it's less than 50°F out, and requires about a half-pump on the throttle to start if it's been sitting more than about 18 hours.

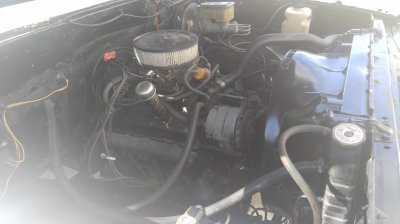
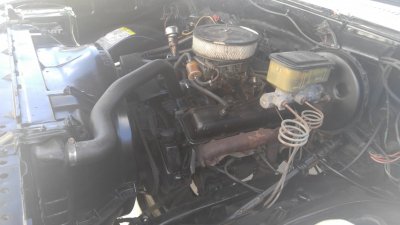
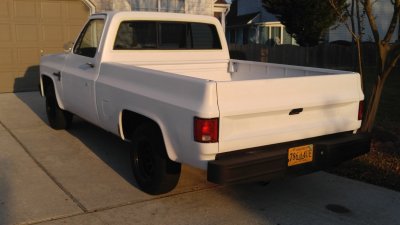
I got to poking around in the engine bay after the first bad thing to happen to me roughly a week ago. I drove about 45 minutes and tried to turn off the truck, but it started diesel-ing for about 10 seconds before finally quitting. Other than that (well, that and one trip of high-rpm shifting, hasn't happened since), she's seeming to be "Old Faithful," which is what I want out of her. However I'm starting to get suspicious of the previous owner's carb tune and adjustments as I calculated my first tank of gas at roughly 8.5MPG and upon further inspection some funky vacuum lines. I'm not expecting 20+ MPG out of a 30 year old truck, but I was expecting double digit, low-mid teens.

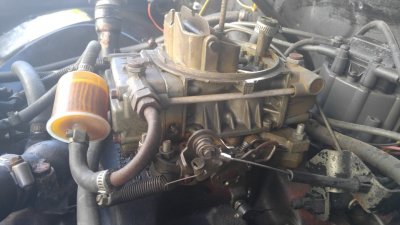
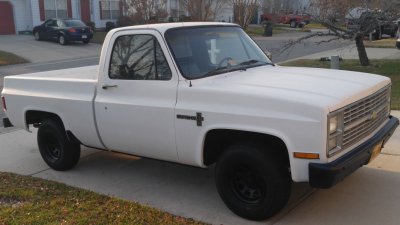
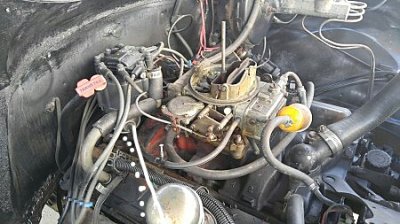
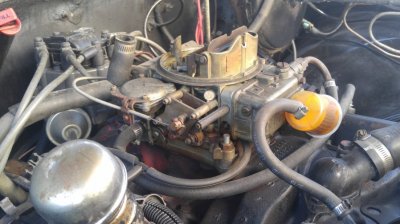
So, now I'm sitting here in my driveway poking around with a carburetor, which is something I've never done before. The vacuum line I'm worried about is the one that comes off the distributor from the carb. The way it's currently set up, the line comes from the front of the carb, under the float bowl area, and goes to the distributor. However, the line has a T junction, and following that section of hose leads to an open end.

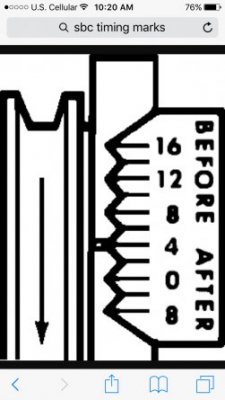
I hit the Google machine and what I found tells me that line should start on the carb, but directly above the left side mixture screw, which on mine has a plugged 2" length rubber hose (it actually looks like a cut piece of spark plug wire, I can see a bit of copper).

I'd love to hear your thoughts!


Here's a link to an imgur album in case I can't get the uploads right: 83 Chevy w/ Holley 600 http://iob.imgur.com/uYGg/rCXfptsery
 

Attachments

  • 1119161453b.jpg
    1119161453b.jpg
    100.1 KB · Views: 168
  • 1119161454.jpg
    1119161454.jpg
    99.6 KB · Views: 164
  • 1119161453a.jpg
    1119161453a.jpg
    100.4 KB · Views: 142
  • 1119161453.jpg
    1119161453.jpg
    101.6 KB · Views: 172

Rusty Nail

Full Access Member
Joined
Jan 29, 2015
Posts
9,795
Reaction score
9,701
Location
the other side of the internet
First Name
Rusty
Truck Year
1977
Truck Model
C20
Engine Size
350sbc
That's wild. I bet it runs like ****! :D 
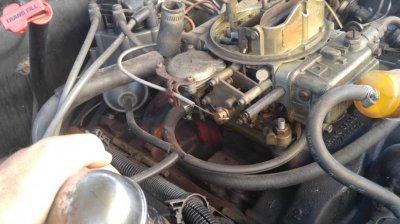
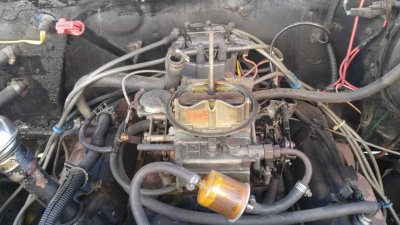
Obviously there should not be an open end. Run a 1/4 inch sheet metal screw in the little one, and cap the big one some way until you, we figure it out. Maybe with a spark plug? That's a breather tube? What are at the ends of the large hose?
Vacuum leaks are Bad,bad.

That will throw EVERYTHING off. Transmission shift points, base idle, spark advance, idle mixture, base idle speed, ignition timing, etc.
Consider ALL of those adjustments are wrong because of that. The vacuum hose to the advance canister should not have a tee, we need rid of it. Maybe you can remove it and swap in a butt connector. It is in the wrong place anyways. Should be at the other one, above the throttle blades. Switch the higher "2 inch" cap around. Are you sure it's sealed? Another sheet metal screw please. The low one likely will not be used, the top hole is ported vacuum and the bottom one is full manifold vacuum. (Above and below the throttle blades.) Is there a functional EGR valve installed? I don't see one but it should have one.

Don't get frustrated. These are simple and easy things often accomplished with a screwdriver.
Better mileage, here we come! Please be patient, this IS the internet and sorting previous owner ******** can be time consuming, and it WILL domino effect to some extent and cost some few dollars. When you switch that pair of vacuum lines, it may start running ****** up but that's only because it's ****** up. AND you can easily find people to disagree with me, but they are wrong. LoL.

I can not stand when dudes try to help and start guessing in public, on the internet.
I observe the carburetor fuel inlet is on the "wrong side" and there is only one, which greatly reduces the options of which model you have.
So I/we are not forced to guess, and you find true and correct solution, please provide the model number of your Holley. It is likely located on the "choke horn", stamped into the metal at the highest point of the carburetor. Driver side, towards the grille.

Also very,very, helpful will be a couple of wider angle pictures, offering a more bird's eye view so we can get a better idea of equipped components. Need a top down view of the engine bay. Show the air cleaner. We like lookin at trucks around here. :)

If you're lucky, that's an 80547 but I don't think it is. You have the OEM "thermostatic" air cleaner installed? If so, truck may have the wrong thermostat housing and the air cleaner wouldn't function correctly. Got a picture of the "vacuum hose routing" sticker under the hood? Your '83 may not use the matching tstat housing. You have a square bore carburetor on a spread bore manifold. Your Holley has no provision for that large vacuum hose in the back. That tee should be removed/deleted. That is a quadrajet intake but lemme keep lookin.
It should not be orange. Wtf? We need moar pics! Intake part number? An orange manifold will not have EGR. .You think it runs okay now? Lol, just wait.
You're off to a great start. Delete /close that pair of open vacuum leaks, modify the vacuum lines as previously suggested, check the oil, and call me in the morning.

There should be a gasket under the air cleaner.
Buy a new PCV valve.
Mid teens is optimistic, but you can better 10mpg easy.
There are some very strange things going on under your hood!

The Thermostatic Air Cleaner System is an early emissions control device that was designed to deliver temperature-regulated air to the intake manifold such as warm air for cold engine conditions and cool air for engines at normal operating condition. Thermostatic Air Cleaner systems usually consist of an enclosed air filter housing, with an air intake snorkel containing a thermostatic control valve. This thermostatic control valve controls whether cool air or warmed air enters the intake manifold through a vacuum signal. Later models have used electrically activated thermostatic control valves. After the engine has reached normal operating temperature, the thermostatic air control valve returns to a position to allow cool air to enter the intake manifold for normal engine operation.


P.S. welcome to gmsb.
 
Last edited:

Deezy

Junior Member
Joined
Nov 19, 2016
Posts
26
Reaction score
1
Location
Virginia
First Name
Blair
Truck Year
1983
Truck Model
C-10
Engine Size
350
Intake manifold has what I think says "6268751" and under that "K1". Carb appears to be an 1850-4.

I'll Google the thermostatic thing because I don't know what it is.

The right side valve cover has a hose (valve?) that feeds into the back of the carb. The left side valve cover has a hose that connects into the bottom of the air filter. That's the open hose in picture in front of the distributor. Moar pics incoming!
 

Deezy

Junior Member
Joined
Nov 19, 2016
Posts
26
Reaction score
1
Location
Virginia
First Name
Blair
Truck Year
1983
Truck Model
C-10
Engine Size
350
Here's some more engine bay shots. I connected the distributor vacuum to where it's supposed to connect and plugged the T with a screw.
 

Attachments

  • 1120161326.jpg
    1120161326.jpg
    101.1 KB · Views: 163
  • 1120161252.jpg
    1120161252.jpg
    92.8 KB · Views: 144
  • 1120161257.jpg
    1120161257.jpg
    97.7 KB · Views: 144
  • 1120161252b.jpg
    1120161252b.jpg
    92.3 KB · Views: 144
  • 1120161252a.jpg
    1120161252a.jpg
    94.9 KB · Views: 149

Deezy

Junior Member
Joined
Nov 19, 2016
Posts
26
Reaction score
1
Location
Virginia
First Name
Blair
Truck Year
1983
Truck Model
C-10
Engine Size
350
Here are some exterior shots of the truck.

Now that I've plugged the one vacuum leak I found, I took the truck for a little test drive and according to my butt-dyno it seems a slight bit more responsive and peppy. However, now there's a whirring or ticking sound coming from I think the distributor when I give more than about 25% throttle. It was happening before I switched the vacuum lines, but not until about 75% throttle.
 

Attachments

  • 1119161559.jpg
    1119161559.jpg
    93.7 KB · Views: 155
  • 1119161559a.jpg
    1119161559a.jpg
    92.5 KB · Views: 154
  • 1119161559b.jpg
    1119161559b.jpg
    96.6 KB · Views: 142
  • 1119161600.jpg
    1119161600.jpg
    96.3 KB · Views: 141

Rusty Nail

Full Access Member
Joined
Jan 29, 2015
Posts
9,795
Reaction score
9,701
Location
the other side of the internet
First Name
Rusty
Truck Year
1977
Truck Model
C20
Engine Size
350sbc
Ya, I bet! The difference in throttle % is your bad gas mileage.
Sharp lookin truck dude, you're in good shape! What's her name?
Ah ha!
Trust in the butt dyno, those very simple changes will help a TON!
Hell man, you already hit 10mpg. Welcome to double digits.

By chance do you own a vacuum gauge?
A timing light?
Do you know somebody that would let you borrow theirs for maybe a week?

Pull the PCV valve from the driver side valve cover and inspect, engine running. It may be the source of rattle you call ticking. It's likely preignition = a bad timing adjustment as a result of tuning around the vacuum leaks and running the hoses wrong. Enter the domino effect.The idle speed SHOULD change after you pull the valve out. Report findings.
We start simple and free. Spending money is knocking on the door. We begin cheap, no worries.

Did you check the oil?
It's important.
How about the radiator? Does it have antifreeze in it?
I'll edit some more later tonight.

We"re gonna need a 9/16 combination wrench, a number one and two flathead screwdriver, plus a $20 dollar bill.

Go easy on the throttle until you adjust the timing. You can swap those hoses back around until then. Issue has been pinpointed, they are root.

A help to cure the dieseling is to turn it off in gear, at the lowest possible RPM. No harm comes of that Actually, it's desired. Dieseling is more domino effect.
Without the proper tools we're guessing. CLOSE is possible over the internet. Certainly huge improvement is within your reach.
 
Last edited:

Deezy

Junior Member
Joined
Nov 19, 2016
Posts
26
Reaction score
1
Location
Virginia
First Name
Blair
Truck Year
1983
Truck Model
C-10
Engine Size
350
I don't own a vacuum gauge or a timing light but wouldn't opposed owning one of each if they're not expensive. I don't know any wrenchers around here I just moved to Virginia in October.

I did check my oil... The oil is fresh, however I can't get a clean line on the dipstick because the entire dipstick tube appears be slightly wet with oil... I think this may be related to another thing I've noticed: my oil pressure is fairly high. A cold start will have the gauge needle at about 60psi, driving while cold will about 70psi, and once the truck is warm it idles at roughly 40psi, center of the gauge. Not sure if that's bad but it does have good oil in it. Could use a bit of trans fluid, that's on the low side.

Coolant is good and clean and green, had a warm day where she leaked a bit from the driver side two weeks ago but haven't replicated the problem since and the level is still good. I have a bubbling sound from the heater core but don't know that's necessarily a bad thing.
 

Rusty Nail

Full Access Member
Joined
Jan 29, 2015
Posts
9,795
Reaction score
9,701
Location
the other side of the internet
First Name
Rusty
Truck Year
1977
Truck Model
C20
Engine Size
350sbc
Nah, those tools are pretty cheap really and will last a lifetime. I bet you could get both for $100?
I meant to run that screw into the vacuum hose, not the tee, lol.
Really should cap the vacuum hose to the distributor while adjusting ignition timing.

Okay. Good pics, very helpful. It's easy to determine the location of intake and exhaust valves, by looking. Obvious where the intake manifold and exhaust manifold enter/exit the cylinder head.
I'm looking at the vacuum nipple of the distributor. I see it pointing to the "bottom" of the exhaust valve area, do you see that? Imagine a straight line exiting that advance canister and follow it to the head. It really should be more towards the "top" of the exhaust valve area. That's pretty easy to do without a timing light. Judge by the raised runners of the intake manifold.
Arrange the root vacuum hoses in the correct orientation, and use your 9/16 to loosen the hold down bolt underneath the distributor. It'll be tricky, but it's possible.
Not too loose, but enough so slight rotation of the distributor body is possible. The #4 exhaust valve between the #6 and #4. Aim for the center of the big exhaust manifold connection on the passenger side.
There will be a change in engine RPM.
Goose the throttle a bit and make sure the "ticking" is vanished. You're after the highest possible idle speed without the ticking. I don't know how else to say it.
Tighten hold down bolt.

That's pretty close over the internet, without a timing light. Right to advance, left to retard. You'll figure it out. "Timing by ear".

Maybe a good Google search of the subject will aide you.

It's not difficult and you can't re ally mess it up or hurt it, it's a Chevrolet. PLAY with it. Set it one way and go drive it a short distance. Repeat. It won't take long. You will not "gas out of the ticking", don't try to. The adjustments are VERY SLIGHT.
Start with half an inch clockwise, from the straight line to the dotted line.
 

Attachments

  • download.png
    download.png
    8.3 KB · Views: 187
  • IMG_20161120_230945.jpg
    IMG_20161120_230945.jpg
    79.7 KB · Views: 201
Last edited:

Deezy

Junior Member
Joined
Nov 19, 2016
Posts
26
Reaction score
1
Location
Virginia
First Name
Blair
Truck Year
1983
Truck Model
C-10
Engine Size
350
Bought a MityVac gauge and a timing light today, unfortunately got home late and ran of sunlight. I'll getting started tomorrow, any tips other than ones above before I get started? I'll be hitting up YouTube to see what I can sort out.
 

Rusty Nail

Full Access Member
Joined
Jan 29, 2015
Posts
9,795
Reaction score
9,701
Location
the other side of the internet
First Name
Rusty
Truck Year
1977
Truck Model
C20
Engine Size
350sbc
Cool dude, I"m excited for you.
Any luck timing by ear? Didn't try it?
Anyways...
You have almost everything you need. I am serious about that 20 bucks though.
All those vacuum hoses, the PCV valve and hose, the breather hose to the air cleaner AND a can of carburetor cleaner can all be had for that Jackson. Install confidence. Drive hard!

In order to domino desirably, you MUST have a correct base timing. Likely somewhere between 6 and 10 degrees. Thevstock setting is likely 0°. That info is on the underhood sticker with the vacuum routing. Play with it. You may change it 100 times, I cannot say what you will like or what fits your driving style. You own the tools , no worries. They are cheap!

To set base timing, both of those carburetor ports should be capped, effectively disconnecting the distributor and preventing vacuum leaks.
Read instructions, following directions?
Loosen hold down. Cylinder #1. Power.
The indicator will be seen behind the water pump. Checkbit out before hand . Find the timing mark on the Harmonic balancer and make sure you can see it. It's only a line. Timing marks are connected to the timing cover. Most of the time, you'll have to look behind the water pump, top down. You will have to crawl on the fan shroud.

Be careful.

Watch the power wires , they will move right for the fan! I use the hood latch.

Loose clothing.
Jewelry.
Fan blades .

OK.

When you get done, connect distributor to the top port and hook your vacuum gauge to the bottom one.

Basically, and I mean BASICALLY,, you want to adjust the carburetor AND the timing, around the highest possible vacuum reading.
Youll see when you start doing it, but that's basically what to gauge success by. That's something to shoot for.
Timing to highest vacuum? It's hard to teach on the internet, I've got other things in my head. I keep thinking someone else will chime in. Don't you think that's weirdness?
Higher vacuum is directly proportional to higher MPG.

Set base timing.
Connect vacuum gauge and set base idle speed.
Set base mixture.

The Holley video will be helpful.
Highest vacuum possible cannot be overstated. Neither can being careful and exercising safety.

Have fun making it all work right, together.

Spend that 20 and you will own the confidence you yearn.
You have the tools and the desire, nothing stops you now.

Be patient, move surely. There is no pressure and YOU are calling the shots. While it is composed of different parts, it functions as one.
You are the boss of them and it.
Mutual respect is mandatory.

It is more powerful than you, but you are the guy with the tools. You depend on one another. Mutual respect is mandatory.

The truck IS a tool.

Mutual respect is mandatory.
 
Last edited:

Deezy

Junior Member
Joined
Nov 19, 2016
Posts
26
Reaction score
1
Location
Virginia
First Name
Blair
Truck Year
1983
Truck Model
C-10
Engine Size
350
Well I got to tinkering, wrenching, strobing, etc. I got the fuel ratio dialed in, I think, and got my vacuum set up steady right around 20.5" with a slight needle wobble up and down.

Then I got to timing, and I'm not sure I understand what I'm doing. I see the timing mark and a sawblade looking hunk of metal which I'm assuming is the indicator for lining up the TDC line. Unfortunately I don't have the fancy measuring tape attached to the balancer to tell degrees. However, my understanding is that ADVANCE moves the line to the right, and RETARD moves the line to the left... But after I set TDC to line up directly at (what I'm assuming is) 0°, hooking up the vacuum advance moves the line to the left (which I thought was retarding). Adjusting the distributor so the line moved right made the idle sound like crap.

Anyways, I tuned to best idle, hooked the vacuum back up and went for a test spin. The ticking sound is still there, but only under load. Revving in Park or Neutral results in no ticking, but now any acceleration faster than grandma results in ticking. More throttle, louder ticking... So I decided to find out what happens at WOT. The motor sounded like it was gonna rattle apart and a bunch of smoke came out of the exhaust.

I was under 1/4 tank of gas so I put in mid-grade thinking maybe ethanol blend might be part of the culprit but that made no change.
 

Deezy

Junior Member
Joined
Nov 19, 2016
Posts
26
Reaction score
1
Location
Virginia
First Name
Blair
Truck Year
1983
Truck Model
C-10
Engine Size
350
I think maybe I was overthinking it earlier... If the TDC (0°) mark is to the LEFT of the indicator, then the indicator is showing degrees advance. Now somebody I spoke with earlier told me I should have some sort of other measurement lines on the harmonic balancer but I don't see any. Maybe it's just too dirty but I don't see any way of reaching my hand down there to clean it... Any ideas?
 

Georgeb

Full Access Member
Joined
Apr 30, 2015
Posts
3,259
Reaction score
214
Location
Wisconsin
First Name
George
Truck Year
2003
Truck Model
K10 Burb Z71
Engine Size
5.3
On a stock configuration you will have one line on the balancer. Try to clean the saw tooth tab off and you will
See the marks on it somthing like the image below. Set it around 10 to start with and place your vacuum advance on manifold vacuum. You will need to go back over the air fuel ratios then.
 

Attachments

  • IMG_1948.jpg
    IMG_1948.jpg
    26 KB · Views: 134

Latest posts

Forum statistics

Threads
42,217
Posts
911,522
Members
33,721
Latest member
cmritz
Top