Ultra-low voltage at power window breaker?

Disclaimer: Links on this page pointing to Amazon, eBay and other sites may include affiliate code. If you click them and make a purchase, we may earn a small commission.

da_raabi

Trailer Park Supervisor
Joined
Aug 7, 2013
Posts
1,403
Reaction score
901
Location
FloriDUH
First Name
Adam
Truck Year
1986
Truck Model
c30
Engine Size
454
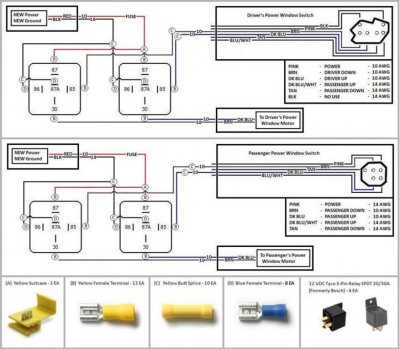
So I have been chasing down the cause of why my back windows don't work.

Using a multimeter I figured out that I was only getting about 0.3V at the switch, which obviously wont do crap.

I hopped over to the fuse block and pulled the circuit breaker and checked the resistance across it - no resistance so it seems thats OK.

I plugged the multimeter in to the two ports on the fuse block that the breaker go's in and turned the key to on. I read a voltage drop of 0.3V - telling me that the window circuit is only being supplied 0.3V AT THE FUSE BLOCK. Anyone know why this would be?
 

Rustywer

Junior Member
Joined
Jul 8, 2014
Posts
15
Reaction score
0
Location
San Diego, Ca.
First Name
Rusty
Truck Year
1977
Truck Model
C30
Engine Size
350 CID
Reading the two points and completing the circuit will only give you the difference between the two points. Read the feed to a chassis ground. You should have source(battery) voltage there. If not, trace back to the fuse. You can also use a power probe and apply battery votage then check the operation of the different components. There are two circuits here to check. Control - 12 volt to switch then through relay to ground. Motor - 12 volt through closed relay contacts through motor to ground.

Basic trouble isoation for any circuit like this is - Switches, fuses, relays, plugs, component.

Make sure there are no safety lockouts, like a door open switch that will interrupt/open the voltage to prevent operation when that condition is met.
 

chengny

Full Access Member
Joined
Feb 22, 2012
Posts
4,086
Reaction score
1,010
Location
NH
First Name
Jerry
Truck Year
1986
Truck Model
K3500
Engine Size
350/5.7
Plugging the probes of a meter into a fuse socket won't read the voltage that is available to the circuit (might read amperage if done right - but not voltage). Measure the voltage by touching the red probe to the assumed power supply and the black probe to a good clean ground point.

You could measure the available voltage at the line side of the fuse (RH slot looking at fuse block) or up at the top where the power lead plugs into the WDO jack (that bank is ignition switched so the key must be in the RUN position to get power at either of those test points).

The fuse block:

You must be registered for see images attach


No relay involved in the power window circuitry - only the power locks use a relay.
 

da_raabi

Trailer Park Supervisor
Joined
Aug 7, 2013
Posts
1,403
Reaction score
901
Location
FloriDUH
First Name
Adam
Truck Year
1986
Truck Model
c30
Engine Size
454
Plugging the probes of a meter into a fuse socket won't read the voltage that is available to the circuit (might read amperage if done right - but not voltage). Measure the voltage by touching the red probe to the assumed power supply and the black probe to a good clean ground point.

You could measure the available voltage at the line side of the fuse (RH slot looking at fuse block) or up at the top where the power lead plugs into the WDO jack (that bank is ignition switched so the key must be in the RUN position to get power at either of those test points).

The fuse block:

You must be registered for see images attach


No relay involved in the power window circuitry - only the power locks use a relay.

Ahhh, thank you very much. It looks like I forgot my basic electricity practices. Based on your instructions it would appear I am getting a solid 12V at both locations on the fuse block, as well as at the connector in the door. Now since I do not have a window switch to plug in, can I jumper the connector to make the window go up and down? If so, which post holes would I jump to do so. Keep in mind this is a crew cab rear door, if it matters. Thanks so much for the help - you da man!
 

chengny

Full Access Member
Joined
Feb 22, 2012
Posts
4,086
Reaction score
1,010
Location
NH
First Name
Jerry
Truck Year
1986
Truck Model
K3500
Engine Size
350/5.7
Pink lead is hot to the switch. The up/down leads out of the switch to the motor are brown/dk blue.

Jump the pink to brown - red line - to lower the window (brown goes down) and jump the pink to dark blue - yellow line - to raise it.

You must be registered for see images attach


Disregard the purple and dark green - they are the remote power signals from the driver's master switch.

The shape of the harness connector (and the positioning of the sockets) is valid if you view it from the side with the holes (sockets). If you had a switch, it would be viewed with the prongs pointing up. So to assemble the connector to the switch would be like slapping a sandwich together.
 

da_raabi

Trailer Park Supervisor
Joined
Aug 7, 2013
Posts
1,403
Reaction score
901
Location
FloriDUH
First Name
Adam
Truck Year
1986
Truck Model
c30
Engine Size
454
Ok cool, thats a ton of help. I'll try it this afternoon. Hopefully it works and I'll go get some switches!
 

chengny

Full Access Member
Joined
Feb 22, 2012
Posts
4,086
Reaction score
1,010
Location
NH
First Name
Jerry
Truck Year
1986
Truck Model
K3500
Engine Size
350/5.7
I am getting a solid 12V at both locations on the fuse block, as well as at the connector in the door.

That's a good start, but be aware that even if the voltage measures okay, it is not always a good indicator of the current carrying capacity of the conductor.

The connections inside those power window/lock harness clips can get really raggedy after 30 years. Many of the copper strands at the end of the leads are often broken and the ones that remain are barely holding on. You might consider popping them open and tightening things up with a soldering iron.

The poor condition these harness clips are the main reason for that power window modification that is so popular. The wiring is shot and cannot carry enough current to operate the windows as designed.
 

MadOgre

Full Access Member
Joined
May 4, 2014
Posts
4,090
Reaction score
49
Location
NA
First Name
NA
Truck Year
NA
Truck Model
NA
Engine Size
NA
I am getting a solid 12V at both locations on the fuse block, as well as at the connector in the door.

That's a good start, but be aware that even if the voltage measures okay, it is not always a good indicator of the current carrying capacity of the conductor.

The connections inside those power window/lock harness clips can get really raggedy after 30 years. Many of the copper strands at the end of the leads are often broken and the ones that remain are barely holding on. You might consider popping them open and tightening things up with a soldering iron.

The poor condition these harness clips are the main reason for that power window modification that is so popular. The wiring is shot and cannot carry enough current to operate the windows as designed.

What popular modification would that be ? I saw my wiring through the door jam is all cracked and old. Not looking forward to re wiring everything.
 

da_raabi

Trailer Park Supervisor
Joined
Aug 7, 2013
Posts
1,403
Reaction score
901
Location
FloriDUH
First Name
Adam
Truck Year
1986
Truck Model
c30
Engine Size
454
He's referring to the relay swap - set up a set of relays to power the windows instead of using the direct-wire method the OE used. Its exactly like the kit available for relay'd headlights.

Now back to my issue. I attempted to jumper the power the way it was explained above - no dice. I pulled the connector at the window motor and verified continuity between it and the switch connector - it checked good. So what am I down to now? Dead window motors? Could the circuit breaker in the fuse block be opening every time I try to power the motors?
 

MadOgre

Full Access Member
Joined
May 4, 2014
Posts
4,090
Reaction score
49
Location
NA
First Name
NA
Truck Year
NA
Truck Model
NA
Engine Size
NA
He's referring to the relay swap - set up a set of relays to power the windows instead of using the direct-wire method the OE used. Its exactly like the kit available for relay'd headlights.

Now back to my issue. I attempted to jumper the power the way it was explained above - no dice. I pulled the connector at the window motor and verified continuity between it and the switch connector - it checked good. So what am I down to now? Dead window motors? Could the circuit breaker in the fuse block be opening every time I try to power the motors?

Cool. Does it have new wiring to go through the door jam ?
 

da_raabi

Trailer Park Supervisor
Joined
Aug 7, 2013
Posts
1,403
Reaction score
901
Location
FloriDUH
First Name
Adam
Truck Year
1986
Truck Model
c30
Engine Size
454
Cool. Does it have new wiring to go through the door jam ?

Unfortunately its not a pre-made kit. You would have to build it yourself. Its not a big deal, it just takes a bit of work.
 

MadOgre

Full Access Member
Joined
May 4, 2014
Posts
4,090
Reaction score
49
Location
NA
First Name
NA
Truck Year
NA
Truck Model
NA
Engine Size
NA
ya I was trying to avoid that work part
 

chengny

Full Access Member
Joined
Feb 22, 2012
Posts
4,086
Reaction score
1,010
Location
NH
First Name
Jerry
Truck Year
1986
Truck Model
K3500
Engine Size
350/5.7
Now back to my issue. I attempted to jumper the power the way it was explained above - no dice. I pulled the connector at the window motor and verified continuity between it and the switch connector - it checked good. So what am I down to now?

Dead window motors?

Could the circuit breaker in the fuse block be opening every time I try to power the motors?

Probably neither. The problem is I gave you bad (well half-assed) advice. It is all well and good to supply the motor with power by jumping the the pink to the brown/dk blue. But that only takes care of half of the circuit, the other side of the motor has to be connected to ground.

Those little switches are more involved than they look. When you push it up for example, one set of contacts within the switch closes and connects pink to dk blue. Easy enough right?

But simultaneously, another set of contacts closes and connects the brown to ground. That completes the motor circuit and it spins up.

But here is where it gets involved; the only path to ground for the entire system is via the drivers side master switch and then to the common ground buss.

So that means that one of the two remote power supplies (the ones I told you to ignore) becomes the ground wire. They alternate depending on which lead is hot to the motor.

Dark green is the ground wire when going down (and brown is hot from pink). And when going up, the dk blue is hot from pink and the purple wire supplies the path over to the master switch/ground buss.

I would forget about jumping the switch - unless you want to do it one time to prove operational capability of the motors.

If you do want to test the motors (prudent), make the ground connection locally. Supply the power to the motor as I first described (that much is correct). But in addition, connect another jumper the other motor lead and run that to a good ground.

Example:

To raise the window jump pink to dark blue (positive supply) and also jump the brown to the chassis (negative to ground).

As GM describes it:

You must be registered for see images attach
 

chengny

Full Access Member
Joined
Feb 22, 2012
Posts
4,086
Reaction score
1,010
Location
NH
First Name
Jerry
Truck Year
1986
Truck Model
K3500
Engine Size
350/5.7
The power window modification just brings the supply voltage closer to the window controls via a pair of large wires. These are run straight from a good hot connection (the firewall junction block for example) and a dedicated ground point. Once these two wires are inside the door panel,they supply power to the motor via a relay (one for each direction).

Other than fishing the previously mentioned pair of wires (through the A pillar, rubber conduit and into the door) and mounting a pair of general purpose relays, there is not much else involved - other than a number of crimp connections to make up. Here is the most well written procedure for this modification that I have come across (the author even includes a materials list):

You must be registered for see images attach
 

Attachments

  • PowerWindowMod.jpg
    PowerWindowMod.jpg
    87.3 KB · Views: 183
Last edited:

da_raabi

Trailer Park Supervisor
Joined
Aug 7, 2013
Posts
1,403
Reaction score
901
Location
FloriDUH
First Name
Adam
Truck Year
1986
Truck Model
c30
Engine Size
454
Now back to my issue. I attempted to jumper the power the way it was explained above - no dice. I pulled the connector at the window motor and verified continuity between it and the switch connector - it checked good. So what am I down to now?

Dead window motors?

Could the circuit breaker in the fuse block be opening every time I try to power the motors?

Probably neither. The problem is I gave you bad (well half-assed) advice. It is all well and good to supply the motor with power by jumping the the pink to the brown/dk blue. But that only takes care of half of the circuit, the other side of the motor has to be connected to ground.

Those little switches are more involved than they look. When you push it up for example, one set of contacts within the switch closes and connects pink to dk blue. Easy enough right?

But simultaneously, another set of contacts closes and connects the brown to ground. That completes the motor circuit and it spins up.

But here is where it gets involved; the only path to ground for the entire system is via the drivers side master switch and then to the common ground buss.

So that means that one of the two remote power supplies (the ones I told you to ignore) becomes the ground wire. They alternate depending on which lead is hot to the motor.

Dark green is the ground wire when going down (and brown is hot from pink). And when going up, the dk blue is hot from pink and the purple wire supplies the path over to the master switch/ground buss.

I would forget about jumping the switch - unless you want to do it one time to prove operational capability of the motors.

If you do want to test the motors (prudent), make the ground connection locally. Supply the power to the motor as I first described (that much is correct). But in addition, connect another jumper the other motor lead and run that to a good ground.

Example:

To raise the window jump pink to dark blue (positive supply) and also jump the brown to the chassis (negative to ground).

As GM describes it:

You must be registered for see images attach

chengny - you are seriously the bomb. As it so happens I do not currently have the master switch in the front door. Some asshat decided to remove the front power windows and go manual instead of just fixing them. The harness is still there, just no switch. I'll try the method you explained here and see if that gets the motor move - thats what I'm concerned with right now. If it does work I'll get switches for the back doors and figure out a safe way to jumper the grounds at the master for now. THANK YOU for the help - seriously I was floundering on this one! I'll try it out tonight - fingers crossed!
 

Latest posts

Forum statistics

Threads
42,304
Posts
913,378
Members
33,802
Latest member
rogueakula
Top