

You are using an out of date browser. It may not display this or other websites correctly.
You should upgrade or use an alternative browser.
You should upgrade or use an alternative browser.
Brake Light Problems
- Thread starter Boone83K10
- Start date
Disclaimer: Links on this page pointing to Amazon, eBay and other sites may include affiliate code. If you click them and make a purchase, we may earn a small commission.
Boone83K10
Full Access Member
- Joined
- Feb 4, 2013
- Posts
- 841
- Reaction score
- 42
- Location
- Boone, NC
- First Name
- Benjamin
- Truck Year
- 1983
- Truck Model
- K10
- Engine Size
- 350
Maybe not - let me read.
And - I still can't get past this one- the front parking lights don't light up with the rest of them - correct?
everything on the front works great as it should. Signal left, grille light and side light blink nicely. same for right side.
also the license lamp is ancient and could this be a bad ground since it grounds through the entire lamp to the bumper?
Last edited:
robert8096
Full Access Member
- Joined
- Mar 27, 2011
- Posts
- 878
- Reaction score
- 55
- Location
- Goose Creek SC
- First Name
- Robert
- Truck Year
- 1986
- Truck Model
- c10
- Engine Size
- 350
Check that the sockets are clean.
More importantly be sure that each socket has the correct bulb installed - and that they are installed correctly.
It is not unusual for someone to jam a lamp with the wrong base configuration into a socket.
When that happens one lighting circuit bleeds over into another - this most commonly occurs in the middle (brake light/directional) assembly.
When you did this step did you use new bulbs? I had a problem like this on a car one time and it turned out to be a shorted bulb. The bulb looked fine and I didn't find the problem until I replaced all the bulbs with new ones.
Boone83K10
Full Access Member
- Joined
- Feb 4, 2013
- Posts
- 841
- Reaction score
- 42
- Location
- Boone, NC
- First Name
- Benjamin
- Truck Year
- 1983
- Truck Model
- K10
- Engine Size
- 350
no I didn't use new bulbs, that would involve spending money... booooooooo
Boone83K10
Full Access Member
- Joined
- Feb 4, 2013
- Posts
- 841
- Reaction score
- 42
- Location
- Boone, NC
- First Name
- Benjamin
- Truck Year
- 1983
- Truck Model
- K10
- Engine Size
- 350
chengny
Full Access Member
- Joined
- Feb 22, 2012
- Posts
- 4,086
- Reaction score
- 1,010
- Location
- NH
- First Name
- Jerry
- Truck Year
- 1986
- Truck Model
- K3500
- Engine Size
- 350/5.7
Ben - dude, those are the wires I've been talking about all along.
Doesn't matter. I sat down and gave this some thought - avoided distractions for awhile (the Patriots were on last night so I was useless).
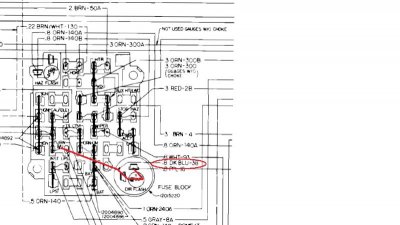
Bottom line - you have a short between the LH directional lead (YELLOW) and the common lead (LT GRN) that splits and feeds the B/U's on both side.
I'm not sure we're on the same page (esp in light of the post immediately above) but here goes:
If you pull the flasher (the wiring and how it connects the back up light circuit to the directionals are shown above) - then the LT GRN lead to the B/Ur's will be isolated. It will have no possible way to be cross connected or influenced by any other circuit.
Having said that, I mean within the cab there is virtually no chance of a short. The switches that the wires run to are 3 -4 feet apart.
The B/U's and directionals come off the same fuse as indicated above both on a DK BLUE wire.
The blinker lead is immediately fed into the flasher relay and from there it goes straight up for awhile here it joins the rest of the wires that are headed to the multi-function switch on the steering column. Up in that switch the DK BLU ends and the splits off into either yellow LH or ...what, DK GRN - I forget at this point. Then for those 2 wires its back down the column and out through the firewall.
The B/U circuit in the cab is wicked simple. DK BLUE wire from TAIL B/U fuse to the NSS which is about 6 inches away at the bottom of the column. There the DK BLUE goes away and comes out of the switch as LT GRN. A 1 -2 foot trip and it's out the firewall and into the harness tube that runs along the inside of the frame.
Within that hard plastic tube (probably very near one of the ends) is where the B/U lights and LH directional circuits are getting crossed over. I can almost guarantee you that.
But don't stress brother. Even if you have to pull the wires out of the tube (or pull the tube along with the wires) and lay them on the fender to inspect/repair - it's easy.
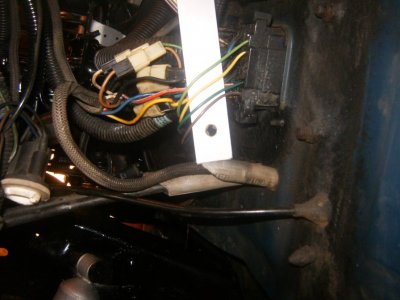
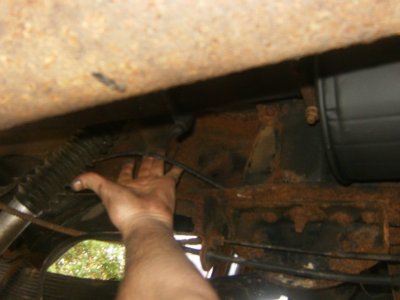
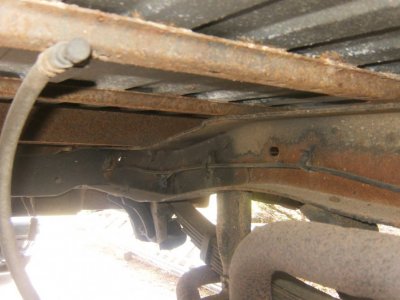
The hard plastic tube only carries those 4 wires that you have become so familiar with. There is plenty of room to pull them out or even take the entire out. The 4 (Y,LG,DG & Br) pass through the firewall gland and quickly enter the tube, The tube is contained in a protective loom up till about the back wall of the cab then after that it's just hard plastic. It's not slave labor or even rocket science to pull the harness for repair. Here are some images showing the routing. They are numbered 1 - 10; with 1 being at the firewall and 10 being back by the end of the frame rail. It will take 2 post boxes to upload them all:
Doesn't matter. I sat down and gave this some thought - avoided distractions for awhile (the Patriots were on last night so I was useless).
Bottom line - you have a short between the LH directional lead (YELLOW) and the common lead (LT GRN) that splits and feeds the B/U's on both side.
I'm not sure we're on the same page (esp in light of the post immediately above) but here goes:
If you pull the flasher (the wiring and how it connects the back up light circuit to the directionals are shown above) - then the LT GRN lead to the B/Ur's will be isolated. It will have no possible way to be cross connected or influenced by any other circuit.
Having said that, I mean within the cab there is virtually no chance of a short. The switches that the wires run to are 3 -4 feet apart.
The B/U's and directionals come off the same fuse as indicated above both on a DK BLUE wire.
The blinker lead is immediately fed into the flasher relay and from there it goes straight up for awhile here it joins the rest of the wires that are headed to the multi-function switch on the steering column. Up in that switch the DK BLU ends and the splits off into either yellow LH or ...what, DK GRN - I forget at this point. Then for those 2 wires its back down the column and out through the firewall.
The B/U circuit in the cab is wicked simple. DK BLUE wire from TAIL B/U fuse to the NSS which is about 6 inches away at the bottom of the column. There the DK BLUE goes away and comes out of the switch as LT GRN. A 1 -2 foot trip and it's out the firewall and into the harness tube that runs along the inside of the frame.
Within that hard plastic tube (probably very near one of the ends) is where the B/U lights and LH directional circuits are getting crossed over. I can almost guarantee you that.
But don't stress brother. Even if you have to pull the wires out of the tube (or pull the tube along with the wires) and lay them on the fender to inspect/repair - it's easy.
The hard plastic tube only carries those 4 wires that you have become so familiar with. There is plenty of room to pull them out or even take the entire out. The 4 (Y,LG,DG & Br) pass through the firewall gland and quickly enter the tube, The tube is contained in a protective loom up till about the back wall of the cab then after that it's just hard plastic. It's not slave labor or even rocket science to pull the harness for repair. Here are some images showing the routing. They are numbered 1 - 10; with 1 being at the firewall and 10 being back by the end of the frame rail. It will take 2 post boxes to upload them all:
Attachments

Boone83K10
Full Access Member
- Joined
- Feb 4, 2013
- Posts
- 841
- Reaction score
- 42
- Location
- Boone, NC
- First Name
- Benjamin
- Truck Year
- 1983
- Truck Model
- K10
- Engine Size
- 350
I pulled the directional flasher only tonight, then stepped on the brake.
I have brake lights and B/U lights. Sounds like not only is the YEL wire shorted to the LT Green but the Brown as well.
I guess I will have to see if I can inspect all the wiring tomorrow.
I have brake lights and B/U lights. Sounds like not only is the YEL wire shorted to the LT Green but the Brown as well.
I guess I will have to see if I can inspect all the wiring tomorrow.
chengny
Full Access Member
- Joined
- Feb 22, 2012
- Posts
- 4,086
- Reaction score
- 1,010
- Location
- NH
- First Name
- Jerry
- Truck Year
- 1986
- Truck Model
- K3500
- Engine Size
- 350/5.7
They (the wires) might be too twisted inside the tube but it may be possible to withdraw one at a time. Inspect it's insulation as it is withdrawn from the tube end.
Ah nevermind, I just carefully read your latest post - the one above this - it sounds like the whole group of 4 wires is trashed. You would probably save time by cutting the 4 wires at the firewall and hauling the whole thing out the back.
That plastic tube is very sturdy and very well supported by clips to the frame. No normal amount of vibration could cause chafing to the extent that the wires inside would be affected. I am guessing it is pinched or crushed somewhere.
After you snip the wires at the firewall - but before you make the big step of ripping the harness out - ring the wires out.
You can work at either end. But whichever end you choose, make sure that the copper conductors at the other end are all well seperated or have been snipped with the insulation flush with the copper - IOW that they cannot come in contact with each other.
So, lets say you decide to work under the rear end - with the wires well seperated from each other at the firewall. Use your meter as a continuity tester and methodically check each lead (Br, LT GRN, DK GRN & Y) for continuity to the others.
Also after checking for shorts between the various wires, check each lead for short to ground.
When it comes to using the basic functions of a multimeter, it sounds - from what I've read - that you are all over it. So, in the interest of me not having to type a huge tutorial, I won't go into detail.
But do be advised; the frame where you will be working, will most likely have a fairly heavy coating of rust. So before checking for shorts to ground, take a wire brush or a piece of emery cloth and make a good clean spot for your probe that goes to ground.
Short version; there should be no contnuity from one wire to any other. Aditionally, there should not be continuity between any of the 4 wires and the frame (gound).
Then, if by some miricale, the wires ring out as they should - stop. Do not pull the harness or tear it open. We'll leave it alone and continue to look elsewhere for the answer.
You don't have a neighbor who hates you do you ?
Last edited:
MrMarty51
Full Access Member
- Joined
- Oct 25, 2012
- Posts
- 7,524
- Reaction score
- 9,381
- Location
- Eastern Montana
- First Name
- Martin
- Truck Year
- 1978
- Truck Model
- K20
- Engine Size
- 400
If cutting wires, and planing on soldering on new wires, clip each wire a little bit longer than the last wire, so You dont have a big O`L knot of splicings in one spot.
Boone83K10
Full Access Member
- Joined
- Feb 4, 2013
- Posts
- 841
- Reaction score
- 42
- Location
- Boone, NC
- First Name
- Benjamin
- Truck Year
- 1983
- Truck Model
- K10
- Engine Size
- 350
ok I took off the bulkhead connector and tested at the firewall. All things are good. It is sending the correct signals through the firewall. So that means it is somewhere from there to the rear!
All the protective sheathing is in very good condition. I guess I will have to start somewhere. I don't see how I can pull the cover off the wiring without cutting it off?
All the protective sheathing is in very good condition. I guess I will have to start somewhere. I don't see how I can pull the cover off the wiring without cutting it off?
Boone83K10
Full Access Member
- Joined
- Feb 4, 2013
- Posts
- 841
- Reaction score
- 42
- Location
- Boone, NC
- First Name
- Benjamin
- Truck Year
- 1983
- Truck Model
- K10
- Engine Size
- 350
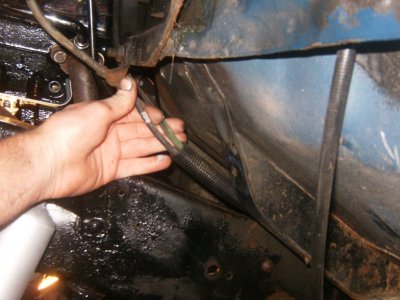
You must be registered for see images attach
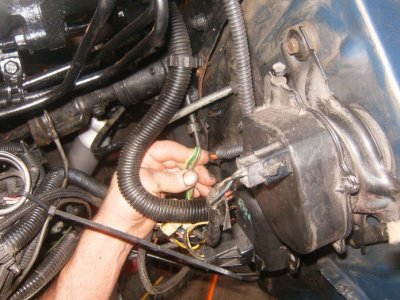
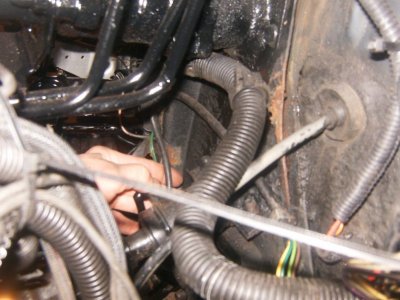
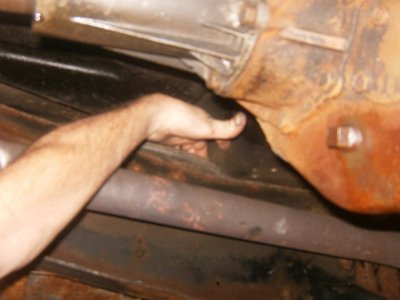
I began to pull the wiring off the frame rail... this is very bad. This truck has true dual exhaust from when it had the engine swap. They ran the driver pipe too close to the frame rail above the axle and it did this...
You must be registered for see images attach
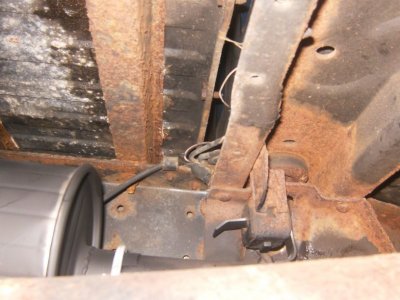
You must be registered for see images attach
Now what do I do, anyone want to sell me the entire rear harness???? I don't feel like putting good wiring from one end to the other.
Boone83K10
Full Access Member
- Joined
- Feb 4, 2013
- Posts
- 841
- Reaction score
- 42
- Location
- Boone, NC
- First Name
- Benjamin
- Truck Year
- 1983
- Truck Model
- K10
- Engine Size
- 350
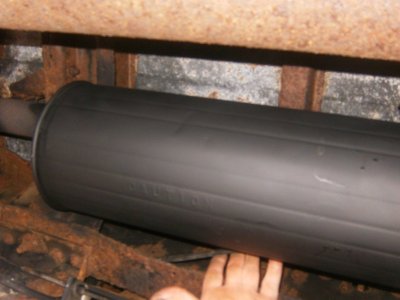
actually, I think I will just do this and cover it with some header wrap maybe... my new (today) book from LMC ....
You must be registered for see images attach
chengny
Full Access Member
- Joined
- Feb 22, 2012
- Posts
- 4,086
- Reaction score
- 1,010
- Location
- NH
- First Name
- Jerry
- Truck Year
- 1986
- Truck Model
- K3500
- Engine Size
- 350/5.7
That plastic tube is very sturdy and very well supported by clips to the frame. No normal amount of vibration could cause chafing to the extent that the wires inside would be affected. I am guessing it is pinched or crushed somewhere.
Guess I missed melted huh?
Just refer to those images that show the routing and run a new set of wires. Remember - your actual rear lighting harness is fine. Don't buy an aftermarket set.
It is just the run from firewall to 4 prong plug that is toast. Also, you can salvage the 4 prong and 2-3 feet of the wiring upstream of it. Solder/heatshrink that onto the new wiring.
There are only 4 leads - encased in a length of 1/2" OD black poly-pipe.
The wire is available anywhere.
As for the plastic sheathing, the OEM stuff looks like the same material used in irrigation systems to connect the sprinkler heads to the main run. It is refered to in the trade as "funny pipe".
Get the sheathing layed out - and straightened as best as you can. Use a heat gun or hair dryer to help.
When it is fairly straight, pull 4 new wires through it. Leave a couple of feet excess on either end.
Double the excess wires back over the sheathing and wrap with tape - to aid in feeding through the frame. Do both ends - explained below.
Get under the truck and bring your new "harness" with you. Find a spot where you are about in the middle of the run - maybe around the front of the gas tank.
Feed the ends of the new wiring in both directions. It might be easier to go way out past the rear end first, straighten the sheathing again, and then push the foward end towards the firewall.
Couple of cable pulling hints:
1. Coat the outside of the poly-pipe with plenty of grease
2. If you hit a spot where the cable sticks, try threading it through (i.e twisting the outer casing with a pair of vise-grips that are lightly clamped on)
Last edited:
Boone83K10
Full Access Member
- Joined
- Feb 4, 2013
- Posts
- 841
- Reaction score
- 42
- Location
- Boone, NC
- First Name
- Benjamin
- Truck Year
- 1983
- Truck Model
- K10
- Engine Size
- 350
I called LMC..
even though the part is in the book, it is not in their "system" yet until Tuesday.
My question is, it says rear body harness, so is that from firewall to rear harness or is it the actual tail light harness which I don't need.
:-\
even though the part is in the book, it is not in their "system" yet until Tuesday.
My question is, it says rear body harness, so is that from firewall to rear harness or is it the actual tail light harness which I don't need.
:-\