- Joined
- Sep 29, 2010
- Posts
- 17,092
- Reaction score
- 2,213
- Location
- Green Bastard Parts Unknown
- First Name
- Jay
- Truck Year
- 2001
- Truck Model
- pontiac aztek
- Engine Size
- 3.4
Installing a compass/temp mirror
Difficulty 4/10 (10 being hardest)
This is a how to on installing an auto-dimming rear view mirror with compass and temp in your truck.
Install at your own risk as this involves a little wiring work.
Don't you hate driving at night and when someone comes up behind you with bright lights
and you have to flip the little lever on the mirror? I do too, so I have installed
these mirrors in most every car I have owned. Even with tinted windows, those bright lights
can be a pain in the eye. It's also nice to see what the temp is and which direction you are going.
What you will need:
1. mirror and temp sensor - from a 1998-2005 fullsize truck is where I find them most often but some Saturns have them too, mostly Vues.
2: length of wire. 18 gauge will be fine.
3. phillips screwdriver.
4. T20 Torx
5. wire cutters/strippers
6. 7 mm (9/32) socket and ratchet or nut driver
7. spade connector
8. soldering iron and solder
9. Shrinkwrap or electrical tape
10. beer (optional)
11. 45-60 minutes
Getting your mirror. There are two different kinds and I will show how to install both kinds. You will find them in many 1998+ fullsize GM trucks and SUVs as well as Saturn Vues. There are others but I am going to use these as examples. There are several types, some have a single display and you have to switch back and forth to see one or the other - I like these better because the dual display leaves a big blind spot for me. Others have a dual display showing both compass and temp at the same time. Not much to getting them off, use a T20 torx and unscrew it from the mount. Get the wiring too with a good length and the little cover that goes between the mirror and headliner if you want. You will also need the temp sensor probe. If you can, go find a late model S Blazer with the grille removed, they are just clipped on and have a good bit of wiring to include.
Gentex 16 pin: (The Donnellys used in the Saturns are visually similar and also have the same connector but do not have PASSENGER AIR BAG)
Gentex 177 7 pin, both single and dual display.
Now comes the fun part. I'll forgo all the stuff to remove because some have it and some don't. You need to wire it now. I run the temp sensor first. You want this somewhere behind the grille or behind the bumper is best, away from heat of the condenser or radiator. Run your wiring to the firewall and find a pass through somewhere. On my GMT400, I ran it through the cruise control wiring so I didn't have to drill any holes and add grommets, but you may have to.
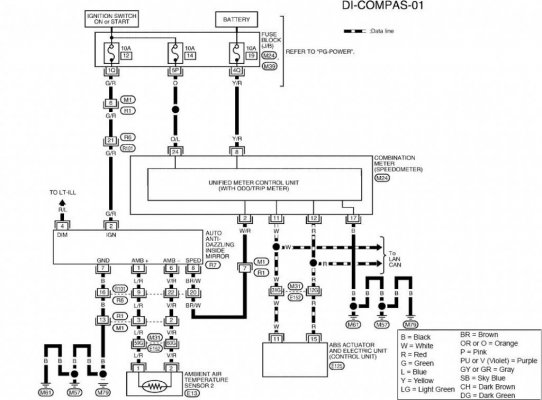
Here are the wiring diagrams for both the 7 pin and 16 pin connectors.
Run those wires up along the A-pillar and to the mirror. Likewise you can run your power and ground along the same route. The wiring diagrams are shown below. Some have a 7 pin wiring connector and some have 16 pin connector.
Now put all your trim back if you removed any and test the mirror.
If your display is dark, want a minute and it should brighten in the light of day. Some are instant and some take a minute to adjust to the level of brightness.
If your display says C (single display) or CAL (dual display), take your truck to an empty parking lot or cul-de-sac and drive in circles 3 or 4 times until it calibrates. You will also need to set the zone by holding the COMP button down until a number appears.
If you need to change to Celsius, hold the TEMP button down for 3-6 seconds until the F starts flashing, then push TEMP again, it will then change to Celsius.
To turn off the auto-dim on the GENTEX 177 (7 pin) and GENTEX 263 (need to clarify that is the model number, but it's the 16 pin), hold the TEMP button down for 8-10 seconds until the green LED goes off.
To turn off the Donnelly auto-dim (Vue mirror), hold down the COMP button for 8-10 seconds.
Difficulty 4/10 (10 being hardest)
This is a how to on installing an auto-dimming rear view mirror with compass and temp in your truck.
Install at your own risk as this involves a little wiring work.
Don't you hate driving at night and when someone comes up behind you with bright lights
and you have to flip the little lever on the mirror? I do too, so I have installed
these mirrors in most every car I have owned. Even with tinted windows, those bright lights
can be a pain in the eye. It's also nice to see what the temp is and which direction you are going.
What you will need:
1. mirror and temp sensor - from a 1998-2005 fullsize truck is where I find them most often but some Saturns have them too, mostly Vues.
2: length of wire. 18 gauge will be fine.
3. phillips screwdriver.
4. T20 Torx
5. wire cutters/strippers
6. 7 mm (9/32) socket and ratchet or nut driver
7. spade connector
8. soldering iron and solder
9. Shrinkwrap or electrical tape
10. beer (optional)
11. 45-60 minutes
Getting your mirror. There are two different kinds and I will show how to install both kinds. You will find them in many 1998+ fullsize GM trucks and SUVs as well as Saturn Vues. There are others but I am going to use these as examples. There are several types, some have a single display and you have to switch back and forth to see one or the other - I like these better because the dual display leaves a big blind spot for me. Others have a dual display showing both compass and temp at the same time. Not much to getting them off, use a T20 torx and unscrew it from the mount. Get the wiring too with a good length and the little cover that goes between the mirror and headliner if you want. You will also need the temp sensor probe. If you can, go find a late model S Blazer with the grille removed, they are just clipped on and have a good bit of wiring to include.
Gentex 16 pin: (The Donnellys used in the Saturns are visually similar and also have the same connector but do not have PASSENGER AIR BAG)
You must be registered for see images
You must be registered for see images
You must be registered for see images
Gentex 177 7 pin, both single and dual display.
You must be registered for see images
You must be registered for see images
You must be registered for see images
You must be registered for see images
Now comes the fun part. I'll forgo all the stuff to remove because some have it and some don't. You need to wire it now. I run the temp sensor first. You want this somewhere behind the grille or behind the bumper is best, away from heat of the condenser or radiator. Run your wiring to the firewall and find a pass through somewhere. On my GMT400, I ran it through the cruise control wiring so I didn't have to drill any holes and add grommets, but you may have to.
Here are the wiring diagrams for both the 7 pin and 16 pin connectors.
You must be registered for see images
You must be registered for see images
Run those wires up along the A-pillar and to the mirror. Likewise you can run your power and ground along the same route. The wiring diagrams are shown below. Some have a 7 pin wiring connector and some have 16 pin connector.
Now put all your trim back if you removed any and test the mirror.
If your display is dark, want a minute and it should brighten in the light of day. Some are instant and some take a minute to adjust to the level of brightness.
If your display says C (single display) or CAL (dual display), take your truck to an empty parking lot or cul-de-sac and drive in circles 3 or 4 times until it calibrates. You will also need to set the zone by holding the COMP button down until a number appears.
You must be registered for see images
If you need to change to Celsius, hold the TEMP button down for 3-6 seconds until the F starts flashing, then push TEMP again, it will then change to Celsius.
To turn off the auto-dim on the GENTEX 177 (7 pin) and GENTEX 263 (need to clarify that is the model number, but it's the 16 pin), hold the TEMP button down for 8-10 seconds until the green LED goes off.
To turn off the Donnelly auto-dim (Vue mirror), hold down the COMP button for 8-10 seconds.

")