how to make up a braided hose

Disclaimer: Links on this page pointing to Amazon, eBay and other sites may include affiliate code. If you click them and make a purchase, we may earn a small commission.

Raider L

Full Access Member
Joined
Sep 1, 2020
Posts
1,892
Reaction score
996
Location
Shreveport, LA
First Name
William
Truck Year
1974
Truck Model
C10
Engine Size
355
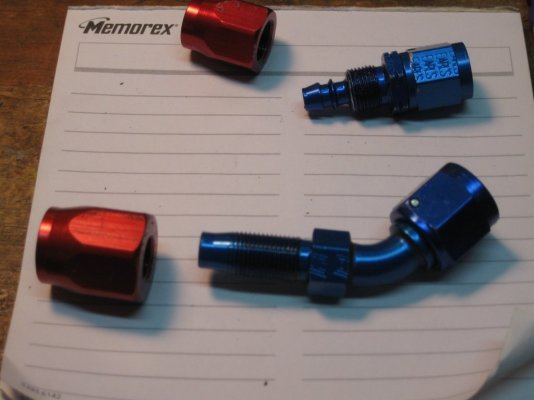
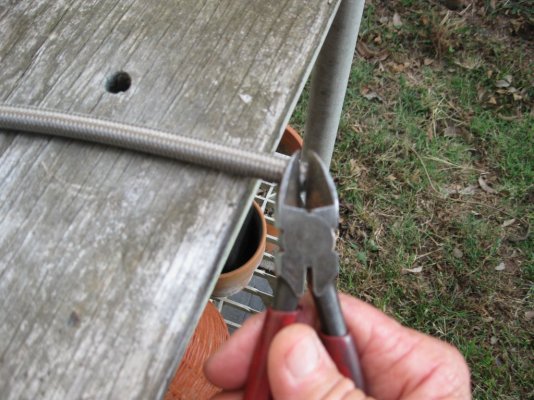
I preparation to reinstall my fuel pressure gauge, first I have to make up one end of this 1/4" steel braided hose. Use the side cutters to slightly trim any wires that are sticking out and may look like they would get in the way of the nut being pushed on the end of the hose.
You must be registered for see images attach
Work the nut onto the hose end after trimming the little wires off the edge that might be keeping it from going on. Start out by beginning working it on by tilting the hole onto to the end of the hose and work it around until it's on the end of the hose all around. Once it's started you can use a tiny bit of motor oil inside the nut to give it some lube. Go to the first pic in the row below, because it's the one showing trimming the edge wires. Then the text for the above pic is the rest of the text that follows.
You must be registered for see images attach
Once it's well started you can use a socket to be able to turn the nut while you push it on further.
You must be registered for see images attach
This isn't to good of a pic, but what I'm trying to show is the end of the hose pushed all the way in by turning it and pushing it until it reaches the threads that are near the end of the nut.
Don't go up onto these threads because those threads are where the outer fitting goes inside the nut. It threads into the nut just like a screw.
You must be registered for see images attach
Then push the barb end into the end of the hose inside the nut until it reaches the threaded end of the fitting. Then while pushing the fitting end into the nut, turn it until you see it is started threading into the nut. Then you can put a wrench on the fitting and finish screwing it into the nut until it stops turning. Do not tighten it much more after it stops or it could damage the fitting threads. Now you are done.
But unfortunately I was not able to finish putting this fitting together. So I'll have to take it over the a hydraulics shop where I bought the hose and see what the problem is and maybe have them finish putting it together. Sorry. I know how to make up braided hoses I was an aircraft mechanic for over seven years and made dozens of hoses including all the hoses on my truck. They'll get it together tomorrow. Some kind of glitch.
 

Attachments

  • making up a braided hose 002.jpg
    making up a braided hose 002.jpg
    163.5 KB · Views: 119
Last edited:

Raider L

Full Access Member
Joined
Sep 1, 2020
Posts
1,892
Reaction score
996
Location
Shreveport, LA
First Name
William
Truck Year
1974
Truck Model
C10
Engine Size
355
This is the better photo of the end of the hose as it is in as far as it needs to be. This is the reason why when you start the hose end has to be clean and not have hardly any at all, wires sticking out. It's because that braid and all has to go inside this nut and it can't have anything interferring with it sliding inside the nut. It can be a real pain in the you know what!! I'm not nearly as strong as I used to be and even this 1/4" hose is kicking my butt. But if you order braided hose from Russel, I think they make theirs so it fits inside their nuts and fittings easier than regular industrial braided hose which this hose is. I know it's supposed to be standardized, but this hose seems a lot tighter than I remember it being some time ago. Either that or I'm about ready for the wheel chair.
You must be registered for see images attach
 

Raider L

Full Access Member
Joined
Sep 1, 2020
Posts
1,892
Reaction score
996
Location
Shreveport, LA
First Name
William
Truck Year
1974
Truck Model
C10
Engine Size
355
@Catbox,

Ha, ha, ha! Yes, yes, tell me about it. When I was doing this little pics what you didn't see was the blood on both of my index fingers from having those stiff a** wires stick me while I was pushing the nut on.

Yeah, the end was taped and I had taken it off to get the nut on. When I was an aircraft mechanic getting stuck by some bigger stainless wire seemed almost a rite of passage. I can remember getting a piece of wire in my hand, now just a single strand, and it would be so painful it'd make my whole arm hurt!
 

Raider L

Full Access Member
Joined
Sep 1, 2020
Posts
1,892
Reaction score
996
Location
Shreveport, LA
First Name
William
Truck Year
1974
Truck Model
C10
Engine Size
355
Okay, getting the fitting in turned out to be a real super pain in the a**. I did take it over to the hydraulics shop where I bought the hose to see if those guys could figure out why the fitting wouldn't go in. They weren't doing anything right then and we were laughing about it, there was four guys trying to get that dang fitting into that hose end. THEY GAVE UP ON IT AND DECLARED A HOPELESS CAUSE!!
I've contacted Autometer about their hose assemblies and I'm waiting to hear from them. This is so funny to me because I've have made up no telling how many braided hoses when I worked on planes, some so big it took two guys to get the nut on and finish putting it together. I'm talking about fuel crossover hoses that are two and a half inches in diameter, big a** braided hoses. It was cheaper for us to make them up ourselves to save money. Can you imagine how much a hose that big would cast? And for twenty two aircraft! When you get different types of aircraft though, the lines that size are metal with a fitting on the end. But some places on the craft need a hose and that's where my experience came from. I made up all the braided hose on my truck, and I have a lot.

But I just came back from Lowe's and bought a high speed cut off wheel to I can try something different on that hose. I have a Dremel tool, but I was out of those thin cut off wheels so I went and got some more. I tried to put the fitting into that nut while I was at the hydraulics shop yesterday and it screwed right in. So I didn't damage the threads messing with it the other day when I made those pics, thank God. What I'm going to try is, recut the hose end and this time not push the hose into the nut as far as it's upposed to go, but rather stop short so I can get the fitting threaded into the nut two or three threads and then finish pushing the nut up some. I needed to have done that the other day but I didn't think of it, I was bleeding to much, ha, ha, ha! I'll get it. I still have to make up the other end and put a fitting on it so I'll have one hose for the gauge reinstall.
 

BigDaddy72

Full Access Member
Joined
Jul 26, 2020
Posts
434
Reaction score
871
Location
Bentonville Arkansas
First Name
Travis
Truck Year
1974
Truck Model
C30 Chassis Cab
Engine Size
496
If you use the khol tools and aluminum vise jaws the are a breeze. There is also a cutter that cuts the lines clean with no tape and no frayed ends.

Use these and AN lines are easy peasy.
 

BigDaddy72

Full Access Member
Joined
Jul 26, 2020
Posts
434
Reaction score
871
Location
Bentonville Arkansas
First Name
Travis
Truck Year
1974
Truck Model
C30 Chassis Cab
Engine Size
496
Also get yourself a set of an wrenches and a good aluminum adjustable that helps keep the scratch and gouge free.
 

Raider L

Full Access Member
Joined
Sep 1, 2020
Posts
1,892
Reaction score
996
Location
Shreveport, LA
First Name
William
Truck Year
1974
Truck Model
C10
Engine Size
355
@BigDaddy72,

Yeah, I've seen those aluminum AN wrenches and have thought about. So far I'm just careful with how I put the regular wrench on. what it is, I don't take these fittings loose at all after I put them on. It's usually just the one time and then it's on there for years.
 

BigDaddy72

Full Access Member
Joined
Jul 26, 2020
Posts
434
Reaction score
871
Location
Bentonville Arkansas
First Name
Travis
Truck Year
1974
Truck Model
C30 Chassis Cab
Engine Size
496
If it would help anyone, I did a write up in the custom c30 thread with step by step pictures using all those handy little guys. It takes the pain out of making them.

Also if anyone uses a cut off wheel be sure to clean the lines out before installing them they will be full of debris.
 

Raider L

Full Access Member
Joined
Sep 1, 2020
Posts
1,892
Reaction score
996
Location
Shreveport, LA
First Name
William
Truck Year
1974
Truck Model
C10
Engine Size
355
Okay, here's what I found out was the problem. When I was over at the hydraulics shop yesterday I saw something that sprang a memory of something. When one of the guys came over to the counter to talk about what problems they were having he put a end fitting down on the counter. It had a long tapered tube end on it that goes inside the hose. I thought, " Hey, I remember those fittings. I've got some of those. "What is this?" And it was a Russell fitting, which are a much better product and a very close to if not just like Aeroquip hose fittings which are aircraft grade fittings we used when I worked on aircraft.

When I got back from Lowe's today I was going to start putting that hose end together again. I cut the hose off with the high speed cutting wheel and I went outside to think about formulating a plan of attack to get that hose end back on there. I knew what I was going to do and then it dawned on me, "Wait a dang minute!!"

That's when I realized what the problem was. It wasn't anything wrong with what I did the first time...It was the brand of fitting that was causing the problem and I'll show you. I remember how easy it was to make all those hose fittings up years ago and it was the fact that I was using mostly my hose ends I already had, Aeroquip. And when I ran out the only hose ends that Super Shops had were Russell hose ends. They were just like Aeroquip with that long tapered tube end that goes in the hose inside the nut, and the threads start way down the tube, which double as the sealing ribs against the inside of the hose as you make it up.
You must be registered for see images attach
cutting the hose end off.
You must be registered for see images attach
This is the Earl's fitting end. See how short it is? And notice how big the ribs are and the shape of the end that goes into the hose first, it flares it out right off and causes over tight condition in the end of the hose.
You must be registered for see images attach
Here's the Earl's on top and then a Russell fitting at the bottom. It's a 3/8" but the 1/4" I'm needing is made the same. I'm using it as an example for showing the difference in product mfg. Notice how the Russell fitting, at the bottom, is long and has no flare but instead is long and the threads begin as actually not complete threads at first, then they work into whole threads. By the time the fitting tube is that far into the hose the threads are already making up in the nut. Big difference, and better for getting the fitting started, then made up. Also, look how large the Earl's nut hole is, at the top, if you can make it out. This allows for a sudden deflection to cross thread the fitting. Then you are in trouble.
You must be registered for see images attach
This is how the Russell nut is made, a small hole not like the Earl's with a big threaded end. The comparison of a Russell, lower and a 45 degree, and the Earl's, top. Again we see how the Russell is made. It's much easier to push the tube end of the fitting into the hose end inside the nut if there is a long tube with threads gradually starting into the hose end.
Here's the main difference in product between easy to make up, superior quality, and excellent finish. If you have the money only buy Aeroquip. The next down is Russell, and last and probably least is Earl's. Don't buy Earl's, the barb end is crap, it's to short, the barb ribs are to big and get hung in the hose, and the threads are to short and they aren't designed to pull the nut, hose, and fitting end together.
 

Attachments

  • different hose ends Russell 013.jpg
    different hose ends Russell 013.jpg
    82.1 KB · Views: 102
Last edited:

Raider L

Full Access Member
Joined
Sep 1, 2020
Posts
1,892
Reaction score
996
Location
Shreveport, LA
First Name
William
Truck Year
1974
Truck Model
C10
Engine Size
355
@BigDaddy72,

I stayed on your thread and made some comments about the fittings and hose end tools you told me about. I remarked about them on your thread. By the way I read the whole thread. Outstanding Build!! I'm going on your Redhorse site and look at tools and fittings. I really liked the quality of the fittings you used on your truck. That's what I have on mine. It's just, like I mentioned on your build site that I really didn't expect there to be that much difference between fitting mfg.'s. Boy. I know now. That won't happen again I'll tell you that. I have a lot of fittings in my parts boxes and they're all Aeroquip and Russell, NO Earl's and there won't ever be anymore. You know I would have expected Earl's to be up with everyone else but I guess when you cut corners to make money that's what you do. You make crap. No wonder those guys at the hydraulics shop couldn't put that fitting together. It was crap! Well, I put that fitting in a bag in my parts box and marked it "Do Not Use!" I'm not going to just throw it away though, I just won't use it. No problem.
 

Raider L

Full Access Member
Joined
Sep 1, 2020
Posts
1,892
Reaction score
996
Location
Shreveport, LA
First Name
William
Truck Year
1974
Truck Model
C10
Engine Size
355
@BigDaddy72,

I just went to your companys site and ordered two AN-4 straight hose fittings. Thanks. And I noticed you also have "fire sleeve". We used that stuff a lot when I worked on planes and I had quite a bit of it in my tool box in several sizes when the airline went down, so I had it when I started on rebuilding my truck. I used it to wrap the fuel line as it got near the header tubes there next to the engine to keep heat from affecting the fuel line. I also had enough left to wrap the starter wiring where I rerouted it down behind the engine. It also ran kinda close to the #8 cyl. header tube to keep the heat from frying the wire. I love the stuff.
 
Last edited:

Camar068

Supporting Member
Supporting Member
Joined
Feb 5, 2014
Posts
4,157
Reaction score
3,015
Location
Kentucky
First Name
David
Truck Year
1986
Truck Model
K10/LM7 5.3/4L60e/np208/3.73/32"
Engine Size
10 yrs Air Force
I watched about 5-10 youtube video's. I forget which one, but after the first the others where easy.
 

Raider L

Full Access Member
Joined
Sep 1, 2020
Posts
1,892
Reaction score
996
Location
Shreveport, LA
First Name
William
Truck Year
1974
Truck Model
C10
Engine Size
355
@Camar068,

Are you talking about making up braided hoses? I know how to do it. I was an aircraft mechanic for years. We made up all of our hoses for the planes. And if they were wrong and something happen that caused the aircraft to have a fatal problem, people died! So they had to be right, every time. I made all the hoses on my truck. What the problem was, not every hose fitting is of the same quality or design, which was the main problem. Earl's fittings aren't designed properly. And I bought a inferior quality hose fitting. That was why I couldn't get the fitting on the hose correctly. It wasn't that I didn't know what to do. I have better fitings on the hose going to my fuel pressure gauge now, and am going to keep those in reserve. I ordered two new ones from @BigDaddy72's company instead. They've been shipped. When they come in I'll do my little build so people can see what to do to install the Autometer fuel pressure gauge correctly.
 

Latest posts

Forum statistics

Threads
42,115
Posts
909,418
Members
33,607
Latest member
MixManSC
Top