Most water tight enclosures will hold moisture. Hand Held Radios rated for IP67 or IP68 are known to hold condensation and short out.
The one's not rated, are useless for accidental drop in the water... It's a paradox...
Many a Mariner has grabbed the handheld needed for rescue, only to find out it was dead from moisture invasion.
Waterproof boxes are a myth, unless you pull all the air out and insert silica gel, like your double pain sliding glass door or windows have, in the aluminum extrusions, with pin holes. There's silica in the tubes of aluminum to keep the moisture from forming inside the vacuum.
Grew up soldering everything, after I got the Radio Shack Soldering kit...
The problem is:
Solder joints will crack around salt water humid conditions, such as near the beach... most Marine applications do not recommend solder anything. They break at the solder joint from corrosion. There's a lot to be said for high quality heat shrink crimps, too. When salt corrosion breaks your power wires, you have a fire behind your dash or under your hood, from vibrations cracking the wires at the solder. Just sayin'...
Soldered joints can be isolated... and I'll get to what works, if you have to solder later...
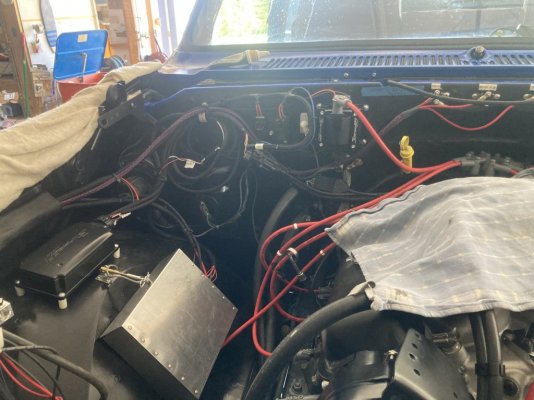
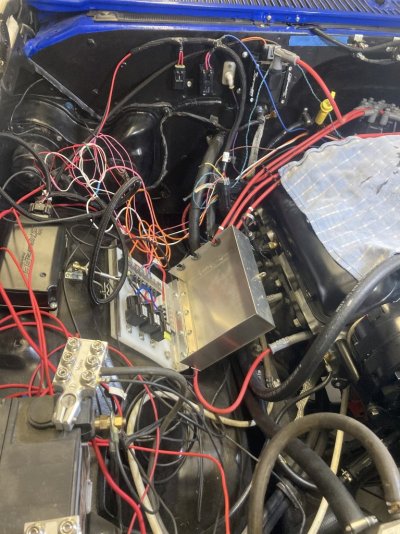
My truck has a 600A Buss-bar on the firewall.
Removed the A/C box and coil, so it left room to utilize the upper firewall section and drape my wires straight down from my buss bar, before bending and routing to the batteries. Used a sheet metal plate and a rubber gasket. Then riveted the hole closed, where the A/C crap used to live.
The hood gasket seal, at my
firewall, is much drier than mounting on the fender wall, where I get water and snow creep in, under the sides of the hood.
That said, this fix will probably work on the inside fender, as well:
Mounted the buss-bar to a 3/8" slab of rubber, (5"x7" Mud Flap) so the rubber slab bolts vertical/parallel, directly to the fire wall.
The buss-bar mounts horizontal, to the rubber, around 1-1/2" below the bolts to the firewall.
Before I mounted the mud flap to the firewall, I found an old tractor inner tube and sliced it into a 12" wide strip, around 24" long.
|| <--fold where inner tube is flat at the top
||
||
||
|| <--12" or more, as needed double layer, water runs out the bottom..
The tube I used was for a giant tractor tire, so the top of the tube was folded flat and I cut it straight down to what would be the bottom rim, flat area of the inner tube.
I cut the bottom, so the flaps are separate and open facing down.
Then I drilled out the mud flap and drilled through the double layer of inner tube, and folding over the electrical assembly, effectively hiding and protecting the electrical circuitry from a direct overhead and front on splash and covering any flat surfaces with a double layer of good quality flexible rubber.
Any water projected up underneath falls down and out. All the circuits are protected with fuses, especially where they meet the buss-bar and have high voltage. Air can circulate through and dry everything off easy.
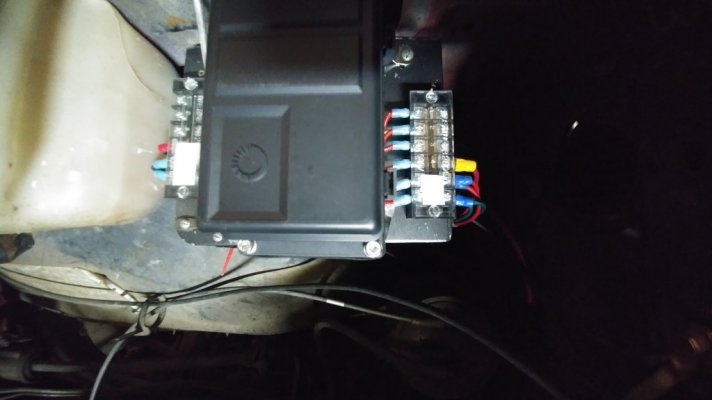
You must be registered for see images attach
Yes, that is two #4 gauge battery jumper cable wires, stripped, shrink wrapped three times and hammer crimped into a #2 copper terminal on the left lug...
It is the main feed from the battery to the Buss. Big shrink rules. Buy some...
You must be registered for see images attach
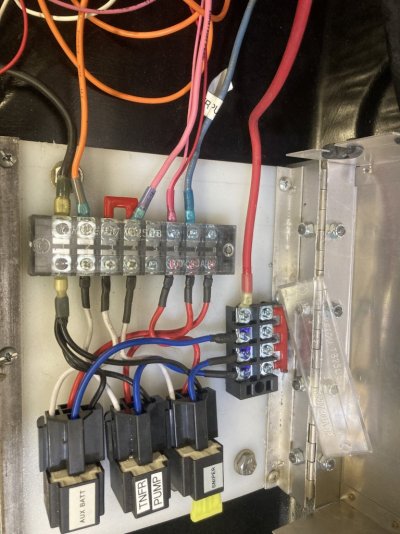
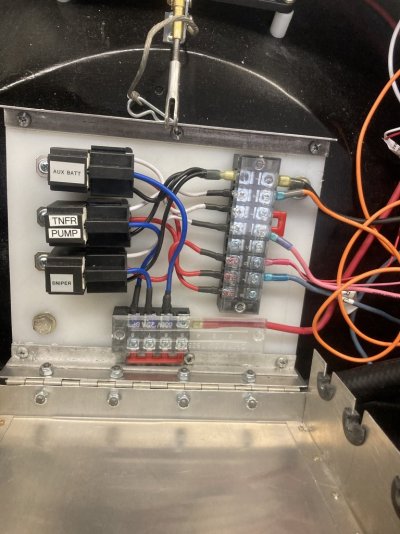
This gets small bolts nuts and washers and mounts to the section of mud flap.
See how it has holes above and below the covers? This style allows to you break away the lower cut outs, and wires come up from underneath. It's called a drip.
Mine does not have the plastic covers. You can use the covers or eliminate them with my design. You'll see later, when using the fuses I selected for the big battery wires, why the covers just get in the way...
The buss I used is rated for 600A and it came from SkyCraft, in Orlando... it came with 4 smaller screws for crimp on circle lugs. They are mounted on the outer edges of a much thicker aluminum buss block, than the one pictured, but this one will work too, with some mods... or by adding the smaller screw block in addition to this one, on your mud flap...
(Not shown.) for 10-16ga wires, to attach.
Main power feed to the battery and minor circuits 3/8" lugs. This setup, will feed dual batteries, your charging controller and your winch power feed, nicely.
I used one of the 23/8" lugs to make a home run to another power block on the driver's side rear fender wall. It has relays and 8ga power feed so the rear blazer window runs off relays with fat power to the fuel pump and rear window.
The old window power home run wires now run low voltage and only activate the relays on pin 35. All my relays, use fly back protection, with resistors and Zenor diodes soldered in... But that is another thread...
Used marine grade ice cube fuses on 2 ga and 4 ga battery wires to power the buss and smaller in line wired fuses with water protective fuses spliced everywhere else.
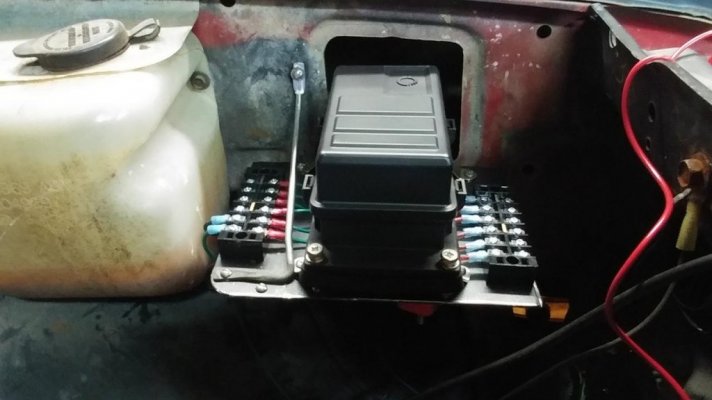
You must be registered for see images attach
You must be registered for see images attach
These hang from the buss bar.
They sell a similar unit with 2 cube fuses on it too.
The inner tube drapes over everything and hangs/bolts behind and down behind the mud flap. The mud flap does not contact the firewall.
The bolts to the buss bar do not touch the fire wall, because when they penetrate the mud flap, they are shielded from the wall.. by the inner tube.
Wrap around protection, folded over the top and Isolated.
In the past year, driving in tough weather, my fuses have not blown once,
...however there was more work to be done to prevent splashing...
If you've read this far, keep reading...
My advice for your install:
Remove your metal plate from under your distribution block and find an old chunk of mud flap and mount the entire system virtical, with a rubber or plastic open bottom shield of some sort, similar to above. Your metal plate can be used to make a flat surface where the hole behind your buss exists. Screw the plate nicely over the hole and use a grommet for your wires. You can access it later with screws.
The water will run down, if any gets up there, momentarily from your buss bar, with my design. You can silicone all the connectors under the clear plastic connector housings, as well, if you want it sealed. However, you may not need to, and it would make it harder to repair or rewire, with silicone all over the crimps...
It you are mudding and swamping, then by all means, silicone away.
The design is isolated, so the water cannot short to metal, because everything is double insulated... Triple in some instances...
How about the solder connections issue mentioned previously?...:
Silicone caulk was designed for aerospace connections to prevent moisture from building up in a space capsule.
When breathing in space, hot exhaled breath would condensate and short out the sensitive electronics.
Moisture behind the command module control panels, condensates on the freezing cold circuit boards, because the space capsule was in sub zero space. No air circulation or heated panels installed, to dry it off. They had never done this stuff before and stuff got messed up bad...
The aluminum can was frosty. Great film about when that exact problem caused a few issues getting a good guy home, if I recall..
The same thing will occur if you try to seal up your buss bar too tight, in your project.
You can cover the case with anything to hide the inner tube. Aluminum box, or plastic cover... Metal Cover can be in close proximity, so long as the inner tube is not perforated through both layers. Make it safe, then box it in for pretty.
Splash protection matters:
If you take old inner tube from the same tubes you found at the tire shop, and zip tie 36" lengths to the holes under your wheel wells, you can prevent a great deal of water from splashing into your engine bay. Saves the headers and exhaust manifolds from warping too. Cold water on your heads can't be good...
Try to hit up a tire shop for those big, 12" wide innter tubes, after they rip them out of a tractor with 5-1/2' tires. They just throw them away anyways, but they make great wheel well splash guards. Notch for your shocks and brake lines accordingly.
Be prepared to change it a few times, until yours look cool, straight, flush, cut correctly...
Nothing is really water proof. If there's air space, there's moisture in the box, period. Water Resistance is all we can achieve, without a vacuum, or a layer of silicone caulk.
The screws on top of my mud flap, going into the firewall, could use a gob of silicon on each of them, to make it bullet proof.
Just make certain you leave enough wire for every connection to have this:
You must be registered for see images attach
You can get fussy and make it really nice. Crimp terminals from McMaster Carr or 3M work great.
These are for the die hard solder guys, so we don't get anyone's feathers wrinkled... Links:
McMaster Carr Solder Lined Heat Shrink Terminals
McMaster.com has good selection of heavy duty heat rated CRIMP terminals, without solder too. I try to avoid anything with thick hard plastic on the lugs.
A bag of HF shrink is cheap, just try to remember to put it on the wires before you crimp... and double or triple shrink where it might bend or become rubbed.
These are my go to:
3M Heat Shrink Ring Terminals
They are much heavier duty than the cheap crimps from overseas...
By good crimpers, like these LINK:
Ideal Terminal Lug Crimpers
I used these ^^^ same crimpers to make over 5000 crimps, per install, in several Casino and Hard Rock Corporate distributed audio/video system with zero defect... Anybody showed up with anything else, the one's they brought, got the trash bin, period.
If you select carefully at HF, you
may find one in 250 similar crimpers, which
might line up OK... Sometimes every one on the shelf is worthless.. or the handles won't move right...
For $10 bucks more the Ideal works. USA USA USA
I cannot stress enough the value of a main power disconnect switch, rated for 250-300 amps, between the battery GROUND and the BUSS_BAR.
Wrenching anywhere around my buss bar can be dangerous, if you accidentally lift a wrench up under the flap. A box covering it, would help.
Having the ability to shut off THE GROUND WIRE from every cicuit on the truck is invaluable... ecm reset, testing circuitry, theft protection... Mount it under the hood and use it often, is my program. Buy the best quality switch you can afford, without the plastic handles... they brake and fall out.
Be great to see what you do to protect your system.
I have not built a box for mine, because it doesn't matter to me.
The sides of the inner tube could have been laced up to make the flap permanent, but then would not have been able to access it when a fuse goes (or to take these pictures).
Hope this was helpful to somebody...