Turbo 350 Disassembly

Disclaimer: Links on this page pointing to Amazon, eBay and other sites may include affiliate code. If you click them and make a purchase, we may earn a small commission.

HotRodPC

Administrator
Staff member
Admin
Joined
Aug 29, 2010
Posts
47,014
Reaction score
9,009
Location
OKC, OK
First Name
HotRod
Truck Year
85 K20 LWB
Truck Model
Silverado
Engine Size
454 - Turbo 400 - 3.73
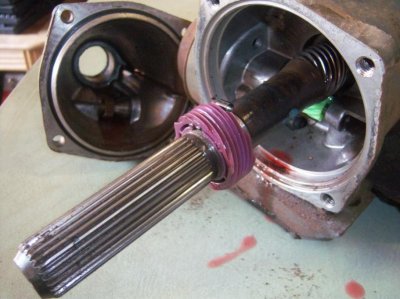
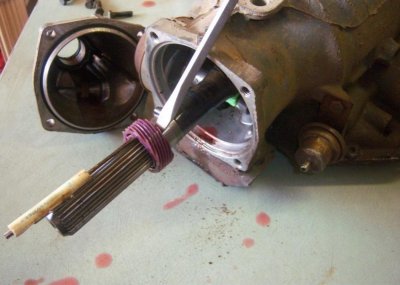
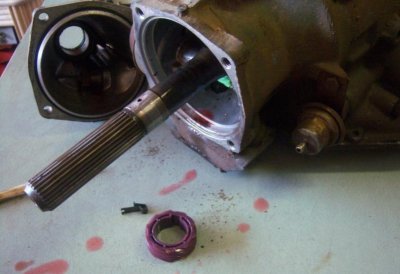
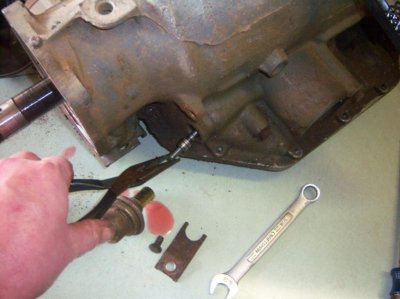
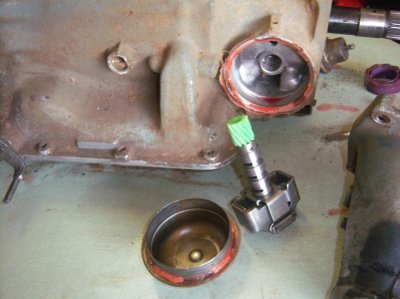
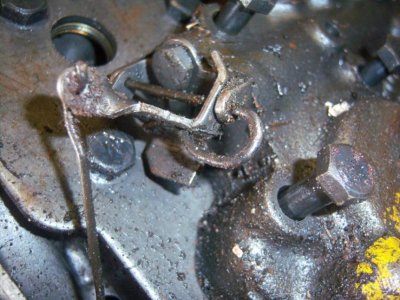
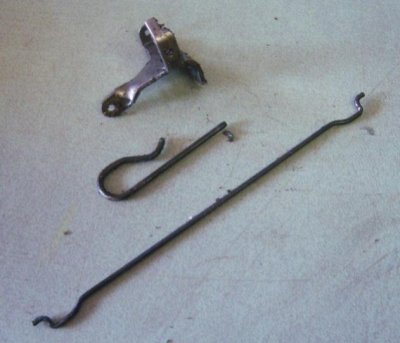
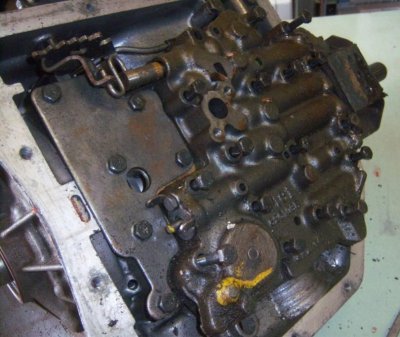
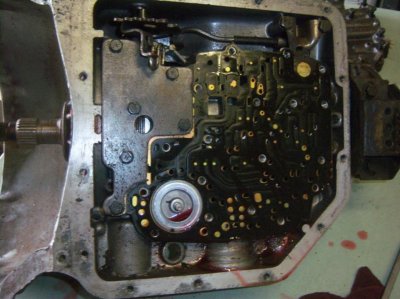
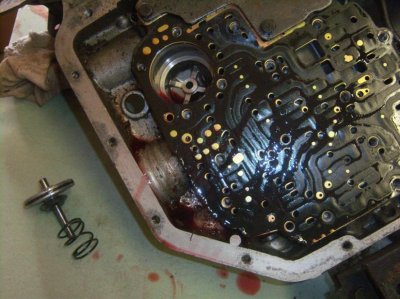
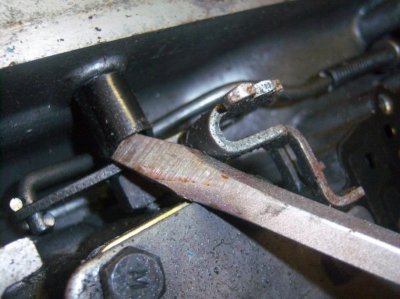
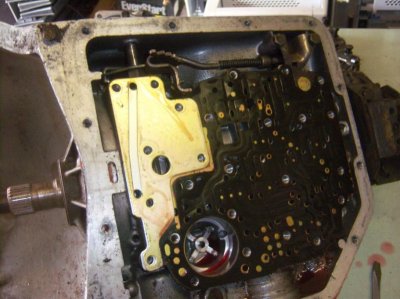
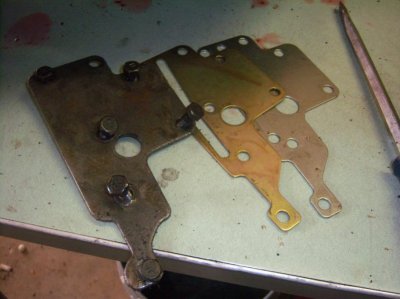
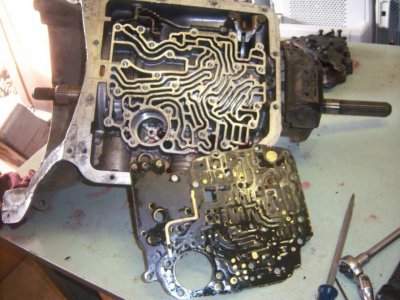
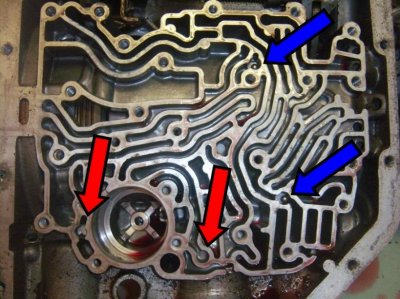
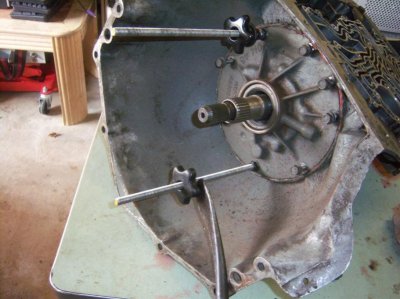
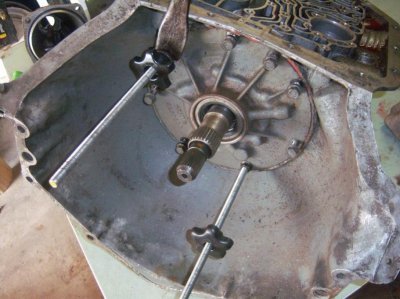
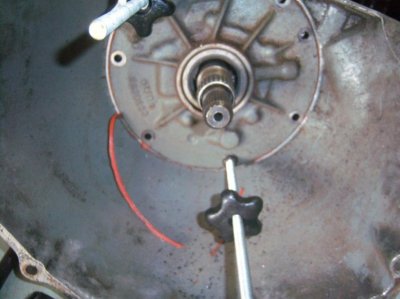
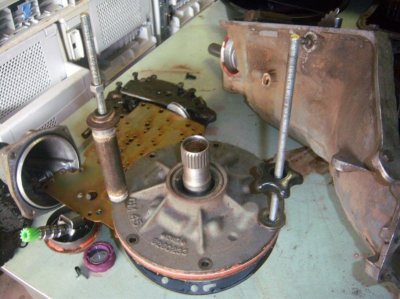
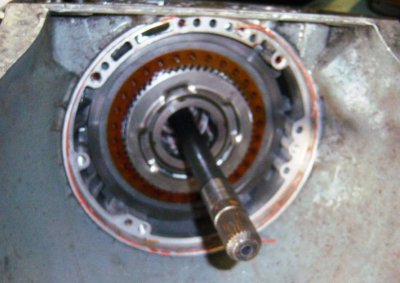
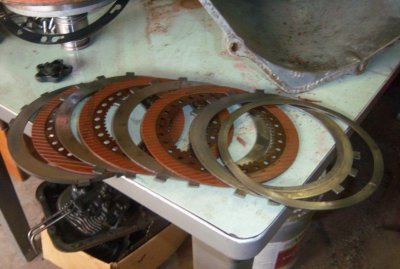
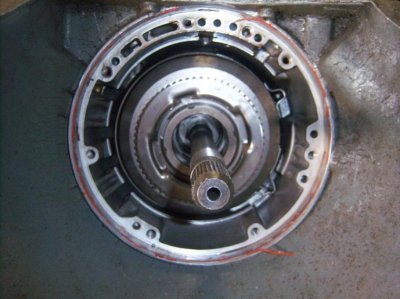
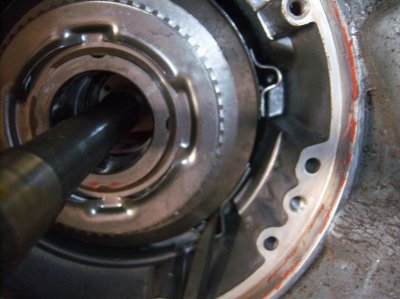
As many of you were aware. I am building a TH350 for my brothers El Camino. I tore his core apart and didn't like a few things about his case, where it has been previously cut and shaved and weakening the bell housing area. So, I have to donate him one of my Th350 cores and this time, no longer in any kind of hurry, decided to take some pics and post up a thread that might be helpful to some of you.

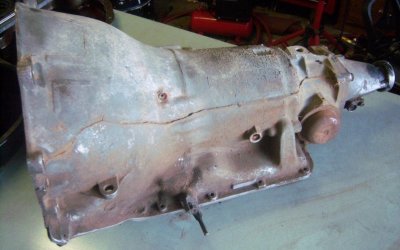
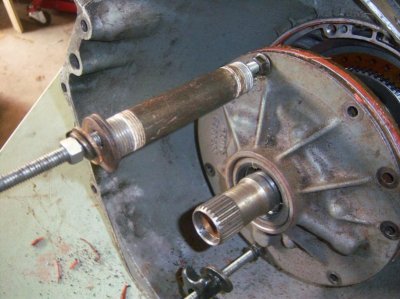
This paticular core I bought for $20. You'll see later why I decided to buy it. It is a short tail shaft of 6in and appears to be a passenger car transmission but was taken out of a 70 Chevy Pickup.

attachment.php
 

Attachments

  • th350 004.jpg
    th350 004.jpg
    86.1 KB · Views: 1,236

HotRodPC

Administrator
Staff member
Admin
Joined
Aug 29, 2010
Posts
47,014
Reaction score
9,009
Location
OKC, OK
First Name
HotRod
Truck Year
85 K20 LWB
Truck Model
Silverado
Engine Size
454 - Turbo 400 - 3.73
When I purchased this transmission, it did not come with a trans pan. The guy used his pan on the transmission that he replaced and put back into his truck.

Normally, frist thing I like to do it tilt the transmisison to drain as much fluid as possible out of the transmission thru the tailshaft into a bucket or drainpan. Not necessary here since the pan had already been removed.

Next thing I like to do is remove all the externals of the transmission including tailshaft housing, governor cover, detent cable, vacuum modulator and accumulator cover.

Using a 9/16 socket remove the 4 tailshaft housing bolts.
attachment.php


Now is a good time to also remove the speedometer driver gear becasue the tailshaft isn't coming out of the case when you get to that part without the gear being removed. There is a speical tool made to remove this gear. I have been very fortunate to never need the tool, and always been able to get the gear off without damaging the gear. Some transmissions have a steel gear, and you will need the tool since its about like being pressed on and doesn't come off easily. You'll notice I use a small screwdriver to compress the keeper, then I use a much bigger screwdriver to tap the gear off with the palm of my hand, or a small hammer tapping it lightly not to damage the gear. And I do this closest to the output shaft as possible, where the gear has most of its meat and strength.
attachment.php


Here is what the output shaft, speedo gear and speedo gear retainer look like after being taken off.
attachment.php
 

Attachments

  • th350 010.jpg
    th350 010.jpg
    81 KB · Views: 1,650
  • th350 013.jpg
    th350 013.jpg
    64.1 KB · Views: 1,381
  • th350 014.jpg
    th350 014.jpg
    54.5 KB · Views: 1,222
Last edited:

HotRodPC

Administrator
Staff member
Admin
Joined
Aug 29, 2010
Posts
47,014
Reaction score
9,009
Location
OKC, OK
First Name
HotRod
Truck Year
85 K20 LWB
Truck Model
Silverado
Engine Size
454 - Turbo 400 - 3.73
Next, using a 1/2 socket or wrench, remove the bolt holding the vacuum modulator retainer in place. Once this bolt is removed, pull the modulator out of the case along with its O ring seal. Using needle nose pliers, pull the vacuum modulator vavle out of the case.
attachment.php


To removed the governor cover, use a screwdriver to pop the spring clip off the cover. Not pictured here because it was not included, but it's very simple to figure out without need of a pic. Then I use a medium sized flat screwdriver or chisel, and lightly tap around the cover, prying the cover out of the case. Notice here the seal that goes around the cover is not there, and some idiot used RTV silicone instead, making it tougher than normal to get the cover off. After the cover is removed, simply pull the governor out the case. Now is a good time to inspect the gear teeth for damage, and make the valve in the governor is moving freely. If not, you will need to acquire another governor for your build.
attachment.php
 

Attachments

  • th350 016.jpg
    th350 016.jpg
    65.2 KB · Views: 1,400
  • th350 020.jpg
    th350 020.jpg
    75.3 KB · Views: 1,475
Last edited:

HotRodPC

Administrator
Staff member
Admin
Joined
Aug 29, 2010
Posts
47,014
Reaction score
9,009
Location
OKC, OK
First Name
HotRod
Truck Year
85 K20 LWB
Truck Model
Silverado
Engine Size
454 - Turbo 400 - 3.73
Fast forwarding a bit, since I did not get pics of the accumulator removal on the passenger side of the transmission, or the detent cable. The detent cable is easily removed with either a 3/8 or 7/16in socket depending on the size of the bolt used, I have seen both used, then pull the cable out, and disconnect its link from the detent cable link. Be sure to lay the cable somewhere out of the way, so it does not get damaged or kinked if you intend to reuse it. The accumular cover can be removed by inserting a pointed awl or pick into a side hole, then prying the snap ring out of the case. I'll be sure to show this process on assembly. Also note, the accumulator not being removed at this point will not keep the transmission from coming apart. So it can be taken out and inspected even after you have built the transmisison. You only remove it inspect the accumulator spring and replace the O ring, which is very rare to leak anyway.
 

HotRodPC

Administrator
Staff member
Admin
Joined
Aug 29, 2010
Posts
47,014
Reaction score
9,009
Location
OKC, OK
First Name
HotRod
Truck Year
85 K20 LWB
Truck Model
Silverado
Engine Size
454 - Turbo 400 - 3.73
Now with all the externals removed. Its time to roll the transmisison over, pan facing up. Remove the pan. As I said, this transmission did not have a pan on it when I bought it as a core. So you can see alot of dirt and debris on the valve body and filter. Now is also a good time to remove the filter using a wide blade standard screwdriver.
attachment.php


As I mentioned earlier, the reason I bought this transmission, is because I could tell by looking at the valve body that it had a shift kit installed in it. I knew this because I could see the gold valve body plate, and the transfer plate which a Turbo 350 needs to increase fluid pressure in the proper area of the transmssion. The shift kit alone if its the one I am thinking it is, is $35-$45 or so itself depending on where you get it. I assumed this was a B&M Shift Improver Kit, since B&M used gold color plates and TransGo usually used Black plates. If it was stock, it would not have had the transfer plate at all and used a standard steel seperator plate.
attachment.php
 

Attachments

  • th350 024.jpg
    th350 024.jpg
    85.5 KB · Views: 1,138
  • th350 025.jpg
    th350 025.jpg
    74.1 KB · Views: 1,215
Last edited:

HotRodPC

Administrator
Staff member
Admin
Joined
Aug 29, 2010
Posts
47,014
Reaction score
9,009
Location
OKC, OK
First Name
HotRod
Truck Year
85 K20 LWB
Truck Model
Silverado
Engine Size
454 - Turbo 400 - 3.73
Next, I remove the spring loaded keeper pin to remove the detent lever and detent link that goes to the detent cable. Easily pryed out of its position using a medium size standard screwdriver.
attachment.php


This is what the detent lever, keeper pin and link look like after being removed.
attachment.php


Now down to the vavle body with the filter and detent components removed.
attachment.php
 

Attachments

  • th350 027.jpg
    th350 027.jpg
    95.4 KB · Views: 1,452
  • th350 030.jpg
    th350 030.jpg
    39 KB · Views: 1,090
  • th350 031.jpg
    th350 031.jpg
    80.5 KB · Views: 1,427

HotRodPC

Administrator
Staff member
Admin
Joined
Aug 29, 2010
Posts
47,014
Reaction score
9,009
Location
OKC, OK
First Name
HotRod
Truck Year
85 K20 LWB
Truck Model
Silverado
Engine Size
454 - Turbo 400 - 3.73
Next step will be to remove the valve body bolts and the vavle body from the case along with the manual valve that is linked with the S linkage to the manual vavle shift linkage.
attachment.php


This is what it will look like with the valve body removed.
attachment.php


Now is also a great time to pull the band servo out of the case with its pin and spring.
attachment.php
 

Attachments

  • th350 035.jpg
    th350 035.jpg
    92.2 KB · Views: 1,186
  • th350 034.jpg
    th350 034.jpg
    86.6 KB · Views: 1,095
  • th350 037.jpg
    th350 037.jpg
    94.9 KB · Views: 1,191

HotRodPC

Administrator
Staff member
Admin
Joined
Aug 29, 2010
Posts
47,014
Reaction score
9,009
Location
OKC, OK
First Name
HotRod
Truck Year
85 K20 LWB
Truck Model
Silverado
Engine Size
454 - Turbo 400 - 3.73
Now is the time I like to remove the keeper spring for the manual valve linkage. I do this now becuase I use a screwdriver to pry off of the the spacer support plate so I don't have to pry off the alluminum case itself, not to mention a much better angle before the spacer plate is removed. If you wish, you can also remove the rest of the linkage if you so choose. I chose not to. Many times you can rebuild a transmission without ever removing the manual linkage. However, I do remove it since I don't have a special tool to remove the linkage seal without removing the linkage itself. That tool is very useful if need to replace that seal while the transmission is still installed in the vehicle. I've never had the need for it, so I don't own one.

Prying up the spring loaded keeper.
attachment.php


Removed the spacer support plate bolts and removed the stock spacer plate. Now what you see if the transfer plate. Its quite obvious why this is called a transfer plate. You can see where fluid is tranfered from one place to another. A transmission without a shift kit, DOES NOT have the transfer plate, or the silver support plate underneath it.
attachment.php


Here is the 3 plates on top of the valve body spacer plate. The top plate is the only one used in a stock application. The gold and silver plates are part of the B&M Shift Improver Kit.
attachment.php
 

Attachments

  • th350 038.jpg
    th350 038.jpg
    78.4 KB · Views: 1,068
  • th350 040.jpg
    th350 040.jpg
    82.5 KB · Views: 1,270
  • th350 041.jpg
    th350 041.jpg
    66 KB · Views: 1,192

HotRodPC

Administrator
Staff member
Admin
Joined
Aug 29, 2010
Posts
47,014
Reaction score
9,009
Location
OKC, OK
First Name
HotRod
Truck Year
85 K20 LWB
Truck Model
Silverado
Engine Size
454 - Turbo 400 - 3.73
This is what the case looks like with the valve body plate removed. This plate also is part of the shift kit and why its gold. The valve body gaskets are also differant than stock vavle body gaskets. If I get a chance, I'll also post a pic of the stock plate and the B&M plate together later in the thread.
attachment.php


Also another sign a B&M shift improver kit has been installed, is that 2 check balls are not used. Notice the Red Arrows. Stock application requires check balls to be in those locations. With the shift kit, those balls are eliminated. The 2 blue arrows point to the other 2 check ball locations and they are present and used even with the shift kit. So keep that in mind. A Turbo 350 used 4 check balls for a stock OEM application.
attachment.php
 

Attachments

  • th350 043.jpg
    th350 043.jpg
    93.7 KB · Views: 1,297
  • th350 045-2.jpg
    th350 045-2.jpg
    98.1 KB · Views: 2,122

Irishman999

Full Access Member
Joined
Jul 30, 2010
Posts
6,989
Reaction score
202
Location
Safford Arizona
First Name
Jason
Truck Year
1985
Truck Model
K-1500 High Sierra
Engine Size
305
This is really neat, I am diggin this.
 

HotRodPC

Administrator
Staff member
Admin
Joined
Aug 29, 2010
Posts
47,014
Reaction score
9,009
Location
OKC, OK
First Name
HotRod
Truck Year
85 K20 LWB
Truck Model
Silverado
Engine Size
454 - Turbo 400 - 3.73
Now we are ready to remove the front pump. I failed to do so, but I usually recommend removing the front pump seal before removing the pump. Reason being, its much easier to remove the seal while its bolted into place in the transmission and held nicely. I also do not use any special seal remover tool. Its going in the trash anyway, so use a hammer and chisel and tear the seal away from the pump housing without damaging the housing itself. Its actually pretty easy to do without causing any harm.

Remove the pump bolts. You will see bolt holes that have a set of threads. This is for pump removal. You are supposed to use special tools similar to a dent puller to pull the pump out of the case. I have never used the special tools.
attachment.php

I made my own method using 3/8in all thread and wide shouldered jamb nuts to not damage the pump or the threads. Then I use large washers and a pry bar to pry off the case itself.
attachment.php


attachment.php
 

Attachments

  • th350 050.jpg
    th350 050.jpg
    84.1 KB · Views: 1,112
  • th350 054.jpg
    th350 054.jpg
    85 KB · Views: 1,032
  • th350 052.jpg
    th350 052.jpg
    91.4 KB · Views: 1,096

HotRodPC

Administrator
Staff member
Admin
Joined
Aug 29, 2010
Posts
47,014
Reaction score
9,009
Location
OKC, OK
First Name
HotRod
Truck Year
85 K20 LWB
Truck Model
Silverado
Engine Size
454 - Turbo 400 - 3.73
So for the first time ever, I am thinking my home made pump puller all thread tools are not going to work for me. After struggling with it, unlike usual, I look a little closer and realize, whatever Dilbert Dumbshit put this transmission together, used RTV on the pump too. All round the outer edge, and a solid bead around the front of the pump. So I cleaned what I could off with a razor knife, and had to do a little more improvising to my all thread tools to where I could pry a little harder and not damage anything. Finally, it worked and I got the pump off without doing any damage.. Thankfully !!!
attachment.php

attachment.php

attachment.php
 

Attachments

  • th350 055.jpg
    th350 055.jpg
    61.5 KB · Views: 1,031
  • th350 057.jpg
    th350 057.jpg
    86.6 KB · Views: 1,106
  • th350 059.jpg
    th350 059.jpg
    83.1 KB · Views: 963
Last edited:

HotRodPC

Administrator
Staff member
Admin
Joined
Aug 29, 2010
Posts
47,014
Reaction score
9,009
Location
OKC, OK
First Name
HotRod
Truck Year
85 K20 LWB
Truck Model
Silverado
Engine Size
454 - Turbo 400 - 3.73
Sorry for the lousy out of focus pic here. I was still pissed off about the idiot who used RTV silicone on the front pump.

So this is what the transmission looks like with the front pump removed. Because the apply piston for the intermediate clutch pack is actually on the back side of the pump, what you see here is the intermediate clutch pack on the outer sprag race aka roller clutch.
attachment.php


This is the intermediate clutch pack removed from the case. Starting from left to right. The pressure plate, clutch, steel seperator, clutch, steel seperator, clutch, steel seperator, and finally wave spacer ring that the actual apply piston on the back of the pump engages with to apply this clutch pack.
attachment.php
 

Attachments

  • th350 060.jpg
    th350 060.jpg
    65.8 KB · Views: 1,098
  • th350 062.jpg
    th350 062.jpg
    63.9 KB · Views: 1,014

Irishman999

Full Access Member
Joined
Jul 30, 2010
Posts
6,989
Reaction score
202
Location
Safford Arizona
First Name
Jason
Truck Year
1985
Truck Model
K-1500 High Sierra
Engine Size
305
Have you ever tried using like a flat bar on the belhousing with the spinners on the outside of that?

The clutch pack is cool, it looks exactly like a motorcycle clutch and also the same design is used by Caterpillar for the brakes on their haul trucks.
 
Last edited:

HotRodPC

Administrator
Staff member
Admin
Joined
Aug 29, 2010
Posts
47,014
Reaction score
9,009
Location
OKC, OK
First Name
HotRod
Truck Year
85 K20 LWB
Truck Model
Silverado
Engine Size
454 - Turbo 400 - 3.73
So now that we have the intermediate clutch pack removed, what we are looking at is the direct clutch drum and the input shaft.
attachment.php

The input shaft is actually connected to the forward clutch drum which is behind the direct clutch drum. Those 2 drums will come out as 1 assembly, but first, you must remove the band. To remove the band, use a screwdriver to lift the band anchor over the case lugs that hold the band in its place. Once you do that, you should be able pull the band out of the case.
attachment.php
 

Attachments

  • th350 063.jpg
    th350 063.jpg
    78.9 KB · Views: 1,017
  • th350 064.jpg
    th350 064.jpg
    69.9 KB · Views: 1,073

Forum statistics

Threads
42,071
Posts
908,425
Members
33,547
Latest member
Cheify
Top