Suburban Convertible

Disclaimer: Links on this page pointing to Amazon, eBay and other sites may include affiliate code. If you click them and make a purchase, we may earn a small commission.

SpeeedRacer62

Full Access Member
Joined
Mar 7, 2015
Posts
72
Reaction score
68
Location
Fredericksburg, VA
First Name
Chris
Truck Year
1986
Truck Model
Suburban C20
Engine Size
454
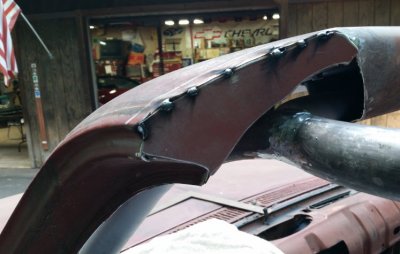
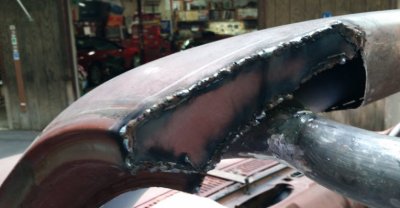
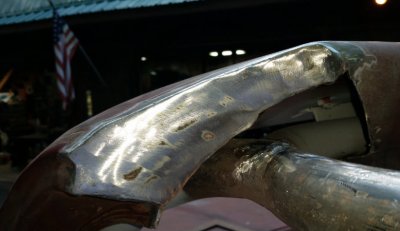
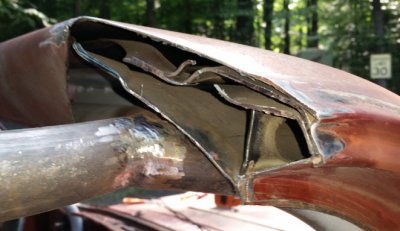
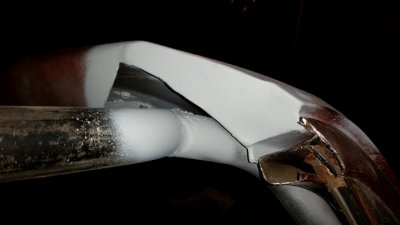
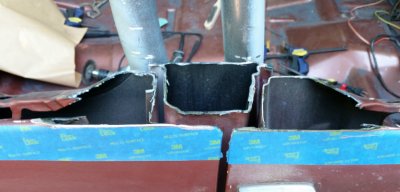
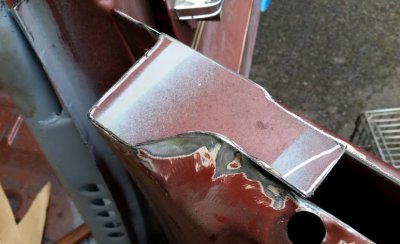
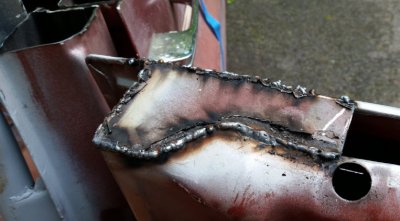
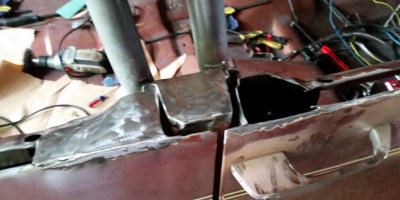
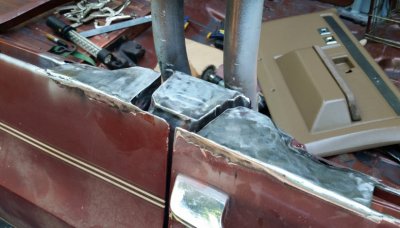
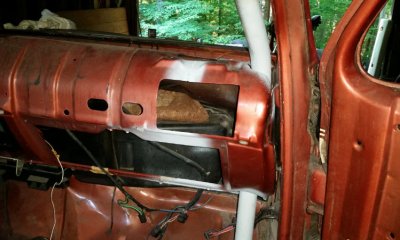
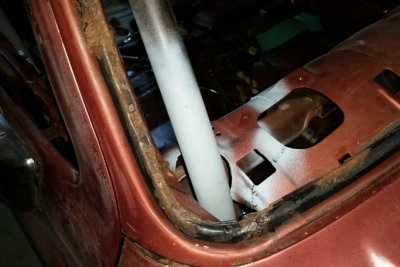
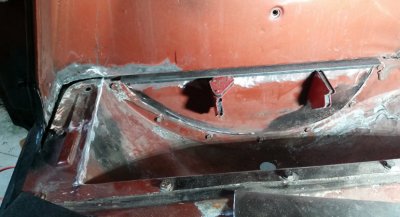
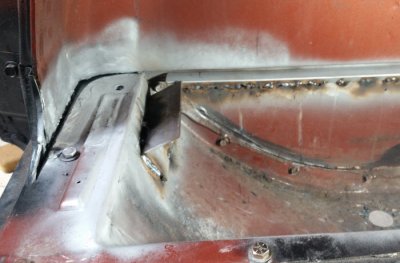
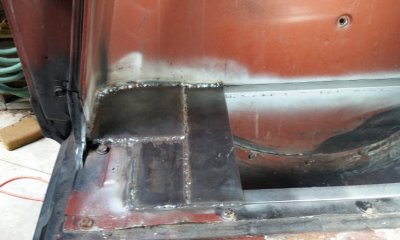
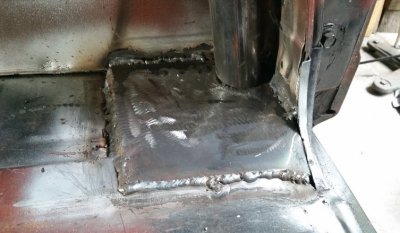
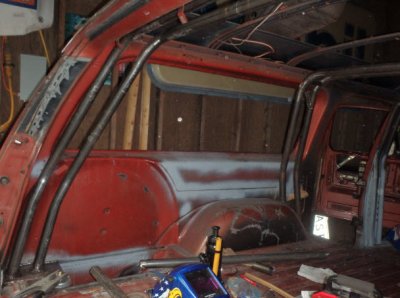
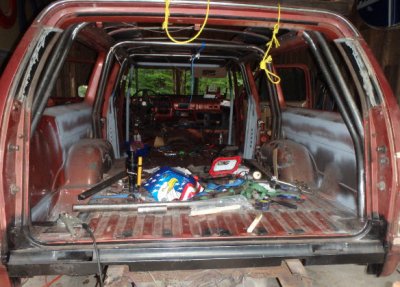
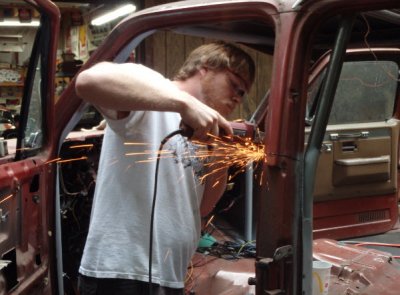
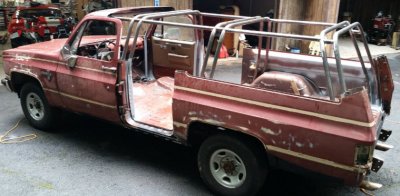
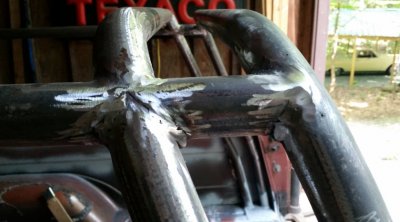
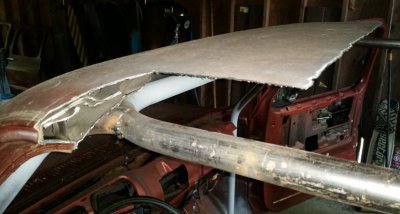
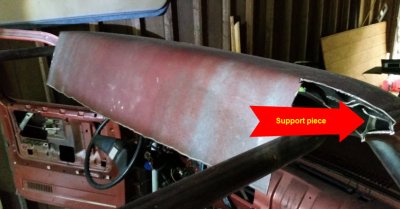
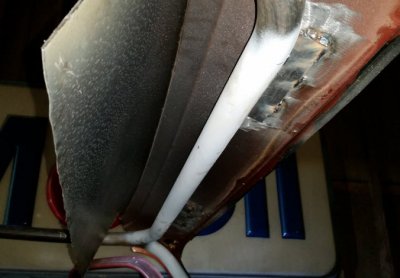
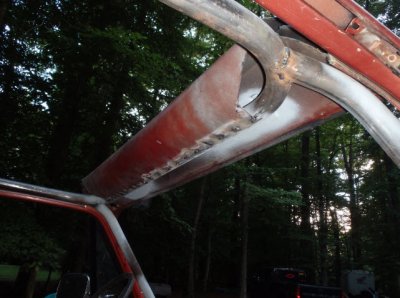
Today I worked on fabricating a suitable mounting pad for 2 hoops on the driver side, rear of the wagon. As you know the spare tire well is there. I had plans to keep it, but wanted to stay with the dual hoop theme. First I cut 2 sections of 1" angle and welded them along the inner quarter and the inner tire tub. Then I cut 2 sections of 1/8" x 3" and fitted them to the rear of the opening. Then I trimmed down my 6"x6"x1/8" plate to lay in the corner. Next I welded a small run of 2" angle to the tub. This will give the upper plates additional support. After that I welded it all up. I'll smear seam sealer everywhere before bed lining the interior. The Pass side was much easier.

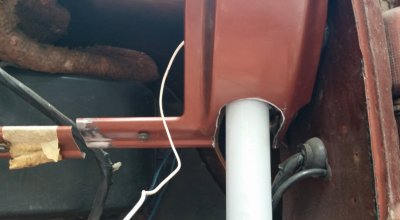
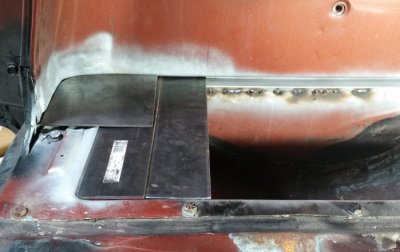
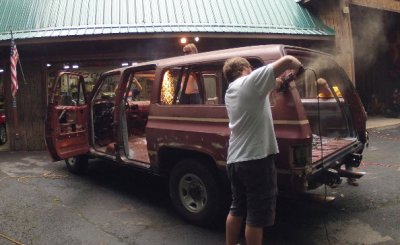
As for the rest of the tub opening, I've got some diamond plate that I'll mount with a hinge and make that area a lockable storage compartment.
 

Attachments

  • tub1.jpg
    tub1.jpg
    74.4 KB · Views: 134
  • tub2.jpg
    tub2.jpg
    62.3 KB · Views: 128
  • tub3.jpg
    tub3.jpg
    60.2 KB · Views: 159
  • tub4.jpg
    tub4.jpg
    57 KB · Views: 125
  • tub5.jpg
    tub5.jpg
    58.1 KB · Views: 138

SpeeedRacer62

Full Access Member
Joined
Mar 7, 2015
Posts
72
Reaction score
68
Location
Fredericksburg, VA
First Name
Chris
Truck Year
1986
Truck Model
Suburban C20
Engine Size
454
Yesterday I fabricated and welded in the pass side mounting pad for the rear most hoop. Then I tried to put a fancy bend on the first hoop. It doesn't look too bad. I hope to make the second rear hoop tomorrow and cut this roof off over the holiday weekend/ Happy 4th everyone!
 

Attachments

  • rear2.jpg
    rear2.jpg
    77.2 KB · Views: 122
  • rear1.jpg
    rear1.jpg
    93.3 KB · Views: 131

SpeeedRacer62

Full Access Member
Joined
Mar 7, 2015
Posts
72
Reaction score
68
Location
Fredericksburg, VA
First Name
Chris
Truck Year
1986
Truck Model
Suburban C20
Engine Size
454
Yesterday I finished mocking up the rear set of hoops and connectors and finished welding them in.
 

Attachments

  • rear10.jpg
    rear10.jpg
    63.9 KB · Views: 137
  • rear11.jpg
    rear11.jpg
    90.3 KB · Views: 138

SpeeedRacer62

Full Access Member
Joined
Mar 7, 2015
Posts
72
Reaction score
68
Location
Fredericksburg, VA
First Name
Chris
Truck Year
1986
Truck Model
Suburban C20
Engine Size
454
On Sunday we added a few gussets to tie some hoops to the rear body panels. Once done we pulled the wagon out of the garage so that we could attack it from all angles. Using cut off wheels, saws all and a plasma cutter my boys and I started to surgically remove the roof. We made cut lines above what will be the final height of each cut. It went fairly smooth and took about 20 minutes.
 

Attachments

  • top1.jpg
    top1.jpg
    62.5 KB · Views: 154
  • top2.jpg
    top2.jpg
    92.5 KB · Views: 165
  • top3.jpg
    top3.jpg
    67.2 KB · Views: 160
  • top4.jpg
    top4.jpg
    50.8 KB · Views: 152
  • top5.jpg
    top5.jpg
    77.8 KB · Views: 155

SpeeedRacer62

Full Access Member
Joined
Mar 7, 2015
Posts
72
Reaction score
68
Location
Fredericksburg, VA
First Name
Chris
Truck Year
1986
Truck Model
Suburban C20
Engine Size
454
Here are the initial pics with the top off. Obviously I still need to chop the door tops off, finish cutting towards the windshield then capping the body where the roof used to reside.

Still a ways to go before shes ready for the road. A few more rust repairs, bed-lining or using lizard skin on the interior walls and floor, repainting the outside a 2 tone orange and white and making new white upholstery using marine grade vinyl.
 

Attachments

  • bare1.jpg
    bare1.jpg
    89.9 KB · Views: 170
  • bare2.jpg
    bare2.jpg
    73.5 KB · Views: 153
  • bare3.jpg
    bare3.jpg
    82.9 KB · Views: 159

SpeeedRacer62

Full Access Member
Joined
Mar 7, 2015
Posts
72
Reaction score
68
Location
Fredericksburg, VA
First Name
Chris
Truck Year
1986
Truck Model
Suburban C20
Engine Size
454
Yesterday I spent time grinding down some of my ugly welds on the roll cage. I also welded the top of the windshield frame to the front halo bar using 2 pieces of angle iron. After that I got to work on trimming up the A pillar. I wanted to cut it flush with the top of the doors where the vent window ends. However I found there's a heavy piece of support metal between the roof support panels and the door jamb pinch weld. I thought it would be best to leave that alone, so I cut just to the rear of it. Then I took the remaining sheet metal roof panel and slowly bent it downward. I plan on putting some dimpled holes in this piece then welding it to the halo bar. Should look trick.
 

Attachments

  • ap1.jpg
    ap1.jpg
    55.7 KB · Views: 142
  • ap2.jpg
    ap2.jpg
    67.4 KB · Views: 141
  • ap3.jpg
    ap3.jpg
    71.3 KB · Views: 141
  • ap4.jpg
    ap4.jpg
    68.6 KB · Views: 167
  • ap5.jpg
    ap5.jpg
    53 KB · Views: 166

Old77

Administrator
Staff member
Admin
Joined
Aug 19, 2010
Posts
28,261
Reaction score
8,729
Location
Kansas City, Mo
First Name
Jacob
Truck Year
1977/1990/1991
Truck Model
C10 longbed/R1500 Burb/R3500 Dually
Engine Size
350/350/454
wow....a lot of progress being made the last couple of weeks! I'm anxious to see how this turns out.
 

SpeeedRacer62

Full Access Member
Joined
Mar 7, 2015
Posts
72
Reaction score
68
Location
Fredericksburg, VA
First Name
Chris
Truck Year
1986
Truck Model
Suburban C20
Engine Size
454
Today I worked on tying the roof panel to the halo bar. I had planned to drill and dimple this piece but I didnt have anything strong enough to press the dimple die while it was still on the truck. So I punted and decided to wrap the old roof panel around the inner structure and weld it to the halo. It took a lot of pushing to get that thick metal to bend, but it did so smoothly and Im happy with the result.

I went ahead and wacked the front upper doors. I hung the rear doors next and wacked them too. It looks totally different with everything cut at the lower window line.
 

Attachments

  • roof1.jpg
    roof1.jpg
    82.3 KB · Views: 168
  • roof2.jpg
    roof2.jpg
    59.9 KB · Views: 169
  • roof3.jpg
    roof3.jpg
    54.6 KB · Views: 177

SpeeedRacer62

Full Access Member
Joined
Mar 7, 2015
Posts
72
Reaction score
68
Location
Fredericksburg, VA
First Name
Chris
Truck Year
1986
Truck Model
Suburban C20
Engine Size
454
wow....a lot of progress being made the last couple of weeks! I'm anxious to see how this turns out.
Me too Old77, very anxious to get her on the road. Hey I read your thread on your '87 and I am very interested in your lowering kit. I saw that you dropped 5/5" with the Western Chassis pieces. I went to their website and didn't see that option. Did you have something done special with them?
 

Old77

Administrator
Staff member
Admin
Joined
Aug 19, 2010
Posts
28,261
Reaction score
8,729
Location
Kansas City, Mo
First Name
Jacob
Truck Year
1977/1990/1991
Truck Model
C10 longbed/R1500 Burb/R3500 Dually
Engine Size
350/350/454
Me too Old77, very anxious to get her on the road. Hey I read your thread on your '87 and I am very interested in your lowering kit. I saw that you dropped 5/5" with the Western Chassis pieces. I went to their website and didn't see that option. Did you have something done special with them?

No, you just have to piece it together. For the rear is just did their leaf springs. They advertise them as giving you a 4" drop but it actually dropped the rear of mine 5". Then for the front I did their drop spindles along with front coil springs. I ended having to cut a coil out of each spring in order to get the desired drop I was looking for up front. She rides pretty good, too. :)
 

SpeeedRacer62

Full Access Member
Joined
Mar 7, 2015
Posts
72
Reaction score
68
Location
Fredericksburg, VA
First Name
Chris
Truck Year
1986
Truck Model
Suburban C20
Engine Size
454
The other day I fabricated some pieces to cap the top of the A pillars. After some cutting and grinding I first tacked them into place. Next I welded them up, followed by some smooth grinding and a fresh coat of primer.
 

Attachments

  • ap1.jpg
    ap1.jpg
    61.5 KB · Views: 168
  • ap2.jpg
    ap2.jpg
    50.3 KB · Views: 144
  • ap3.jpg
    ap3.jpg
    57.4 KB · Views: 170
  • ap4.jpg
    ap4.jpg
    55.7 KB · Views: 162
  • ap5.jpg
    ap5.jpg
    34.1 KB · Views: 155

SpeeedRacer62

Full Access Member
Joined
Mar 7, 2015
Posts
72
Reaction score
68
Location
Fredericksburg, VA
First Name
Chris
Truck Year
1986
Truck Model
Suburban C20
Engine Size
454
Yesterday I took out the pass vent window to replace the rusted frame that holds the glass. Its both rusted and the stud that it rotates on was broken. While those blasted and painted parts dried I started capping the B pillar and the doors on the pass side. Transfered some paper templates to some sheet metal, cut , weld and grinding them smooth. I plan on welding up the entire top edges of all the doors (all glass guts have been removed).
 

Attachments

  • vent01.jpg
    vent01.jpg
    93.8 KB · Views: 136
  • vent3.jpg
    vent3.jpg
    66.9 KB · Views: 130
  • vent4.jpg
    vent4.jpg
    69.8 KB · Views: 152
  • vent5.jpg
    vent5.jpg
    68.4 KB · Views: 132
  • vent6.jpg
    vent6.jpg
    69.9 KB · Views: 130

SpeeedRacer62

Full Access Member
Joined
Mar 7, 2015
Posts
72
Reaction score
68
Location
Fredericksburg, VA
First Name
Chris
Truck Year
1986
Truck Model
Suburban C20
Engine Size
454
Today I finished up the B pillar and the 2 doors that meet there. Still will fill in the rest of the door tops. Then I welded in the pass side of the dash that I cut out so I could get the halo support close to the A pillar. Had to do a lil trimming to make it fit, but looks great I think.
 

Attachments

  • cap1.jpg
    cap1.jpg
    82.6 KB · Views: 142
  • cap3.jpg
    cap3.jpg
    49.3 KB · Views: 137
  • cap4.jpg
    cap4.jpg
    86.2 KB · Views: 135
  • cap5.jpg
    cap5.jpg
    67 KB · Views: 134

Christian Nelson

Full Access Member
Joined
Sep 8, 2011
Posts
296
Reaction score
34
Location
Wisconsin
First Name
Christian
Truck Year
77
Truck Model
K15
Engine Size
400
Great work, but all I can say about it is, you obviously don't have REAL winters where you come from.. LOL..

We would only be able to use that truck for about 3 months, half of that would be rainy and wet...
 

Georgeb

Full Access Member
Joined
Apr 30, 2015
Posts
3,259
Reaction score
214
Location
Wisconsin
First Name
George
Truck Year
2003
Truck Model
K10 Burb Z71
Engine Size
5.3
Great work, but all I can say about it is, you obviously don't have REAL winters where you come from.. LOL..

We would only be able to use that truck for about 3 months, half of that would be rainy and wet...

Lol except for us crazies that go Ice fishing! This would be an awesome ice ride!
 

Latest posts

Forum statistics

Threads
42,110
Posts
909,342
Members
33,601
Latest member
rumpity_z28
Top