Rust Repair Under Molding/Trim

Disclaimer: Links on this page pointing to Amazon, eBay and other sites may include affiliate code. If you click them and make a purchase, we may earn a small commission.

1980 Big Ten

Full Access Member
Joined
Jul 1, 2018
Posts
75
Reaction score
70
Location
Virginia
First Name
Darren
Truck Year
1980
Truck Model
C10 Big 10
Engine Size
350
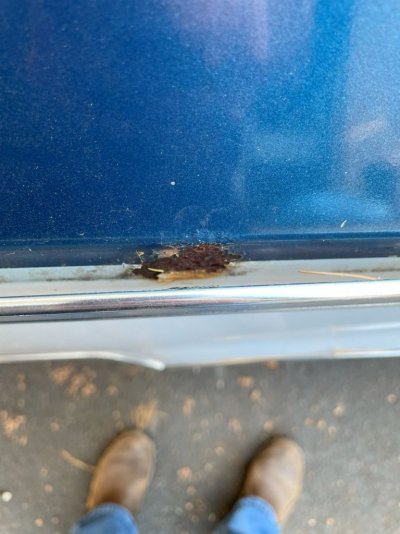
Today I launched a project to repair minor rust under the bedside molding on my 1980. The stickers holding the molding started to pull away from the bedside and pulled the paint with them, causing rust underneath. Pic attached. I found pitting but no weak metal and no holes. I'll document the project here in case anyone wants to help me learn by providing feedback and in case it helps anyone else.

I'll preface by saying that I'm tackling this project in my driveway, in the cold, and as time allows. Not ideal for sure, but rust waits for no man.

Today started with a run to Napa for advice and to pick up a bottle of Permatex Rust Treatment to use on any micro-rust that the sandpaper can't remove. Napa sent me across town to BAPS Auto Paints & Supply for more advice and more options since Napa didn't have any epoxy primer in stock. The BAPS manager came outside to look at the truck and take color readings of the blue and white paints. They sold me an epoxy primer aerosol.

First step was sanding to bare metal. I used 2" sanding discs with a sponge backing, attached to my drill. 80-grit paper made quick work of it. I cleared to about 1/2" of bare metal around the rust spots. Not sure if that'll give me enough room to work with the filler, so I might go back and clear some more before I get to that stage.

Next step was to apply the Permatex Rust Treatment. Bottle says the temp needs to be above 50 degrees, so I gently used my heat gun to warm the bedside before applying. I poured the rust treatment into a small container, applied with a small brush to the bare metal, and repeated after about 20 minutes.

Next steps tomorrow are to lightly sand to remove any flash rust and then apply the primer. No rain in the forecast.
 

Attachments

  • 323569-e81bcf81eeff33ab2ec4195a89301806.jpg
    323569-e81bcf81eeff33ab2ec4195a89301806.jpg
    37.6 KB · Views: 40
Last edited:

MarineOne

Full Access Member
Joined
Jan 12, 2023
Posts
440
Reaction score
451
Location
Western New York
First Name
David
Truck Year
1986
Truck Model
K25
Engine Size
454
Epoxy is okay but will work like complet dog **** in the cold especially a 1k

I highly recommend etching primer it will chemicaly bond to the steel where epoxy is only a mechanical bond
 

1980 Big Ten

Full Access Member
Joined
Jul 1, 2018
Posts
75
Reaction score
70
Location
Virginia
First Name
Darren
Truck Year
1980
Truck Model
C10 Big 10
Engine Size
350
Epoxy is okay but will work like complet dog **** in the cold especially a 1k

I highly recommend etching primer it will chemicaly bond to the steel where epoxy is only a mechanical bond
Grateful for this recommendation. I didn't see it until after today's work. I don't disagree. I spent a lot of time considering etching primer. The reason I didn't go with it is that etching primer apparently can cause problems with overspray on the surrounding paint. If etching primer came in a brush-on application, then I probably would have gone with it. If it already does come in a brush-on application, then shame on me. UPDATE: I suppose I could have just sprayed it into a small container and then brushed it on. More proof that I'm an idiot. Oh well--live and learn.
 
Last edited:

1980 Big Ten

Full Access Member
Joined
Jul 1, 2018
Posts
75
Reaction score
70
Location
Virginia
First Name
Darren
Truck Year
1980
Truck Model
C10 Big 10
Engine Size
350
UPDATE: Today started with applying a Simple Green Crystal cleaner/degreaser solution with a microfiber towel, followed by 320-grit 2" discs on the drill with the foam pad underlayment. In hindsight, I should have gone to the store for 320-grit sheets to use with a foam sanding bloc. I think the result would have been a more even finish without the swirls.

The point of the sanding was two-fold: (1) knock down the Permatex Rust Treatment that had had formed bubbles and ridges from the brush-on application; and (2) feather the surrounding paint to prep for primer. Sanding the Permatex sucked because it gummed up the sanding discs and I had to change frequently. I'm bracing myself for the same thing happening when I go to sand the 1k epoxy primer. Oh well.

After the 320-grit on the drill, I sanded with 600-grit on a firm foam sanding block. Everything I read said to use 320-grit before primer, but the BAPS automotive paint store said I should just use 600. Since the rust and the color transition are on two different body panel planes, I tried to sand separately on both planes. I was pleased with the result. I thought it feathered the surrounding paint nicely. The only bumps I felt with my eyes closed were the spots with rust pitting that will need to be filled later with filler. Pics attached.

After sanding and blowing off whatever dust I could with the compressor, I cleaned the remaining dust with the Simple Green solution and another microfiber towel. Then I followed with denatured alcohol to fully clean the surface before priming. Then I taped and gently warmed the surface with a heat gun. I warmed the primer in a bath of warm water.

The primer went on nicely but had more overspray than I anticipated. Oh well. At least I didn't tape hard lines so that the primer would feather in. After one coat, I repeated the warming steps and applied the second coat. I'm pleased with the results. Pics attached.

Here are two pics after applying Permatex Rust Treatment yesterday and before sanding:
You must be registered for see images attach

Here's a pic after sanding:
You must be registered for see images attach

Here are pics after priming. You can see the pitting where I need to come back with filler. I debated whether to go with regular Bondo or glazing putty because of the small pitting. I opted for regular Bondo because I anticipate needing to fill a larger area than just the pitting so that the bedside is as straight as possible.
You must be registered for see images attach

You must be registered for see images attach
 
Last edited:

MarineOne

Full Access Member
Joined
Jan 12, 2023
Posts
440
Reaction score
451
Location
Western New York
First Name
David
Truck Year
1986
Truck Model
K25
Engine Size
454
Grateful for this recommendation. I didn't see it until after today's work. I don't disagree. I spent a lot of time considering etching primer. The reason I didn't go with it is that etching primer apparently can cause problems with overspray on the surrounding paint. If etching primer came in a brush-on application, then I probably would have gone with it. If it already does come in a brush-on application, then shame on me. UPDATE: I suppose I could have just sprayed it into a small container and then brushed it on. More proof that I'm an idiot. Oh well--live and learn.
It comes in brush on . Epoxy should be fine it's a preference thing
 

SirRobyn0

Full Access Member
Joined
Dec 6, 2019
Posts
6,742
Reaction score
11,319
Location
In the woods in Western Washington
First Name
Rob
Truck Year
1984
Truck Model
C20
Engine Size
305
@1980 Big Ten Looks like your doing good work there! I'm in no way shape or form a body or rust expert, but I have done minor to major rust repair. The worst was the roof under the vinyl top on my 77 Cadillac. So in that case I had big holes, and had to rebuild the windshield channel. But regardless of how bad the rust is, it seems to me the most important thing is to get rid of all the rust possible whether that be through sanding or chemical i.e. acid. And then sealing it up with something, primer and paint of some sort. Anything is better than nothing. But I would prefer epoxy primer, and the reason is simple. It's what I know. I have no experience with self etching. For a quickie repair I might even use (some people will shudder at this) Rust Oleum 2X primer which I think is just an enamel primer, but it's simple to use and sticks fine as long as the surface is prepped well. Anyhow looks like good work I'll be follow the thread as I want to see the finished job!
 

1980 Big Ten

Full Access Member
Joined
Jul 1, 2018
Posts
75
Reaction score
70
Location
Virginia
First Name
Darren
Truck Year
1980
Truck Model
C10 Big 10
Engine Size
350
UPDATE: I looked again at the primer that the BAPS automotive paint store recommended for my project, and I no longer think it's epoxy even though they said it is an epoxy without a hardener (i.e., not 2k). Here's a link to the actual product. I care less about whether it's epoxy than I do about the fact that I see now that it said to scuff with 240-grit before applying and I scuffed with 320-grit followed by 600-grit. I should have followed the TDS instead of blindly following the store's advice. I assume the primer doesn't form a chemical bond so now I question whether it'll have a strong enough mechanical bond to last. Second guessing sucks but it's better than willful ignorance, I suppose.

Later this week I'll have time to finish the project. I'm still working out the details but here's my rough plan, in order: clean/degrease, sand with 240-grit, blow/clean, apply another primer coat, apply filler, block with 320-grit, blow/clean, repeat filler and sanding until perfectly straight, scuff with 240-grit, blow/clean, apply final primer coat, wet sand with 600-grit, blow/clean, tape, apply 2 blue coats, tape, apply 2 white coats, apply clear, wet sand with 3000-grit, blow/clean, polish. Whew! Massive props to guys who do this for a living!

After the paint/clear cures and polish is done, my revised plan now is to re-install the original trim with magnets instead of stickers. I figure that the 2 existing clips (see holes in pic above; might add a 3rd clip above the tire) and 1 screw will keep the magnets from gradually sliding down over time. I no longer have confidence that I prepped the surface correctly to keep stickers from pulling the paint off like last time. Maybe magnets will hold without pulling away the paint.

Feedback welcome, for sure. @SirRobyn0 thanks for the kind words!
 
Last edited:

SirRobyn0

Full Access Member
Joined
Dec 6, 2019
Posts
6,742
Reaction score
11,319
Location
In the woods in Western Washington
First Name
Rob
Truck Year
1984
Truck Model
C20
Engine Size
305
@1980 Big Ten I think it'll be fine, sanding how you did is better than no sanding at all, if your really concerned take it off. It's still in the curing stages you might very well be able to get most if not all of the primer off with lacquer thinner, then sand whatever is left behind and prep by the directions, but I'd leave it as it. And I wouldn't do magnets myself, I think you'll end up either loosing the trim or scratching the paint with the magnets. What I would do is after the final paint and polish has been done I'd let it cure. In cool weather I'd let it go a month. That might be massive overkill but... And then I'd strip off any polish / wax / road grime and use 3M brand trim mounting tape. If you can use wider strips or more than 2 strips all the better, but keep in mind it took 40 years for it to cause the paint loss / rust. I think washing the truck regularly and not letting crud build up along the trim line would go along way to preventing this from happening in the future, but again I'm no paint and body expert, I'm just saying what I would do and that doesn't make it right.
 

Craig Nedrow

NADAR UNDER THE RADAR
Supporting Member
Joined
Sep 1, 2018
Posts
847
Reaction score
1,528
Location
Washington State
First Name
Craig
Truck Year
1973 (have two), 1985
Truck Model
K10, K20, C20
Engine Size
350, 454, 6.2 Detroit
I am just starting my project, wish my truck was as nice as yours. PO screwed the molding on, don’t recommend. I am going to paint my stripes on…like this:
xc_hide_links_from_guests_guests_error_hide_media
. Power nation, beautiful truch. Just for your info Darren, and it sure inspired me. Also like how you respond, grateful, wonderful.
 

Craig Nedrow

NADAR UNDER THE RADAR
Supporting Member
Joined
Sep 1, 2018
Posts
847
Reaction score
1,528
Location
Washington State
First Name
Craig
Truck Year
1973 (have two), 1985
Truck Model
K10, K20, C20
Engine Size
350, 454, 6.2 Detroit
I plan on doing mine myself, but that is a year down the road. Our trucks are very similar. I am just dissembling mine for a frame off, far, far to go, but I am learning and I look to the future when that build is done, have a few more to do, gettin' old, but not as old as Perry!
 

Latest posts

Forum statistics

Threads
42,137
Posts
909,887
Members
33,633
Latest member
satansdad
Top