2002 - 4.8L to 5.3L or should I go to a 5.7L?

Disclaimer: Links on this page pointing to Amazon, eBay and other sites may include affiliate code. If you click them and make a purchase, we may earn a small commission.

dougbert

Full Access Member
Joined
Nov 2, 2015
Posts
659
Reaction score
174
Location
5535 feet in Utah Mountains
First Name
doug
Truck Year
1984
Truck Model
K1500/nv4500/np241c/33x12.50x16/4.10 Gears 14BFF
Engine Size
5.3L - 2002 Silverado, rebuilt top end, long tube headers
Finally removed all unneeded wires from the harness

Organized what was left, put it on the test stand and connected it to the ECU. Then proceeded to lay out the various wires in the general area they will be placed
 

Attachments

  • IMG_20161012_124205_149[1].jpg
    IMG_20161012_124205_149[1].jpg
    87 KB · Views: 127
  • IMG_20161012_124209_475[1].jpg
    IMG_20161012_124209_475[1].jpg
    86.5 KB · Views: 124
  • IMG_20161012_124215_349[1].jpg
    IMG_20161012_124215_349[1].jpg
    85.8 KB · Views: 156
  • IMG_20161012_124220_742[1].jpg
    IMG_20161012_124220_742[1].jpg
    85.5 KB · Views: 156

dougbert

Full Access Member
Joined
Nov 2, 2015
Posts
659
Reaction score
174
Location
5535 feet in Utah Mountains
First Name
doug
Truck Year
1984
Truck Model
K1500/nv4500/np241c/33x12.50x16/4.10 Gears 14BFF
Engine Size
5.3L - 2002 Silverado, rebuilt top end, long tube headers
Here the harness is draped over the engine. Sensor or connector leads are slowly positioned from the ECU to their respective destinations.

Excess wire is then just allowed to drop down. Most of the wires are free and not tangled so they are easily un-threaded and lay down just fine. Some though are tangled with other wires. When I cut them I will unthread them and cut to fit.

One mess is the ground wires. Many ground contact to a single point within the harness. I am thinking I will separate them and re-bond them together later.

very interesting puzzle to un-scramble, but I have to admit, it is fun

dougbert

PS sorry for the blurry pics. I thought they worked right. Will take some in the daylight tomorrow with the bay door up
 

Attachments

  • IMG_20161012_182708_053[1].jpg
    IMG_20161012_182708_053[1].jpg
    97.2 KB · Views: 122
  • IMG_20161012_182714_379[1].jpg
    IMG_20161012_182714_379[1].jpg
    94.2 KB · Views: 116
  • IMG_20161012_182658_401[1].jpg
    IMG_20161012_182658_401[1].jpg
    94.3 KB · Views: 156
  • IMG_20161012_182725_269[1].jpg
    IMG_20161012_182725_269[1].jpg
    92.6 KB · Views: 113

dougbert

Full Access Member
Joined
Nov 2, 2015
Posts
659
Reaction score
174
Location
5535 feet in Utah Mountains
First Name
doug
Truck Year
1984
Truck Model
K1500/nv4500/np241c/33x12.50x16/4.10 Gears 14BFF
Engine Size
5.3L - 2002 Silverado, rebuilt top end, long tube headers
more wiring, circuit by circuit

shortened both coil leads, IAC, TPS, ALT, Water Temp
MAP, Knock sensor lead, CAM sensors, crank sensor, some grounds and all those are now connected to their places, with loom installed.

left to do:

fuel injectors,
key 12volt leads
a couple more grounds

MAF - since it has the incoming air temp, I left it, and will shorten its wires.
 

Attachments

  • IMG_20161015_194951_972[1].jpg
    IMG_20161015_194951_972[1].jpg
    98.6 KB · Views: 126
  • IMG_20161015_195000_319[1].jpg
    IMG_20161015_195000_319[1].jpg
    95 KB · Views: 130
  • IMG_20161015_195008_944[1].jpg
    IMG_20161015_195008_944[1].jpg
    101.3 KB · Views: 125
  • IMG_20161015_195031_283[1].jpg
    IMG_20161015_195031_283[1].jpg
    98.9 KB · Views: 135
Last edited:

dougbert

Full Access Member
Joined
Nov 2, 2015
Posts
659
Reaction score
174
Location
5535 feet in Utah Mountains
First Name
doug
Truck Year
1984
Truck Model
K1500/nv4500/np241c/33x12.50x16/4.10 Gears 14BFF
Engine Size
5.3L - 2002 Silverado, rebuilt top end, long tube headers
put final touches on wires, etc in first pic

2nd pic is the back of the control panel. Top is a fuse panel for KEYED 12v items. Enabled via a relay just below it. Relay is switched on via the toggle switch.

Below relay is the constant 12volt fuse panel. BUSSMAN fuse panels from AdvanceAuto, $10 each

3rd pic is the fuel rail test tap 7/16" x20 with schrader valve inside it

4th pic is the OTC injector cleaner tool with a ON/OFF valve for the compressed air.

5th pic is the OTC hanging by its chain
 

Attachments

  • IMG_20161017_165056_681[1].jpg
    IMG_20161017_165056_681[1].jpg
    95.6 KB · Views: 123
  • IMG_20161017_202232_521[1].jpg
    IMG_20161017_202232_521[1].jpg
    96.8 KB · Views: 128
  • IMG_20161018_174048_035[1].jpg
    IMG_20161018_174048_035[1].jpg
    93.2 KB · Views: 163
  • IMG_20161018_174105_728[1].jpg
    IMG_20161018_174105_728[1].jpg
    90.3 KB · Views: 118
  • IMG_20161018_174111_438[1].jpg
    IMG_20161018_174111_438[1].jpg
    93.8 KB · Views: 164

dougbert

Full Access Member
Joined
Nov 2, 2015
Posts
659
Reaction score
174
Location
5535 feet in Utah Mountains
First Name
doug
Truck Year
1984
Truck Model
K1500/nv4500/np241c/33x12.50x16/4.10 Gears 14BFF
Engine Size
5.3L - 2002 Silverado, rebuilt top end, long tube headers
Pic of the Bluetooth ODBII device which allows my Droid phone to connect to the ECU.

also received my LS6 intake a couple of weeks ago with fuel rails and MAP sensor
along with injectors:

12561462 - 2001-2004 5.7L LS1, LS6 - flows 3.781 gm/sec or 30lb/hr @ 58 psi

the one issue I found on it, is the rear vacuum taps and MAP holder, is loose and wiggles like there is a gap in the gasket of the same.
 

Attachments

  • IMG_20161018_180809_073[1].jpg
    IMG_20161018_180809_073[1].jpg
    86 KB · Views: 132
  • IMG_20161020_162622_059[1].jpg
    IMG_20161020_162622_059[1].jpg
    90 KB · Views: 127
  • IMG_20161020_162627_286[1].jpg
    IMG_20161020_162627_286[1].jpg
    88.6 KB · Views: 120
  • IMG_20161020_162644_478[1].jpg
    IMG_20161020_162644_478[1].jpg
    88.7 KB · Views: 121
  • IMG_20161020_162725_637[1].jpg
    IMG_20161020_162725_637[1].jpg
    96.1 KB · Views: 119
Last edited:

dougbert

Full Access Member
Joined
Nov 2, 2015
Posts
659
Reaction score
174
Location
5535 feet in Utah Mountains
First Name
doug
Truck Year
1984
Truck Model
K1500/nv4500/np241c/33x12.50x16/4.10 Gears 14BFF
Engine Size
5.3L - 2002 Silverado, rebuilt top end, long tube headers
Well today, got things wrapped on the engine test stand and started cranking the starter.

At this time I am uploading to youtube, the link is https://youtu.be/Qi21yqdbvCI

but not uploaded yet.

At first the engine would not start, then I realized the ALTERNATOR control connector was not connected. Plugged that in and the engine started up as in the video.

BUT had a very loud metalic clacking noise on the drivers side, which could be piston slap or con-rod banging.

I think the engine needs to be rebuilt - which is WHY I built the engine test stand in the first place: TO TEST ENGINES before putting them in a vehicle. Too late to take this engine back to the salvage yard, but the next one I get I will be able to test on this stand and if there is a problem to RETURN it.

Also found the water pump rear seal was bad. New water pump coming (2002 Camaro WP that is, along with a 3/4" spacer to make it match the truck belt alignment)

dougbert
 
Last edited:

dougbert

Full Access Member
Joined
Nov 2, 2015
Posts
659
Reaction score
174
Location
5535 feet in Utah Mountains
First Name
doug
Truck Year
1984
Truck Model
K1500/nv4500/np241c/33x12.50x16/4.10 Gears 14BFF
Engine Size
5.3L - 2002 Silverado, rebuilt top end, long tube headers
Received the idler pulley relocation kit. Removed the ALT/PS bracket and cut off the old idler pulley mount and support as per the instructions.

then installed the kit and remounted.

I have the camaro WP coming tomorrow and will see if that really fits

link to ls6 swap article http://www.ls1truck.com/forums/front-page-news/12719-ls6-intake-swap.html

using this spacer http://www.ictbillet.com/3-4-water-...ro-adapter-swap-kit-lq4-ls1-5-3l-lsx-lq9.html with the camaro WP

If have to revert to the LS1 WP, ictbillet also has a 1.5" spacer

pics of idler mount cut off the bracket
 

Attachments

  • IMG_20161025_162013_111[1].jpg
    IMG_20161025_162013_111[1].jpg
    91.3 KB · Views: 154
  • IMG_20161025_162041_892[1].jpg
    IMG_20161025_162041_892[1].jpg
    87 KB · Views: 121
  • IMG_20161025_162056_993[1].jpg
    IMG_20161025_162056_993[1].jpg
    83.3 KB · Views: 132
  • IMG_20161025_164638_656[1].jpg
    IMG_20161025_164638_656[1].jpg
    86.8 KB · Views: 111
  • IMG_20161025_164709_000[1].jpg
    IMG_20161025_164709_000[1].jpg
    92.6 KB · Views: 123
Last edited:

foamypirate

Full Access Member
Joined
Jul 30, 2010
Posts
3,302
Reaction score
453
Location
Central TX
First Name
Jake (Mr. Wilson)
Truck Year
1980
Truck Model
El Camino, baby!
Engine Size
5.3L/4L60E
Received the idler pulley relocation kit. Removed the ALT/PS bracket and cut off the old idler pulley mount and support as per the instructions.

then installed the kit and remounted.

I have the camaro WP coming tomorrow and will see if that really fits

link to ls6 swap article http://www.ls1truck.com/forums/front-page-news/12719-ls6-intake-swap.html

using this spacer http://www.ictbillet.com/3-4-water-...ro-adapter-swap-kit-lq4-ls1-5-3l-lsx-lq9.html with the camaro WP

If have to revert to the LS1 WP, ictbillet also has a 1.5" spacer

Did you consider the LS3 Camaro pump? It lines up with truck accessories, but clears the car intake just fine, and lets you avoid using spacers. You've already got the piece you need to make it work, the idler relocate.

Here is mine:

You must be registered for see images attach
 

dougbert

Full Access Member
Joined
Nov 2, 2015
Posts
659
Reaction score
174
Location
5535 feet in Utah Mountains
First Name
doug
Truck Year
1984
Truck Model
K1500/nv4500/np241c/33x12.50x16/4.10 Gears 14BFF
Engine Size
5.3L - 2002 Silverado, rebuilt top end, long tube headers
Did you consider the LS3 Camaro pump? It lines up with truck accessories, but clears the car intake just fine, and lets you avoid using spacers. You've already got the piece you need to make it work, the idler relocate.

Here is mine:

You must be registered for see images attach


nice. but I didn't know about that one. What year LS3 camaro is that? or better, what is the GM part number?

I received the 2002 Camaro WP today and installed (yes with the spacers). The belt pulleys all aligned up save for the truck tensioner. Ordered one specific for this water pump which is set back a bit.

Your solution looks simpler for sure, but got mine in hand, and going to be off-line for a month.

Good to know of yet another option to solve the issues. Again, part numbers would assist those looking at this.

WP #
Belt #

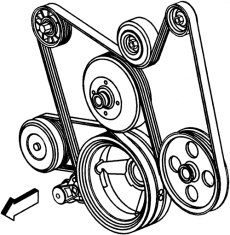
OH, is the LS1 WPs direction different from the truck? Different routing or I might be confused

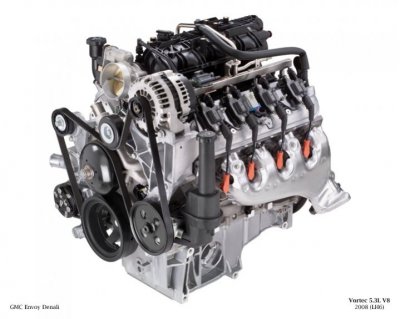
pic 1 is a 2008 5.3L
pic 2 a 2002

thanks
 

Attachments

  • 08 5.3L V8 LH6 EN4 LoR.jpg
    08 5.3L V8 LH6 EN4 LoR.jpg
    60.1 KB · Views: 147
  • 0996b43f80207d90.jpg
    0996b43f80207d90.jpg
    20.5 KB · Views: 137
Last edited:

dougbert

Full Access Member
Joined
Nov 2, 2015
Posts
659
Reaction score
174
Location
5535 feet in Utah Mountains
First Name
doug
Truck Year
1984
Truck Model
K1500/nv4500/np241c/33x12.50x16/4.10 Gears 14BFF
Engine Size
5.3L - 2002 Silverado, rebuilt top end, long tube headers
installed the WP today (19256263)

pic 1 frontal view
pic 2 of spacer with 1/8" NPT hole for steam vent - currently plugged
pic 3 looking along front from DS to PS
pic 4 too dark, but again DS to PS

Note this for the test stand without the PS pump, has an idler on lower right of first pic
and yes, a different length belt is needed for the test stand vs with PS pump
 

Attachments

  • IMG_20161026_145112_911[1].jpg
    IMG_20161026_145112_911[1].jpg
    86.3 KB · Views: 145
  • IMG_20161026_145133_171[1].jpg
    IMG_20161026_145133_171[1].jpg
    92.2 KB · Views: 118
  • IMG_20161026_145149_946[1].jpg
    IMG_20161026_145149_946[1].jpg
    82 KB · Views: 141
  • IMG_20161026_145157_652[1].jpg
    IMG_20161026_145157_652[1].jpg
    86.7 KB · Views: 124
Last edited:

dougbert

Full Access Member
Joined
Nov 2, 2015
Posts
659
Reaction score
174
Location
5535 feet in Utah Mountains
First Name
doug
Truck Year
1984
Truck Model
K1500/nv4500/np241c/33x12.50x16/4.10 Gears 14BFF
Engine Size
5.3L - 2002 Silverado, rebuilt top end, long tube headers
Received the tensioner and the thermostat with housing and stopped by the shop and put those on, when I went out today for a short time.

I still have a question on belt direction on the water pump from the pictures above. Is the LS3 camero water pump going the same direction as the truck WP with those different belt threading?

dougbert
 

dougbert

Full Access Member
Joined
Nov 2, 2015
Posts
659
Reaction score
174
Location
5535 feet in Utah Mountains
First Name
doug
Truck Year
1984
Truck Model
K1500/nv4500/np241c/33x12.50x16/4.10 Gears 14BFF
Engine Size
5.3L - 2002 Silverado, rebuilt top end, long tube headers
was able to mount radiator again (after some modifications due to the lowering of it support) and attach hoses, etc and fill with fluid.

Made sure all was well, fill the mini-tank with gas and fired her up. Nice that there was no longer any coolant flowing out of the WP.

Pic of the Camaro WP and car belt threading - NOT truck threading.
The other 3 pics are of the engine actually running.

I tried to take a movie of the engine running, but my phone battery was gone. Took a still or two of the engine running. Will do tomorrow

Did have piston slap upon start up but within 5 minutes that was gone. Ran 2 - 10 minutes runs (runs out of gas after 10 minutes). Heated up to temperature, and got smoke from ceramic paint on manifolds burning off and then paint on the exhaust pipe to the muffler smoked. The muffler works great, not too loud but throaty. Ran to about 2000 RPM and generated move smoke as things heated up. No exhaust smoke at all.

Oil pressure was 37 at idle, 50 at 2000 RPM. Seems to have one cylinder "bumping" - will do some diag on it as well.

I need to put a USB charge port on the control panel to plug the phone into, and install the MIL light - for grins. The phone will harvest the ODB2 info over bluetooth

Only 4 issues on the engine:

1: 1/8" hole on WP spacer needed to be tighten more and coolant stopped leaking
2: PS head has an new old-style GM temp sending sensor installed and it was leaking, tried to tighten but still drips
3: Mechanical oil pressure nut with 1/8" npt fitting leaked. Put teflon tape on the threads and sealed it
4: DS fuel rail at the rear has a very small leak in it. Probably wont fix as it is the test stand rail

It was VERY interesting and informative to have the engine idling and I could examine all types of things on it - not at all like in a vehicle where you cannot SEE things.

This is really, really neat and I am stroked to use it in the coming engine builds - we have several in the queue - as well has the rebuild of this 4.8 to bigger
 

Attachments

  • IMG_20161108_125127_573[1].jpg
    IMG_20161108_125127_573[1].jpg
    83.6 KB · Views: 140
  • IMG_20161108_141549_653[1].jpg
    IMG_20161108_141549_653[1].jpg
    92.2 KB · Views: 109
  • IMG_20161108_141557_335[1].jpg
    IMG_20161108_141557_335[1].jpg
    83.3 KB · Views: 104
  • IMG_20161108_141602_480[1].jpg
    IMG_20161108_141602_480[1].jpg
    87.3 KB · Views: 106
Last edited:

foamypirate

Full Access Member
Joined
Jul 30, 2010
Posts
3,302
Reaction score
453
Location
Central TX
First Name
Jake (Mr. Wilson)
Truck Year
1980
Truck Model
El Camino, baby!
Engine Size
5.3L/4L60E
Received the tensioner and the thermostat with housing and stopped by the shop and put those on, when I went out today for a short time.

I still have a question on belt direction on the water pump from the pictures above. Is the LS3 camero water pump going the same direction as the truck WP with those different belt threading?

dougbert

You can actually tell the rotation based on which side of the belt is driving the accessory. Smooth side of the belt is reverse rotation to the crank, ribbed side runs same direction. All of the water pump pulleys are smooth, so they will rotate reverse to the crank.
 

dougbert

Full Access Member
Joined
Nov 2, 2015
Posts
659
Reaction score
174
Location
5535 feet in Utah Mountains
First Name
doug
Truck Year
1984
Truck Model
K1500/nv4500/np241c/33x12.50x16/4.10 Gears 14BFF
Engine Size
5.3L - 2002 Silverado, rebuilt top end, long tube headers
You can actually tell the rotation based on which side of the belt is driving the accessory. Smooth side of the belt is reverse rotation to the crank, ribbed side runs same direction. All of the water pump pulleys are smooth, so they will rotate reverse to the crank.


doh! Thanks for that. Now its obvious
 

dougbert

Full Access Member
Joined
Nov 2, 2015
Posts
659
Reaction score
174
Location
5535 feet in Utah Mountains
First Name
doug
Truck Year
1984
Truck Model
K1500/nv4500/np241c/33x12.50x16/4.10 Gears 14BFF
Engine Size
5.3L - 2002 Silverado, rebuilt top end, long tube headers
Worked on the test stand engine today and solved some cylinder miss issues, and capture the runs on video

Video one

https://youtu.be/9_FJWZMjNC0

is the BEFORE video with cyls 1, 3 and 8 missing. I isolated them by removing the spark plug wires of each cyl with a rubber gripped needle-nose pliers.

Then began the diagnosis of what the problems were.

-swapped coils on 7 and 8 - no difference
-installed plug wire "lights" and all cyls lit them up - so we have spark everywhere
-used a NOID light on cyls 1, 3 and 8 and all 3 pulsed good
-swapped injectors 6 and 8, but damaged O rings, had to get new Fel-Pro O-rings for all 8 injects: now cyl 6 was missing. Got some smoke now
-swapped injectors 1 and 5, and 3 and 7: cyls 5 and 7 now were missing.
-Bought some Lucus Injector cleaner fluid. Mixed 1 to 10 which is more than the standard of 3 oz to 10 gallons, but container said one could not over treat

Started the engine up, and it ran lousy. Ran about 10 mins until fuel was gone (the injector cleaner tools holds about a pint or so). Visible smoke in exhaust during the run. Then loaded straight gasoline and run for another 10 minutes.

This last run, the engine was so very smooth and no miss was noticeable. I made an AFTER video for that run.

https://youtu.be/_HrQjuK7dsI

Learned more about EFI and injectors on this diagnosis and fix. These injectors are 21 lbs/hr and the ECU is programmed to that. The ECU and injectors will remain on the test stand intake

Also installed a USB power port to charge the phone running "Torque".

Temperature reached 213 F and the rad cap started leaking coolant via the vent host. Just Idling the radiator and fan keep up with the heat, but rev'ing up, generates more heat than the rad can dissipate


At this point I can say the test stand is a success and can be re-used on other engines now.

dougbert
 
Last edited:

Forum statistics

Threads
42,077
Posts
908,542
Members
33,550
Latest member
kurt54
Top