Turbo 350 Build

Disclaimer: Links on this page pointing to Amazon, eBay and other sites may include affiliate code. If you click them and make a purchase, we may earn a small commission.

HotRodPC

Administrator
Staff member
Admin
Joined
Aug 29, 2010
Posts
47,014
Reaction score
9,013
Location
OKC, OK
First Name
HotRod
Truck Year
85 K20 LWB
Truck Model
Silverado
Engine Size
454 - Turbo 400 - 3.73
Whoever rebuilt this transmision previously was an idiot. This makes about the 5th problem I have found in this transmission. None of the problems with this transmission were due to wear or high performance. All have been faulty builder. Someone who should probably be flipping burgers or shoveling **** for a living.

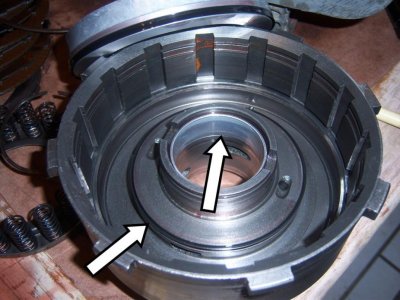
So, onto another direct drum, Lets start over. Now you get to see a newer or later style direct drum assembly.


Here is what the top side of the Direct Drum and Overrun Clutch looks like assembled. Simply pull the snap ring off, then remove the retainer ring.
attachment.php


I have already felt the roller clutch and it feel just great. Overruns in one direction, and grabs hold in the other, so I don't see the need to remove the outer race gear, and clearly the roller clutch assembly does not appear to be damaged in anyway. So I will put the retainer and snap ring back on and call it good and inspected.
attachment.php


Now I flip the drum over, and remove the snap ring and pressure plate. Notice the return spring retainer looks a bit differant than the last one??? This is the newer or later style.
attachment.php


Remember this is donor drum from a core transmission I had from a guy who broke the input shaft on a low mileage rebuild transmisison. These clutches look to be in like new condition. I will save these clutches for later use. I will not use used clutches to rebuild a customers transmission, but I would not hesitate a bit to use these clutches in one of my own vehicles, or buddy who needs a good deal on a trans rebuild. You can get a complete seal kit for a Th350 for less than $20. With that seal kit, you can go thur the whole transmission, reuse your steels if not badly damamged, and if so, I have plenty of good used steels, and use clutches like these and rebuild a transmission and I'd consider it as good as a new rebuild and expect a long full life out of it. The Th400 transmission in my DD is a completly rebuilt transmission, good as new, and it cost me $0. I did buy the kit, but I had sold the donor case for the amount to cover all my parts and 3 gallons of trans fluid. I like FREE recycled parts !!!
attachment.php


Its nice how the later style return springs and retainer are all one piece. Makes for a bit of time savings, and more importantly, your springs don't run off and then you have to short the springs like the last idiot did. I have to wonder WTH he was thinking !!!
attachment.php


You must be registered for see images attach


You must be registered for see images attach


You must be registered for see images attach


You must be registered for see images attach


You must be registered for see images attach
 
Last edited:

HotRodPC

Administrator
Staff member
Admin
Joined
Aug 29, 2010
Posts
47,014
Reaction score
9,013
Location
OKC, OK
First Name
HotRod
Truck Year
85 K20 LWB
Truck Model
Silverado
Engine Size
454 - Turbo 400 - 3.73
Look at the condition of this bushing. Its like new. I'd be willing to bet this core transmission had less than 500 miles on it. I do have a little rust to scrape out of the drum. Once its gets trans fluid on that spot, the rust will no longer be an issue, but you want to remove all you can of it, so it doesn't break loose and go loose in the transmission. Keeping a trans build clean is very important. Also notice the seal is in the drum. Even though I am certain, the seals in this drum are good as new, I am replacing them with the new seals because that is what the customer pays for. I will also keep these seals that are good as new. I will clean them and put them away in a plastic bag. Why would I do this??? You never know when you just might accidently tear a lip seal on a rebuild. In the event I ever do, which is rare, but I have done it before, I can go to my left over seals bag and find one.
attachment.php
 

Attachments

  • th350build 079.jpg
    th350build 079.jpg
    92.6 KB · Views: 467
Last edited:

HotRodPC

Administrator
Staff member
Admin
Joined
Aug 29, 2010
Posts
47,014
Reaction score
9,013
Location
OKC, OK
First Name
HotRod
Truck Year
85 K20 LWB
Truck Model
Silverado
Engine Size
454 - Turbo 400 - 3.73
Next is remove the old seals from the drum and piston.
attachment.php

attachment.php


Its always a good idea to match up your seals from your kit bag. Even though many seals look alike at first glance, many times there is a minor difference.
attachment.php


I've now replaced the new seals, lubed them plenty of TransJel and ready to work the seals into the drum. Although you want to use plenty of lube, you don't want to use to much. This could hinder your efforts in getting the seals to collapse enough to get into the drum without damage.
attachment.php


You must be registered for see images attach


You must be registered for see images attach


You must be registered for see images attach


You must be registered for see images attach
 
Last edited:

HotRodPC

Administrator
Staff member
Admin
Joined
Aug 29, 2010
Posts
47,014
Reaction score
9,013
Location
OKC, OK
First Name
HotRod
Truck Year
85 K20 LWB
Truck Model
Silverado
Engine Size
454 - Turbo 400 - 3.73
Using a lip seal tool, work the seals around the piston so they will seat in the drum without tearing or folding over. It very important to use patence at this point. This can be one of the most frustating parts of building a transmission. Take your time. Turning the piston as your helping with the seal tool also helps.
Also note, that is not a transmission lip seal tool that I use. That is some kind of art sculpture tool. It has its advantages as its flexible and thin, but it also has disadvantages as it can be a bit sharp enough to cut or pinch seals. I've used that one for years and years and many trans builds. A lip seal tool is usually only good for a few builds then it gets weak, bent up and flimsy. Pops can probably atest to that since he used lip seal tools.

attachment.php

attachment.php


Once you have the piston in the drum, give it a spin inside the drum to make sure your seals aren't dragging and spread the lube around the drum. Replace the retun springs and retainer.
attachment.php


Use your clutch spring compressor tool and compress the return springs and retainer, then re install the snap ring.
attachment.php


Once the snap ring is properly fitted into postion, you can now release the clutch spring compressor tool and the retainer should now be holding the return springs in position.
attachment.php


You must be registered for see images attach


You must be registered for see images attach


You must be registered for see images attach


You must be registered for see images attach


You must be registered for see images attach
 
Last edited:

HotRodPC

Administrator
Staff member
Admin
Joined
Aug 29, 2010
Posts
47,014
Reaction score
9,013
Location
OKC, OK
First Name
HotRod
Truck Year
85 K20 LWB
Truck Model
Silverado
Engine Size
454 - Turbo 400 - 3.73
At the point where the piston, retun springs, retainer and snap ring are back in place. Now we can put in our steels and new clutches that have soaked in trans fluid for at least 20 minutes. These ones happened to have soaked overnight.

attachment.php

attachment.php


Now install the pressure plate and snap ring. The direect clutch drum is now 100% rebuilt and compete.
attachment.php


The last thing to do, is use a feeler guage between the pressure plate and the top clutch to make sure your clutch clearance is within tolerance. Differant sources have differant suggestions of what you should have here. Some say as far as .010 -.080, some say .040-.060. This one happens to be .055 and I know that is acceptable.
attachment.php


You must be registered for see images attach


You must be registered for see images attach


You must be registered for see images attach


You must be registered for see images attach
 
Last edited:

HotRodPC

Administrator
Staff member
Admin
Joined
Aug 29, 2010
Posts
47,014
Reaction score
9,013
Location
OKC, OK
First Name
HotRod
Truck Year
85 K20 LWB
Truck Model
Silverado
Engine Size
454 - Turbo 400 - 3.73
That one drum took up alot of time to write up, but you get the idea. What appears to be a minor part, just a small hunk of steel, it holds alot of parts and requires a thorough inspection. You got the advantage to see a couple things that can go wrong with just 1 drum of an automatic transmission. Next up, will be the Forward clutch drum and input shaft assembly.
 

oneluckypops

Full Access Member
Joined
Feb 6, 2011
Posts
2,210
Reaction score
90
Location
Sedalia, Mo.
First Name
Luke
Truck Year
85
Truck Model
K30 SRW
Engine Size
5.7 Fuel injected Vortec/ 4L80E
Optional reading- you can skip this if you wish.

From talking to you earlier about this Transmission I really dont think the previouse person knew what they were doing exactly I think they were doing things to the Transmission from what other people had told them to do to "improve" shift firmness. For instance when they leave some of the return springs out in the old style return springs it was for 1 of 2 reasons.
1. they didnt have enough pressure out of the pump to apply the clutch packs with a proper holding force. OR
2. They left the springs out to give a quicker and firmer shift.
I am leaning more towards #2. Because you say they also swapped the waved steels for regular steels. They did that to give a firmer shift. That is what I call a bass ackwards shift kit. I really wish you would have measured the cluch clearences before you took them all apart.

Oh and by the way incase you didnt know this when they swapped the waved steel for a regular steel they put alot of stress on the pistons so make DAMN sure you go ahead and pull all the drums back out and air test them cause with everything you have found so far it wouldnt suprise me to find a cracked piston.
 
Last edited by a moderator:

HotRodPC

Administrator
Staff member
Admin
Joined
Aug 29, 2010
Posts
47,014
Reaction score
9,013
Location
OKC, OK
First Name
HotRod
Truck Year
85 K20 LWB
Truck Model
Silverado
Engine Size
454 - Turbo 400 - 3.73
Optional reading- you can skip this if you wish.

From talking to you earlier about this Transmission I really dont think the previouse person knew what they were doing exactly I think they were doing things to the Transmission from what other people had told them to do to "improve" shift firmness. For instance when they leave some of the return springs out in the old style return springs it was for 1 of 2 reasons.
1. they didnt have enough pressure out of the pump to apply the clutch packs with a proper holding force. OR
2. They left the springs out to give a quicker and firmer shift.
I am leaning more towards #2. Because you say they also swapped the waved steels for regular steels. They did that to give a firmer shift. That is what I call a bass ackwards shift kit. I really wish you would have measured the cluch clearences before you took them all apart.

Oh and by the way incase you didnt know this when they swapped the waved steel for a regular steel they put alot of stress on the pistons so make DAMN sure you go ahead and pull all the drums back out and air test them cause with everything you have found so far it wouldnt suprise me to find a cracked piston.

Well they were sure stupid if any of the above is true. Putting in less return springs will drag or slow down the clutch comming off process and burn up clutches, which is exactly what the 700r4 has a problem with and why the controversial springs were invented to solve the problem, because for a second or 2 or 3, you are actually in 2 gears at the same time, putting amazing presure on clutch packs, bands, overun clutches, and planteraties, which also reminds me, the low overrun roller clutch in the back, it spun free in both directions, but get this, it looked perfect. Somehow jammed the rollers or weakend the springs and let the rollers fall back and not stop the overrun. That is EXACTLY why my bro did not have 1st gear, and when he put it in manual 1st, the car acted like it had the E brake on real hard and it made the most horrific screeching noise you ever did hear. You did see the high energy clutches weren't burnt, even the steels looked good, so it didn't get incredibly hot, but you could see those high enegy clutches were wore smooth. Probably due to the lack of return springs. Yes, now I wish I would have check those clutch clearances just to see what the clowns did. It wouldn't have mattered since the wear on the clutch packs was so great. The trans could not have had that many miles on it either. The intermediate clutches look brand spankin new but all other clutch packs were about as smooth as a baby's ass. And get this, they also had a B&M Shift Improver Seperator plate drilled for BOTH Stage 1 and Stage 2. Only 2 of the 4 check balls, but no damn transfer plate. Also no accumulaor spring. With all I am finding wrong, you can trust, I am looking EVERYTHING over very good, and cleaning very good, so there is not cracks in the pistons. And what would be the reason for the leaving the drum seal out of the direct drum??? :shrug:

This would have been a very very bad transmission for any newbie to build. A newbie wouldn't know that anything was wrong. If I didn't know Th350's like I do, I wouldn't be finding everything either. I still haven't looked at a diagram, book or anything and catching all of it. As I said, it must be like getting back on a bike. When I say you can bring me one of these in a basket, and I can reassemble it in my sleep or drunk off my ass, I'm not kidding. Ask me how I know !!! :laughing1: Back in those days, we didn't drink at the races. No place for that in that environemnt. That's how people get killed. So I was sober on the weekend going to the drags, but during the week I did my partying while building transmissions. So many of the transmissions I built out in the garage... lets put is this way, the fridge was right next to my roll a way and my 60gal air compressor. :happy175:
 
Last edited:

oneluckypops

Full Access Member
Joined
Feb 6, 2011
Posts
2,210
Reaction score
90
Location
Sedalia, Mo.
First Name
Luke
Truck Year
85
Truck Model
K30 SRW
Engine Size
5.7 Fuel injected Vortec/ 4L80E
Optional reading- you can skip this if you wish.

Well they were sure stupid if any of the above is true. Putting in less return springs will drag or slow down the clutch comming off process and burn up clutches, which is exactly what the 700r4 has a problem with and why the controversial springs were invented to solve the problem, because for a second or 2 or 3, you are actually in 2 gears at the same time, putting amazing presure on clutch packs, bands, overun clutches, and planteraties, which also reminds me, the low overrun roller clutch in the back, it spun free in both directions, but get this, it looked perfect. Somehow jammed the rollers or weakend the springs and let the rollers fall back and not stop the overrun. That is EXACTLY why my bro did not have 1st gear, and when he put it in manual 1st, the car acted like it had the E brake on real hard and it made the most horrific screeching noise you ever did hear. You did see the high energy clutches weren't burnt, even the steels looked good, so it didn't get incredibly hot, but you could see those high enegy clutches were wore smooth. Probably due to the lack of return springs. Yes, now I wish I would have check those clutch clearances just to see what the clowns did. It wouldn't have mattered since the wear on the clutch packs was so great. The trans could not have had that many miles on it either. The intermediate clutches look brand spankin new but all other clutch packs were about as smooth as a baby's ass. And get this, they also had a B&M Shift Improver Seperator plate drilled for BOTH Stage 1 and Stage 2. Only 2 of the 4 check balls, but no damn transfer plate. Also no accumulaor spring. With all I am finding wrong, you can trust, I am looking EVERYTHING over very good, and cleaning very good, so there is not cracks in the pistons. And what would be the reason for the leaving the drum seal out of the direct drum??? :shrug:

This would have been a very very bad transmission for any newbie to build. A newbie wouldn't know that anything was wrong. If I didn't know Th350's like I do, I wouldn't be finding everything either. I still haven't looked at a diagram, book or anything and catching all of it. As I said, it must be like getting back on a bike. When I say you can bring me one of these in a basket, and I can reassemble it in my sleep or drunk off my ass, I'm not kidding. Ask me how I know !!! :laughing1: Back in those days, I was either drunk, asleep or at the illegal street races and we didn't drink at the races. No place for that in that environemnt. That's how people get killed. So I was sober on the weekend going the drags, but during the week I did my partying while building transmissions. So most of the transmissions I built out in the garage... lets put is this way, the fridge was right next to my roll a way and my 60gal air compressor. I'm suprised I don't have to be drunk to build a transmssion. :happy175:


I know what your saying and thats why I think they were trying to build it from what others have told them to do, which is why they left the direct drum seal OUT a cardinal rookie mistake.

Did I understand you say they did NOT have ANY seperator Plate in this trans.? I am suprised it even worked at all if thats what your saying, perhaps thats another reason why the clutches were worn smooth, not enough fluid pressure for a positive engagement
 
Last edited by a moderator:

HotRodPC

Administrator
Staff member
Admin
Joined
Aug 29, 2010
Posts
47,014
Reaction score
9,013
Location
OKC, OK
First Name
HotRod
Truck Year
85 K20 LWB
Truck Model
Silverado
Engine Size
454 - Turbo 400 - 3.73
Optional reading- you can skip this if you wish.

I know what your saying and thats why I think they were trying to build it from what others have told them to do, which is why they left the direct drum seal OUT a cardinal rookie mistake.

Did I understand you say they did NOT have ANY seperator Plate in this trans.? I am suprised it even worked at all if thats what your saying, perhaps thats another reason why the clutches were worn smooth, not enough fluid pressure for a positive engagement

No, they had a seperator plate. Its a B&M shift kit seperator plate. But, the shift kit also uses transfer plate and they didn't use it. And the seperator plate had been drilled for both Stage 1 Kit, AND Stage 2 Kit, not 1 or the other.

The gold plate is the transfer plate. You add that plate along with the silver plate under the OEM plate in a Th350 shift kit.
attachment.php

attachment.php
 
Last edited:

HotRodPC

Administrator
Staff member
Admin
Joined
Aug 29, 2010
Posts
47,014
Reaction score
9,013
Location
OKC, OK
First Name
HotRod
Truck Year
85 K20 LWB
Truck Model
Silverado
Engine Size
454 - Turbo 400 - 3.73
Rebuilding the Forward Clutch Drum is very similar to the rebuilding the Direct Clutch drum that was just previously done. The differance in the drums, is that the Forward Clutch drum has the input shaft pressed into it rather than have an overrum clutch sprag on the front of it.

This is where the hole in your workbench or talbe will come in handly so that you can place the drum face down to remove your clutch pack, return springs and retainer. This is also why the Haggerty Snapress has the hole in the base of the tool.
attachment.php

attachment.php


Notce there is also 1 more clutch and steel in this drum than the direct clutch.
attachment.php


Using your clutch spring compressor, remove the return spring retainer.
attachment.php


You must be registered for see images attach


You must be registered for see images attach


You must be registered for see images attach


You must be registered for see images attach
 
Last edited:

HotRodPC

Administrator
Staff member
Admin
Joined
Aug 29, 2010
Posts
47,014
Reaction score
9,013
Location
OKC, OK
First Name
HotRod
Truck Year
85 K20 LWB
Truck Model
Silverado
Engine Size
454 - Turbo 400 - 3.73
Are we suprised this drum is also missing return springs???
attachment.php


Notice the Forward Clutch Drum does not have a seal in it like the Direct Drum did that happened to be missing form the previous build. Only 2 seals in this drum, and both are on the clutch piston.
attachment.php


Match up the new seals from your kit.
attachment.php


You must be registered for see images attach


You must be registered for see images attach


You must be registered for see images attach
 
Last edited:

HotRodPC

Administrator
Staff member
Admin
Joined
Aug 29, 2010
Posts
47,014
Reaction score
9,013
Location
OKC, OK
First Name
HotRod
Truck Year
85 K20 LWB
Truck Model
Silverado
Engine Size
454 - Turbo 400 - 3.73
So again, we will be upgrading to the newer later style return spring assembly so that we have all the springs in the drum. Remember the donor trans has a broken input shaft. Its actually a combination of broken Forward Clutch Drum and stripped teeth on the input shaft. This is the 2nd most common failure of Th350 behind broken intermediate sprag being #1 failure. All we are using out of this drum is the return springs and retainer.
attachment.php


Install the piston just as done on the direct clutc drum being very careful and patient with the lip seal tool to not damage the seals while installing the piston, return springs, retainer and snap ring.
attachment.php


Then install the clutches, steels, pressure plate and snap ring in the drum, just as also done on the Direct Drum. This drum should have .010 -.080 clearnace and sometimes varies depending on the piston used. In this case, I has just over .030 and calling it satisfactory.
attachment.php


You must be registered for see images attach


You must be registered for see images attach


You must be registered for see images attach
 
Last edited:

HotRodPC

Administrator
Staff member
Admin
Joined
Aug 29, 2010
Posts
47,014
Reaction score
9,013
Location
OKC, OK
First Name
HotRod
Truck Year
85 K20 LWB
Truck Model
Silverado
Engine Size
454 - Turbo 400 - 3.73
Now that the Direct and Forward Clutch drums are rebuild, we can join them together since they go into case as a single unit. Notice the Torrington Bearing that sits on the Forward Clutch Drum, before you put the Direct drum over the input shaft. the Direct drum will sit directly on the bearing not touching the Forward clutch drum.
attachment.php


Keep in mind, the clutches in the Direct Drum, need to be worked and synched over the ring gear on the front of the Forward Drum. You will spin the Direct Drum back and forth till you feel the Direct Drum hit the Torrington Bearing. This is very important to make you sure this down properly. When it comes time to put the pump on, if its not right, the input shaft will not turn. So its not like you can get it wrong and not have a chance to realize its not right before you continue any further in your build.
attachment.php


You must be registered for see images attach


You must be registered for see images attach
 
Last edited:

HotRodPC

Administrator
Staff member
Admin
Joined
Aug 29, 2010
Posts
47,014
Reaction score
9,013
Location
OKC, OK
First Name
HotRod
Truck Year
85 K20 LWB
Truck Model
Silverado
Engine Size
454 - Turbo 400 - 3.73
Moving on now that the Direct and Forward clutch drums are rebuilt and married together, its time to rebuild and inspect the front pump.

Notice the bronze bushing. It is marginal bot OK in this case. If I had these smaller bushings here and wouldn't have to wait 3-5 days to get them, I'd change those out just to be on the safe side. These are really ok, but they are not what I'd consider "GOOD". It would be my preferance to change them. If this transmission was going into a high performance application, I would wait the 3-5 days to make sure they were changed.
attachment.php


Flip the pump over. Now you see the teflon sealing rings in orange and blue, the retainer ring over the intermediate or 2nd gear clutch piston. You also see the selective thrust washer. Selective meaning, they come in different thicknesses to set proper endshaft play. Shims can also be used under the thrust washer, which in this case, the thrust washer is covering it up, but there is small thin shim under the thrust washer.
attachment.php


You must be registered for see images attach


You must be registered for see images attach
 
Last edited:

Forum statistics

Threads
42,124
Posts
909,612
Members
33,617
Latest member
dougli1
Top